Using C# and Auto ML in ML .NET to Predict Video Game Ratings
How ML.NET can do the heavy lifting for your C# code in training machine learning models
In this article we’ll explore getting started with automated machine learning with ML.NET using C# code to solve a classification problem involving video game parental guidance ratings.
This article comes with an accompanying GitHub repository containing a .NET 6 console app that can train itself to evaluate video games and predict an ESRB rating for games the trained model hasn’t seen before.
This content is also available in video form on YouTube
What is ML.NET?
ML.NET is Microsoft’s open-source library for machine learning in .NET applications in C#, F#, or VB. Like most things .NET, ML.NET is cross-platform, but it is also extremely performant and can be used for a wide variety of machine learning tasks.
In short, ML.NET is a great way for teams with existing .NET applications or for developers familiar with .NET technologies to quickly get started with machine learning with their existing technical stacks and skills.
Auto ML is a subset of ML.NET that abstracts away the process of choosing a machine learning algorithm, tuning hyperparameters for those algorithms, and comparing algorithms to each other to identify the best performance. This helps people newer to data science find a model that performs well without needing a much larger data science skillset.
Note: Auto ML can also refer to the interactive model generation tool that comes with ML.NET. We’ll discuss this tool more at the end of the article, but this article primarily focuses on the code aspects of Auto ML
Additional Note: Auto ML is also sometimes also used to refer to Azure Machine Learning Studio’s Automated ML capabilities. While these are similar and may share similar code under the hood, they are two different technologies
Our Classification Problem
For the rest of the article, we’ll be looking at a collection of video games with titles and whether they contain things like blood, violence, language, nudity, drug references, etc. and training a classification model to predict which ESRB rating label will be applied to new games given the features of that game.
ESRB, for those not familiar, stands for the Entertainment Software Rating Board and they classify games so that parents and other guardians can make informed decisions based on game contents when purchasing games for minors.
Games are classified into one of five buckets:
- Everyone
- Everyone 10+
- Teen
- Mature
- Adults Only
Classification is done based at least partially by content descriptors in games. For example, the Nintendo DS adaptation of Chrono Trigger was rated Everyone 10+ and had content descriptors for animated blood, fantasy violence, suggestive themes, and use of alcohol.
ESRB ratings also contain more context in their summary as pictured below:
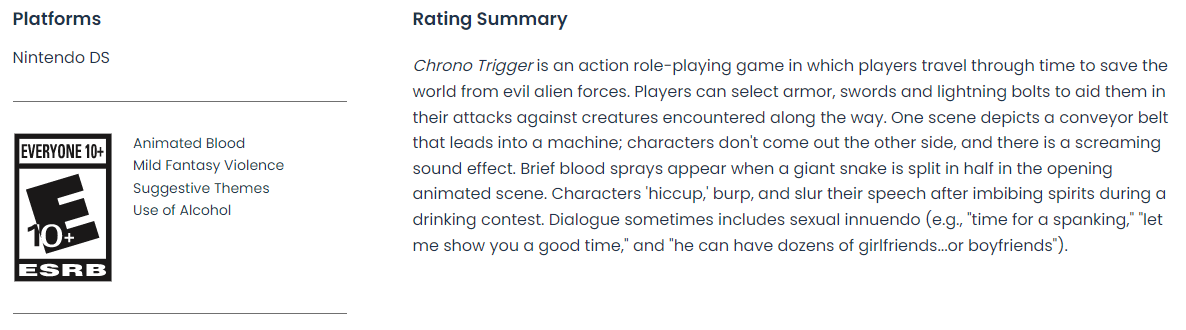
What we want to do is determine the ESRB rating for a game given a list of content descriptors for a new game the ESRB hasn’t seen before. This could give a game publisher a good idea of the rating they’d likely receive when submitting their game for review.
In machine learning terms, this is a classification problem where we are trying to determine what class of things something should be labeled as given a set of features. More specifically, this is a multi-class classification problem because there are more than two ESRB ratings. If there were only two classes, it would have been a binary classification problem.
Introducing our DataSet
For this project I looked for a useful dataset on Kaggle, a machine learning community, and discovered Mohammed Alhamad’s Video Game Rating by ESRB dataset.
This dataset has nearly 2000 games in it and a wide variety of features per game containing information on blood, violence, nudity, drug and alcohol content, lyrics, and language - among other factors.
Kaggle not only provides a way of previewing the data before you download it, but gives you helpful charts showing the distribution of values across the dataset as pictured below:
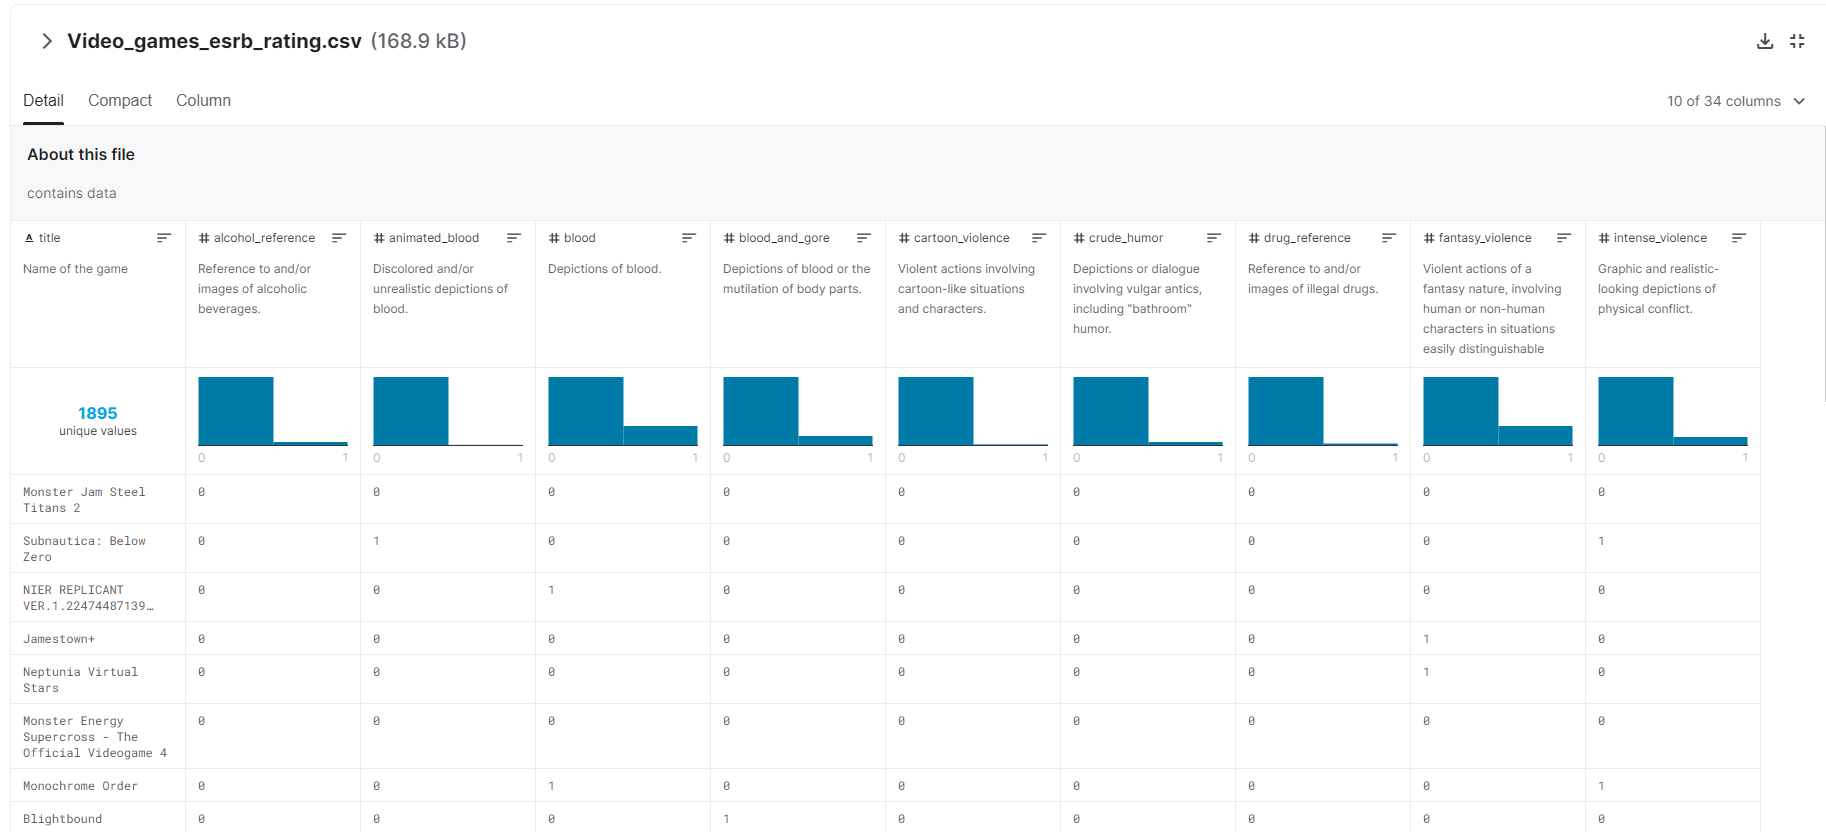
Very few datasets are going to be perfect and this dataset notably doesn’t include any games rated adults only, so any machine learning algorithm built using this data would be unable to classify games into that rating. However, adults only is an ESRB rating that developers are usually targeting very specifically with nudity and sexual content and it is less likely that a game might wind up in that category accidentally.
However, the dataset looks well-suited for classifying games as Everyone (E), Everyone 10+ (ET), Teen (T), or Mature (M).
The dataset includes a file for training and a file for testing datasets and we’ll use both of those.
Referencing ML.NET Libraries
Now that we have a task in mind and a dataset, we can start working with code.
Almost any .NET project should be able to support ML.NET since ML.NET is built on .NET Standard.
To add ML.NET to a project, go to NuGet Package Manager and install the latest versions of Microsoft.ML and Microsoft.ML.AutoML. You may also install additional packages, but you will need these two in order to work with Auto ML.
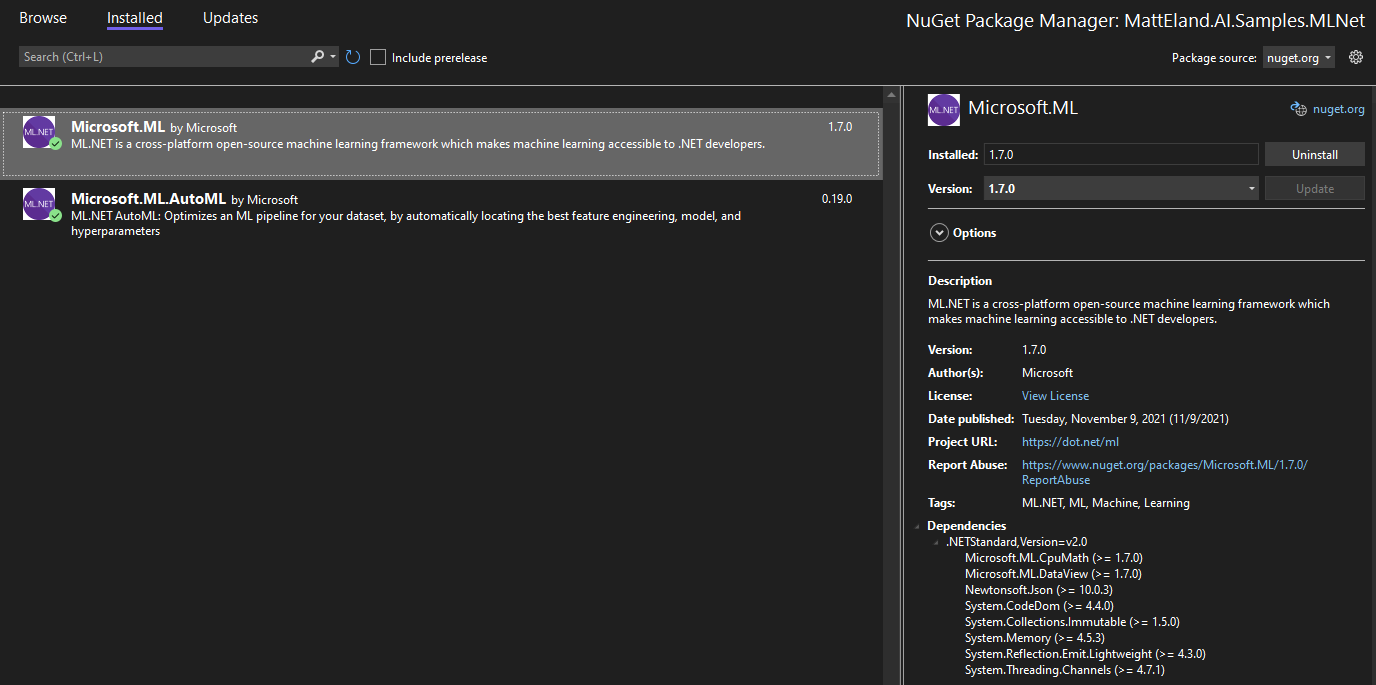
See Microsoft’s documentation on NuGet Package Manager for more details on working with this aspect of Visual Studio.
Training a Model in ML.NET
Before you can predict future values using ML.NET you have to have a trained machine learning model. Later on we’ll take a look at saving and loading models, but for now, we’ll need to load our data and have Auto ML generate a trained model based on this dataset.
Creating a Model Class
In order to load our data, we need to create a model class to store the data representing an individual row.
This is probably the most tedious part of ML.NET development as you need to map each column you care about to a C# property on a class.
Thankfully, I did that work for you already:
using Microsoft.ML.Data;

public class GameRating
{
    [LoadColumn(0)]
    public string Title { get; set; }

    // These columns are our Features that impact the ESRB label
    [LoadColumn(1)]
    public bool Console { get; set; }
    [LoadColumn(2)]
    public bool AlcoholReference { get; set; }
    [LoadColumn(3)]
    public bool AnimatedBlood { get; set; }
    [LoadColumn(4)]
    public bool Blood { get; set; }
    [LoadColumn(5)]
    public bool BloodAndGore { get; set; }
    [LoadColumn(6)]
    public bool CartoonViolence { get; set; }
    [LoadColumn(7)]
    public bool CrudeHumor { get; set; }
    [LoadColumn(8)]
    public bool DrugReference { get; set; }
    [LoadColumn(9)]
    public bool FantasyViolence { get; set; }
    [LoadColumn(10)]
    public bool IntenseViolence { get; set; }
    [LoadColumn(11)]
    public bool Language { get; set; }
    [LoadColumn(12)]
    public bool Lyrics { get; set; }
    [LoadColumn(13)]
    public bool MatureHumor { get; set; }
    [LoadColumn(14)]
    public bool MildBlood { get; set; }
    [LoadColumn(15)]
    public bool MildCartoonViolence { get; set; }
    [LoadColumn(16)]
    public bool MildFantasyViolence { get; set; }
    [LoadColumn(17)]
    public bool MildLanguage { get; set; }
    [LoadColumn(18)]
    public bool MildLyrics { get; set; }
    [LoadColumn(19)]
    public bool MildSuggestiveThemes { get; set; }
    [LoadColumn(20)]
    public bool MildViolence { get; set; }
    [LoadColumn(21)]
    public bool NoDescriptors { get; set; }
    [LoadColumn(22)]
    public bool Nudity { get; set; }
    [LoadColumn(23)]
    public bool PartialNudity { get; set; }
    [LoadColumn(24)]
    public bool SexualContent { get; set; }
    [LoadColumn(25)]
    public bool SexualThemes { get; set; }
    [LoadColumn(26)]
    public bool SimulatedGambling { get; set; }
    [LoadColumn(27)]
    public bool StrongLanguage { get; set; }
    [LoadColumn(28)]
    public bool StrongSexualContent { get; set; }
    [LoadColumn(29)]
    public bool SuggestiveThemes { get; set; }
    [LoadColumn(30)]
    public bool UseOfAlcohol { get; set; }
    [LoadColumn(31)]
    public bool UseOfDrugsAndAlcohol { get; set; }
    [LoadColumn(32)]
    public bool Violence { get; set; }

    // This is our Label column - the one we're trying to predict
    [LoadColumn(33)]
    public string ESRBRating { get; set; }
}
That’s a lot of repetition, but the LoadColumn attribute is referring to a column in the comma separated value (CSV) file from our dataset and will help ML.NET map from the CSV file to a C# class that ML.NET can interpret when training the model.
Loading Data
Now that we have a model class to represent our data, add the following using statements to the top of your file:
using Microsoft.ML;
using Microsoft.ML.AutoML;
using Microsoft.ML.Data;
We can now load our sample data into IDataView instances with the following code:
// Change the paths and names of these two CSV files to match the name and location of the files in your application.
string trainingPath = "TrainingData.csv";
string validationPath = "ValidationData.csv";

// Build a Context object for data loading and model training
MLContext context = new MLContext();

// Load the two datasets
IDataView trainData = context.Data.LoadFromTextFile<GameRating>(trainingPath,
                                                                separatorChar: ',',
                                                                hasHeader: true,
                                                                allowQuoting: true);

IDataView validationData = context.Data.LoadFromTextFile<GameRating>(validationPath,
                                                                     separatorChar: ',',
                                                                     hasHeader: true,
                                                                     allowQuoting: true);
Most everything with ML.NET flows through the MLContext class. Here we’re using it to load two IDataView instances from files.
In machine learning you typically use one subset of your data for training a model and another subset of your data to test the accuracy of the trained model on data it hasn’t encountered before. This is to prevent overfitting where your machine learning solution does well with data it has seen before but is not able to accurately respond to new data points.
While AutoML can take care of splitting data by only working with a training dataset, it is significantly faster to provide it two separate datasets so AutoML is not regularly determining where and how to split your training dataset. For this reason, we’ll take advantage of the separate training and testing files provided to us by the Kaggle dataset.
Let’s talk briefly about the parameters to LoadFromTextFile. The first parameter is the path to the file to load, but separatorChar, hasHeader, and allowQuoting are important for us with this data. The separatorChar tells ML.NET that this is a comma separated value file (the default is tab separated). hasHeader tells ML.NET that the first row of data is column names and is not actual data used to train the model. Finally, allowQuoting tells ML.NET that some columns may contain quoted values that may include commas. This will prevent parsing errors when ML.NET needs to use this data.
Running the Experiment
Now that we have data loaded, we can have ML.NET train a machine learning model for that data with the following code:
// Configure the experiment
MulticlassExperimentSettings settings = new MulticlassExperimentSettings()
{
    OptimizingMetric = MulticlassClassificationMetric.LogLoss,
    MaxExperimentTimeInSeconds = 60,
    CacheDirectoryName = null, // Skip the disk and store in-memory
};
MulticlassClassificationExperiment experiment = context.Auto().CreateMulticlassClassificationExperiment(settings);

// Actually Train the model
ExperimentResult<MulticlassClassificationMetrics> result;
result  = experiment.Execute(trainData: trainData,
                             validationData: validationData,
                             labelColumnName: nameof(GameRating.ESRBRating));

// Store some commonly-used elements as variables
RunDetail<MulticlassClassificationMetrics> bestRun = result.BestRun;
ITransformer bestModel = bestRun.Model;
Here we’re doing two things:
- Creating and configuring an Auto ML experiment
- Running the experiment and storing the results into
resultonce it completes
Note that everything we are doing involves the word “Multiclass”. ML.NET has many different types of experiments you can do from regression to classification to clustering and others. Each type of experiment has its own classes associated with it, but they tend to follow similar naming conventions and arrangements. Using strongly-typed classes for our experiments and their results gives us direct access to the specific metrics and parameters relevant just to multiclass classification problems.
Let’s talk briefly about the settings we’re providing our experiment.
The most important setting to provide to the experiment is the number of seconds to spend training the model. The experiment will continue for that duration of time. During that time it will try as many different sets of algorithms and scenarios as it can and it will return the best model it discovered at the end of that time. This is part of why it’s so important to provide both training and validation data because the provided validation data allows Auto ML to evaluate about 6 models in the time it’d ordinarily take to evaluate 1 without that validation data, which amplifies the effect of the time you give Auto ML for training.
It can sometimes be hard to determine how long to train a model, but thankfully Microsoft offers some guidance on this in some of their documentation. In general, they encourage you to train based on the size of your dataset and use the following rules:
| Size | Time to Train |
|---|---|
| under 10 MB | 10 seconds |
| 10 - 100 MB | 10 minutes |
| 100 - 500 MB | 30 minutes |
| 500 MB - 1 GB | 1 hour |
| over 1 GB | 3+ hours |
Microsoft presents these rules as more of guidelines and your actual training time needs to vary based on number of columns and your actual observed performance.
For this dataset our size is very small at 200kb and I’ve been happy with results after a minute of training. However, smaller training times would also yield good results.
In addition to the time you allot for the experiment, you can also customize aspects like which metric is most important to you from a trained model, the directory to use on disk for caching results between runs (or null for no caching), and you can even customize the algorithms that Auto ML considers using.
Running the experiment is synchronous and occurs when the Execute call occurs on the experiment. This method takes in a number of parameters including the training and, optionally, validation data. You can also provide the name of the column to use as the label (the value you want to predict) and can specify a progress reporter as well (we’ll discuss this shortly).
Once an experiment completes it returns an ExperimentResult containing validation metrics, information about the best run it had, and the best model.
Reporting Progress During Training
Since model training can take some time, ML.NET allows you to provide a progress reporter to the Execute call like so:
ExperimentResult<MulticlassClassificationMetrics> result;
result  = experiment.Execute(trainData: trainData,
                             validationData: validationData,
                             labelColumnName: nameof(GameRating.ESRBRating),
                             progressHandler: new MulticlassProgressReporter());
Here MulticlassProgressReporter is not a provided class, but a class you can create that implements the IProgress<RunDetail<MulticlassClassificationMetrics>> interface.
A simple implementation would look something like the following:
using Microsoft.ML.AutoML;
using Microsoft.ML.Data;
public class MulticlassProgressReporter : IProgress<RunDetail<MulticlassClassificationMetrics>>
{
public void Report(RunDetail<MulticlassClassificationMetrics> value)
{
// Metrics may be null if an exception occurred or this run was canceled due to time constraints
if (value.ValidationMetrics != null)
{
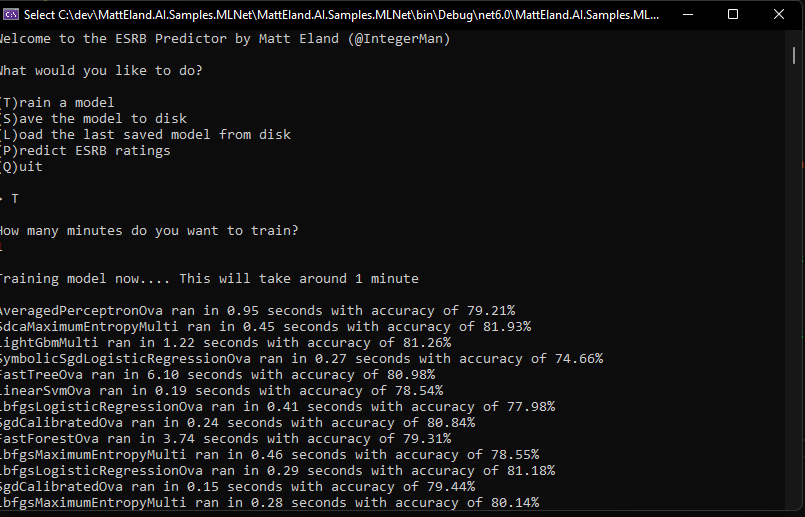
double accuracy = value.ValidationMetrics.MacroAccuracy;
Console.WriteLine($"{value.TrainerName} ran in {value.RuntimeInSeconds:0.00} seconds with accuracy of {accuracy:p}");
}
else
{
Console.WriteLine($"{value.TrainerName} ran in {value.RuntimeInSeconds:0.00} seconds but did not complete. Time likely expired.");
}
}
}
This routine would log individual algorithms as they complete evaluation as shown in the following screenshot of the sample trainer app in this article’s GitHub repository:
Evaluating Model Performance
Now that we have our trained model, stored in an ITransformer variable, we should take a look at how it performs.
While there are a vast array of metrics around machine learning and these metrics are available to us via the ValidationMetrics property on a RunDetail instance, perhaps the most informative piece of feedback for classification problems is a confusion matrix.
Confusion matrixes can be used to compare the actual value of something versus what our trained model predicted it should be. This lets us identify cases where our trained model may be misclassifying things and get a class-by-class accuracy comparison.
ML.NET makes it very easy to get this information by giving us both the raw data in arrays as well as a dedicated method to generate a pre-formatted confusion matrix.
For example, given a RunDetail called bestRun the following code builds and displays a confusion matrix:
string table = bestRun.ValidationMetrics.ConfusionMatrix.GetFormattedConfusionTable();

Console.WriteLine(table);
This output will look something like the following image:
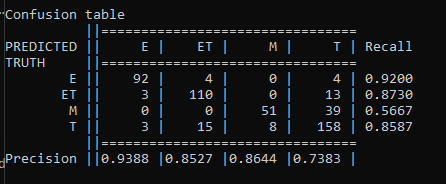
A good confusion matrix has a high number of values along the main diagonal from the upper left to the lower right and very few values in other cells.
This confusion matrix shows us the 4 ESRB classifications our data supports along each column. If you follow each column down you’ll see the amount of times an item of that type was classified by the model as that row’s label. For example, 92 games rated E were correctly classified as E (Everyone) by our model, while 3 were incorrectly classified as ET (Everyone 10+), 3 were incorrectly classified as T (Teen), and none were classified as M (Mature).
The last column gives us recall metrics per classification telling us how reliable our classifications are for that given result. The last row also displays precision metrics telling us how precise our model is for things of a given classification.
Overall, confusion matrixes help you understand the performance of your classification models and understand where errors may occur. This can help you make informed decisions as to whether your model meets your needs or if you need to find ways of getting a more accurate model.
In this case our model is fairly reliable, though there is a chance that models may mark individual games as being in a slightly different category. However, there are no cases where things that should be rated E are rated M or vice versa, though the 3 E games that were rated as teen games may be cause for concern.
Explaining Model Performance
Transparency is important in machine learning solutions, and ML.NET provides capabilities to investigate what features are the most important in a machine learning solution. However, this is a more involved process deserving of an article and video of its own. Until I write an article on that, the best resource I can recommend to you is Microsoft’s documentation on feature explainability in ML.NET.
If Auto ML is interesting to you and you don’t necessarily need C# code for it, it’s worth noting that Azure Machine Learning Studio’s Automated ML has some fantastic model explainability features that are worth checking out.
Predicting Values for New Games
Now that we have a model, we can use it to predict what the ESRB rating for a new game not contained in our dataset would be.
Before we can do this, we need to create a new class to store a prediction result. This class should look something like this:
using Microsoft.ML.Data;

public class ESRBPrediction
{
    [ColumnName("PredictedLabel")]
    public string ESRBRating { get; set; }

    public float[] Score { get; set; }
}
This class stores the predicted value in ESRBRating and also stores an array of probabilities in its Score property. This array of probabilities is the probability that the row belongs to each of the 4 different classifications our data supports. These probabilities should add up to 1, representing 100 %. The largest probability in the Score array is the probability that the row is actually categorized correctly.
Now that we have our prediction class, we can generate predictions by creating a PredictionEngine instance and calling its Predict method:
PredictionEngine<GameRating, ESRBPrediction> predictEngine = context.Model.CreatePredictionEngine<GameRating, ESRBPrediction>(transformer: _model, inputSchema: _schema);

GameRating games[] = new[] {
    new GameRating()
    {
        Title = "Teen Side Scroller",
        CartoonViolence = true,
        MildLanguage = true,
        CrudeHumor = true,
        Violence = true,
        MildSuggestiveThemes = true
    },
    new GameRating() {
        Title = "Assistant to the Lawn Service Manager 2022",
        MildLanguage = true,
        CrudeHumor = true,
        AlcoholReference = true,
    },
    new GameRating()
    {
        Title = "Shoddy Surgeon Simulator",
        BloodAndGore = true,
        DrugReference = true,
        PartialNudity = true,
    },
    new GameRating()
    {
        Title = "Intense Shoot-o-rama: Why would anyone play this edition",
        BloodAndGore = true,
        DrugReference = true,
        AlcoholReference = true,
        Nudity = true,
        StrongLanguage = true,
        SexualContent = true,
        MatureHumor = true,
        IntenseViolence = true,
    }
};

foreach (GameRating game in games) {
    ESRBPrediction prediction = predictEngine.Predict(game);

    float bestScore = prediction.Score.Max();

    Console.WriteLine($"Predicting rating of {prediction.ESRBRating} for \"{game.Title}\" with a confidence score of {bestScore:p}");
}
This should generate output like the following:
Predicting rating of T for "Teen Side Scroller" with a confidence score of 74.21%
Predicting rating of ET for "Assistant to the Lawn Service Manager 2022" with a confidence score of 70.34%
Predicting rating of M for "Shoddy Surgeon Simulator" with a confidence score of 57.96%
Predicting rating of M for "Intense Shoot-o-rama: Why would anyone play this edition" with a confidence score of 99.47%
Overall, those look like good classifications for those games and good confidence scores.
Note how confident the algorithm is of the shooter and how uncertain it is on the surgery game. This highlights how important a confidence score can be, because the odds of our surgery game being downgraded to a teen rating are significantly higher than our intense shooter game being moved out of mature.
It’s also worth mentioning that there is the potential that existing ESRB games are subjective rather than objective and may carry individual bias pushing titles to ratings they ordinarily might not receive. If this was a common phenomenon, a machine learning algorithm might not be able to get a high degree of accuracy based on historical data. This also represents an opportunity to use machine learning to generate or validate future ESRB ratings to help detect and reduce bias in the field of game rating.
Next Steps
Okay, so now that we’ve seen the complete flow from loading data to training a model to evaluating its performance and getting predictions from it, the question is: what do we do from here?
ML.NET is thankfully very easy to incorporate into your existing code and new projects. Let’s look at a few things that make that easier.
Saving and Loading Models
First of all, organizations often pre-train their models and only periodically re-train them. This means that there’s often a strong need to save a new model to disk after training is completed or load a pre-trained model from disk on application startup.
Saving a model in ML.NET is very easy. Given a trained model stored in an ITransformer variable named model, you could save it to disk with the following code:
string filename = System.IO.Path.Combine(Environment.CurrentDirectory, "Model.zip");
context.Model.Save(model, null, filename);
Here the second parameter to Save is a schema from your dataset which may be provided or omitted. You can get this schema by using the Schema property of an IDataView you used during training. In general, I would provide the schema if you can, though ML.NET is fine without that information.
When a model is saved, it is stored to disk as a zip file containing a series of directories storing the various transformations contained in the ITransform instance representing your model.
This model can later be loaded up using the following code:
DataViewSchema schema;

ITransform model = context.Model.Load(filename, out schema);
This will load the model and its schema from disk and you can now use that model to make predictions without needing to retrain anything.
Integrating into .NET Apps
Now that you see how you can save and load ML.NET models, you can see how you might load a model once as a web server starts up and then have it available for use for any request that comes in to your system. Predictions to a trained machine learning model are quick, so periodically saving your models, then deploying them as part of regular updates allows you to deploy your machine learning models the same way you might any with any software release.
If you were developing desktop or mobile applications you could also store your models in cloud storage and have your application download the latest model on startup if the version of that file in the cloud is more recent than the one the app has locally.
Finally, you could allow an application to train models and save and load them in the same way that the provided example ESRB app does.
Model Builder
Let’s close by also discussing a code-free approach to Auto ML. If writing code isn’t your thing or you’re staring off a brand new application, you can use the ML.NET model builder to train and generate a model using a wizard-based user interface built into Visual Studio.
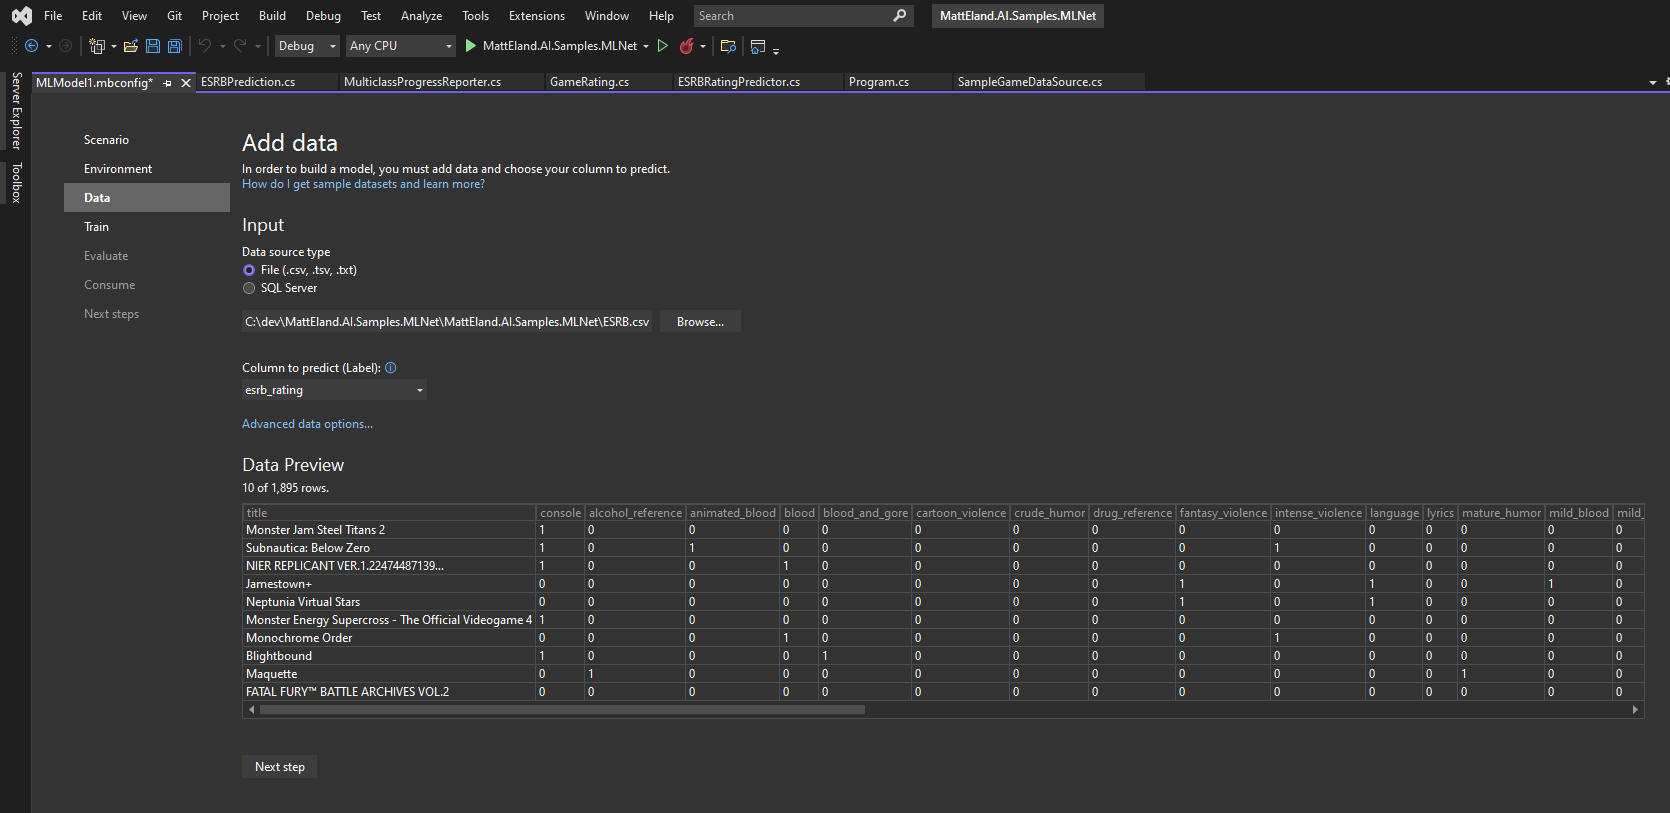
This will build out all the code for you and even give you an opportunity to generate working projects - including API projects - around the trained model.
If this topic is interesting to you, please reach out to me via Twitter or E-Mail if you’d like me to explore it in more length in future content.
Conclusion
In short, ML.NET’s Auto ML capabilities are an amazing and completely free way to help everyday programmers take advantage of capabilities you’d often need a data scientist for. ML .NET lets you and your team use the languages you’re already familiar with to integrate machine learning capabilities into your application without in-depth knowledge of the various machine learning algorithms.
If you’re curious about other types of machine learning tasks supported by ML.NET, check out my article on ML.NET tasks in C#.
I’d encourage you to take a look at the provided example ESRB app and think about places where machine learning might be a good fit for your application and team.
This post was featured as part of the C# Advent 2021 event. Be sure to check out other posts by fantastic members of the .NET community