Managing your Azure Machine Learning Costs
Tips for managing your Azure Machine Learning expenses
Machine learning and AI are awesome, and getting more awesome all the time, but it’s natural to be cautious about cost when using these features. In this article I’ll cover the major cost factors for Azure Machine Learning and sharing some key tips I’ve found to minimize and control your costs.
This article is part one of a five-part series exploring Azure Machine Learning, Azure Cognitive Services, Azure Bot Service, OpenAI on Azure, and Azure Cognitive Search that will be debuting over the coming week as part of Azure Spring Clean 2023.
Before we continue, I have to issue a standard disclaimer on pricing: this article is based on my current understanding of Azure pricing, particularly in the North American regions. It is possible the information I provide is incorrect, not relevant to your region, or outdated by the time you read this. While I make every effort to provide accurate information, I provide no guarantee or assume no liability for any costs you incur. I strongly encourage you to read Microsoft’s official pricing information before making pricing decisions.
I also assume that you have a basic understanding of Azure Machine Learning Studio in this article. If you’re new to machine learning on Azure, I recommend you read my overview article on Azure Machine Learning Studio.
With that out of the way, let’s start exploring AI / ML pricing areas on Azure!
Understanding Your Pricing Needs
First of all, let’s talk briefly about ways of understanding your current pricing needs.
Microsoft gives us a few handy tools for monitoring and controlling your pricing on Azure including Azure Cost Management that let you understand your current costs. In the case where costs might overrun, there’s Cost Alerts and Budgets that let you take automated notification or corrective actions should your costs exceed predictions. Finally, Microsoft gives you a fantastic Pricing Calculator to help you pinpoint costs before creating any services.
This article is not an article about these tools, so this section will be brief, but I find that after the first week of using a new service I like to look at Azure Cost Analysis and get a breakdown of all of my costs for my new project.
Typically I like to put all of my AI and ML services into a resource group that represents the project I want to understand the costs of. Once I do that, I can filter down to just that resource group and get a breakdown of costs by resource type as shown below:
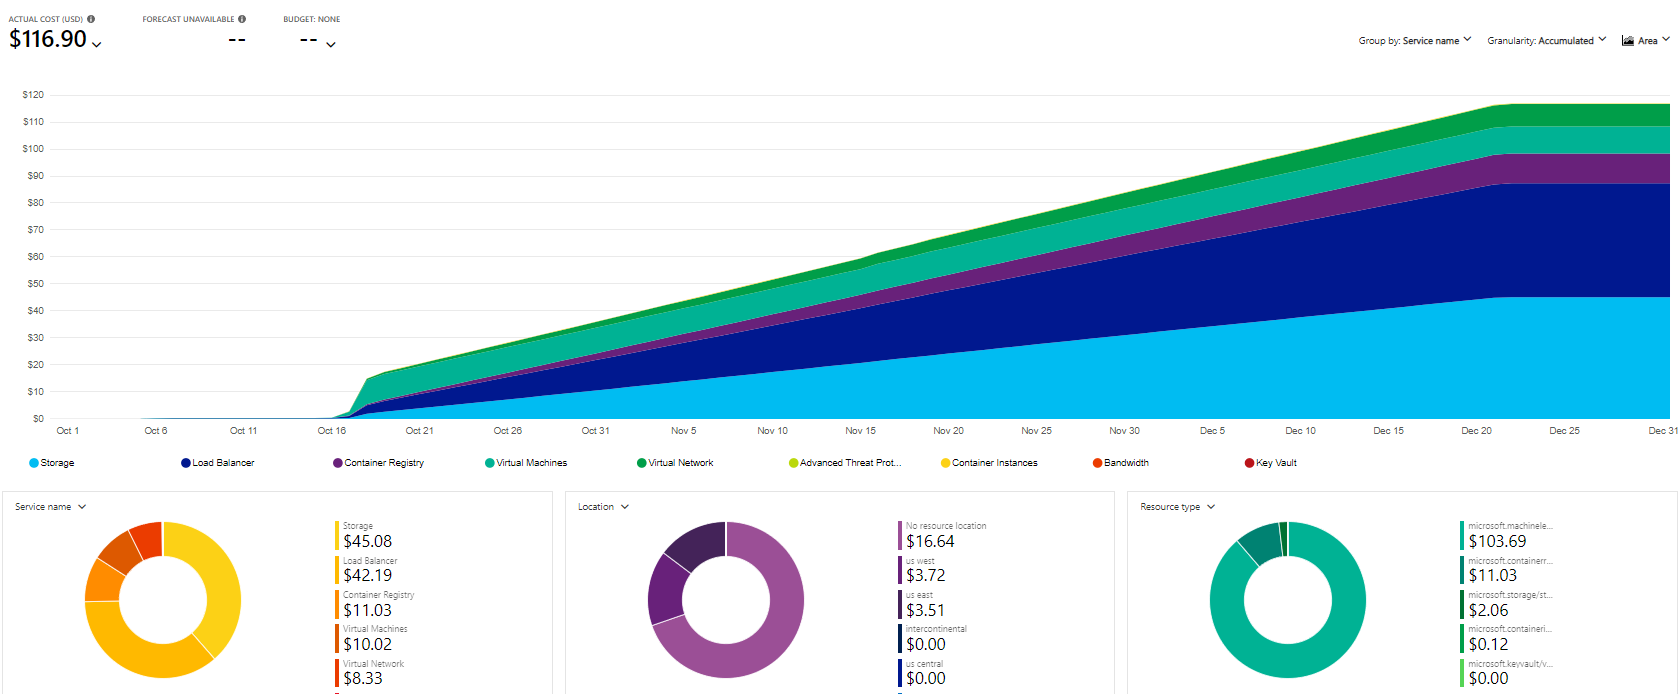
This is a great way of understanding the actual financial impact of services and making adjustments as needed. However, by the time things show up in Cost Analysis, you’ve already incurred their costs.
Let’s talk about some ways of controlling costs in Azure Machine Learning.
Azure Machine Learning
Azure Machine Learning is probably the most complex area in this article because so many things go into a machine learning solution.
Machine learning solutions comprise of the following major cost areas:
- Compute time for training a model, running a notebook, or profiling a data set
- Load balancers and VNets to support clusters when clusters are running
- Storage of trained models, logs, and metrics
- Compute time for deployed models or real-time endpoints running on Azure Container Instances or Azure Kubernetes Service
- Azure Container Registry to manage your registered containers
We’ll talk about each one of these factors in more detail, but my first tip for you is to avoid creating an Azure Container Registry when creating your Azure Machine Learning Workspace.
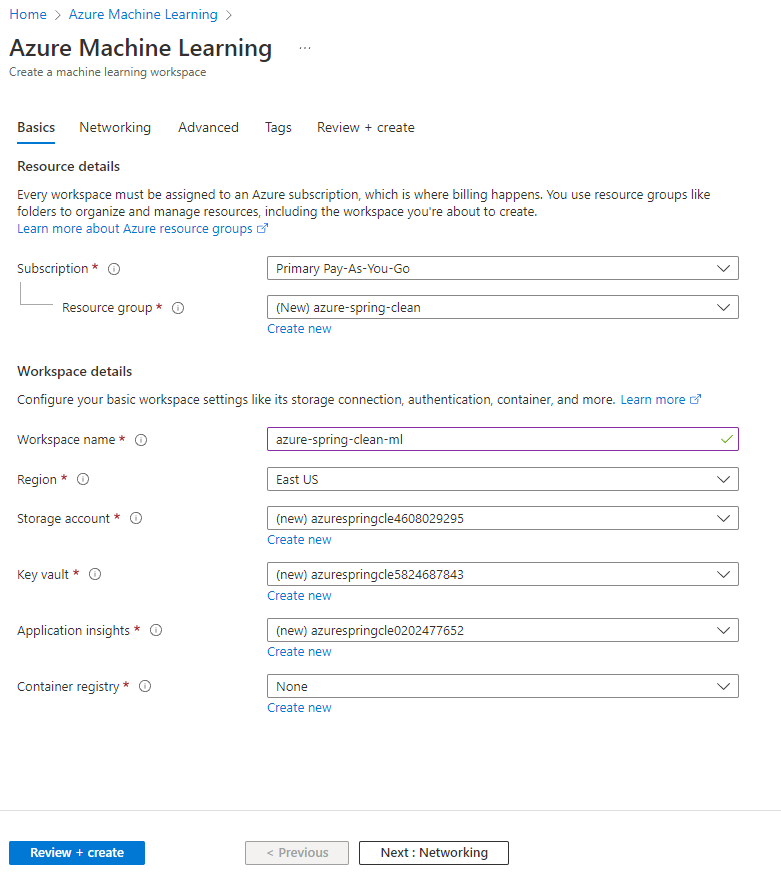
When you provision an Azure Machine Learning Workspace, it needs to create a variety of resources, but the container registry is optional. This is ideal because container registries have a fixed cost associated with them, even if you’re not actively using them.
Leave this value blank or use an existing container registry. The first time you try to deploy a container using your Azure Machine Learning Workspace it will automatically create a container registry for you, so don’t create one before you truly need it.
Controlling Compute Costs
When I first started with Azure Machine Learning I assumed that the majority of my costs would occur from training my models since that’s what the majority of the pricing messaging is focused.
With Azure Machine Learning you need to select and provision the appropriate compute resources before starting your experiments. There’s a heavy emphasis in this process in selecting the right CPU / GPU and memory profile, but in my experience the actual training process is a small part of the overall costs.
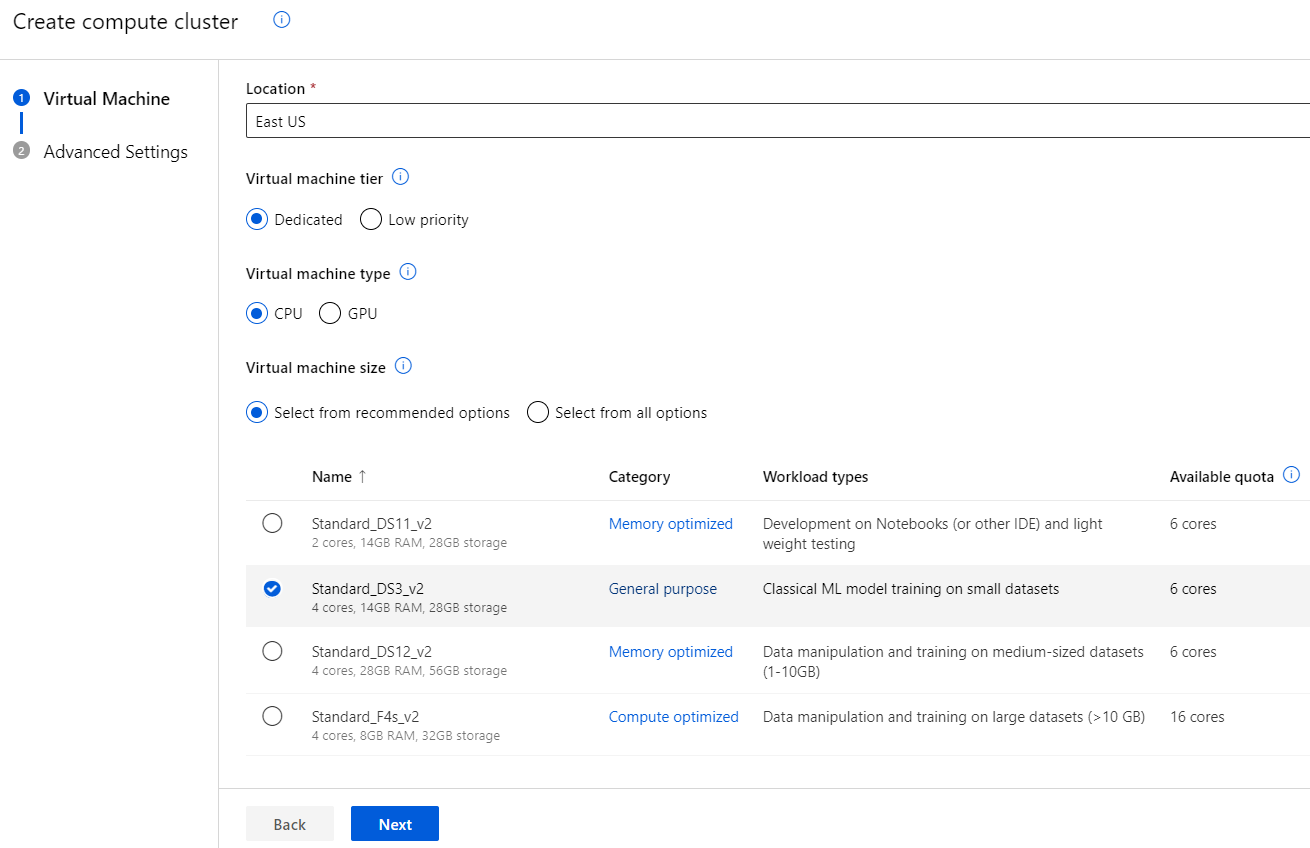
However, for significantly large training runs, this may not be the case and you should invest significant planning on the compute resources you will use.
There are a few things to keep in mind when you are working with Compute Resources:
First, you don’t want to pick too low of a compute tier. Picking a slow compute that costs less per hour but takes longer overall might be more expensive than picking a more appropriate machine for your workload that takes less time to run.
Secondly, using a low priority compute resource can significantly improve your costs while training tasks are running - as long as you are comfortable with your runs taking longer to accomplished or potentially being restarted later if dedicated capacity is needed for competing jobs. Since I personally run most of my experiments outside of working hours, low priority is my preference.
This probably goes without saying, but when you create a compute cluster, make sure you specify 0 as the minimum number of nodes. This allows your compute resources to shut off when you have no active work queued and avoid charges on those resources.
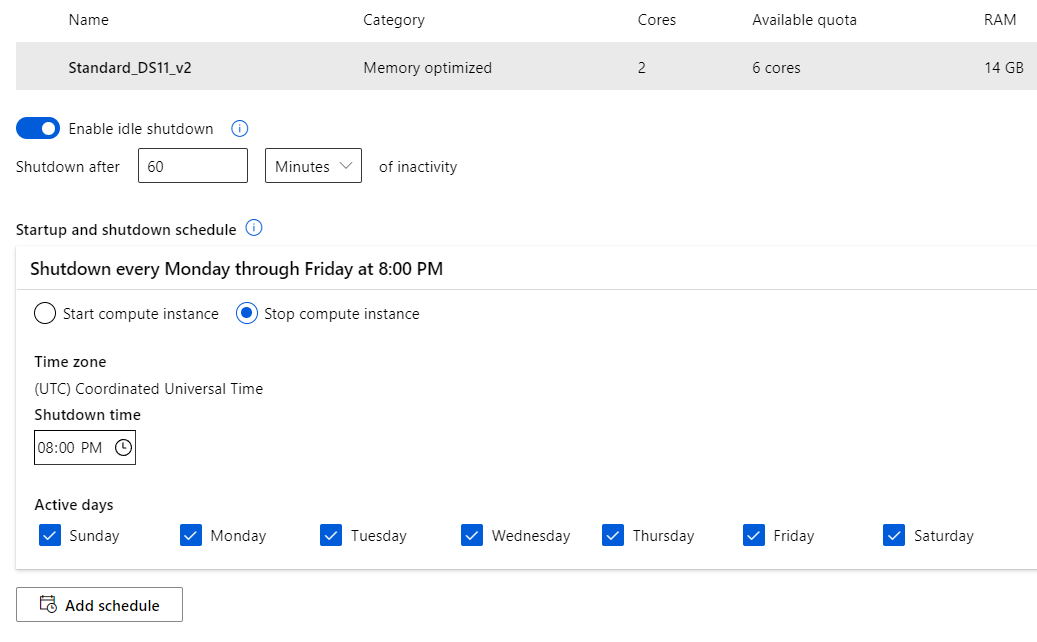
Similarly, when creating a compute instance, I recommend that you enable the idle shutdown timer and also set a stop compute instance schedule that impacts each day of the week. This will ensure that compute instances you leave running in notebooks or other places are shut down within a certain time limit to prevent unexpected charges.
Additional Learning: If you’re confused about the differences between compute instances and compute clusters, check out my article on the various compute resources in Azure Machine Learning
Finally, if you already have available compute resources such as a virtual machine or Azure Databricks, you can use these resources for compute purposes, though you are still paying for their capacity.
If you’re incredibly cheap (like me) one additional option you may want to consider is using the Azure ML Python SDK and your own local compute resources to train models on your machines and then upload the results to Azure. Using this, you completely cut the cloud costs of model training. However, this is only available with the Azure ML Python SDK and only supported for some machine learning tasks.
Storage
One thing that surprised me about my own Azure Machine Learning costs was that my most expensive cost was actually due to storage.
Storage in Azure Machine Learning is typically due to a few things including:
- Trained models
- Training data
- Old versions of training data
- Model metrics
- Logs
- Data Profiles
While storage on Azure is cheap, one thing I personally observed is that a few actions tend to multiply your storage needs.
The first is automated ML. Automated ML will train many different models to see what algorithms and sets of hyperparameters are the most effective at fitting a model to your training and test data. This is fantastic and I absolutely adore automated ML, however the fact remains: it trains a bunch of different models to find the most performant one.
As a result, after you run a model training process using automated ML, you will have many non-performant models in storage that you will be paying for each month. You should delete the trained models that you do not intend to use or refer back to later.
Secondly, if you are using the Azure ML Python SDK, you may be programmatically registering a dataset with Azure Machine Learning Studio. This is a wonderful feature, but if you are trying different things in code and re-run a notebook that happens to register your dataset, that action uploads your data again as a new version of the existing dataset. This means you can have copies or near copies of your data in storage on Azure if you’re not careful.
I recommend that you periodically examine the data you’ve stored on Azure and remove resources that are no longer needed.
In fact, I’ve taken to preferring smaller resource groups for machine learning experiments that I can use to evaluate a model or generate some findings. Once I have my final model, I can download it off of Azure and then delete the experimental workspace’s resource group. If I want to keep that model, I can still upload it to a longer-term resource group with its Azure Machine Learning Workspace.
Endpoints
The most expensive aspect of Azure Machine Learning is often the endpoints feature and deploying your models.
Being able to deploy a real-time model to a live endpoint is incredibly powerful, but an expensive proposition. When you deploy a real-time endpoint, you must pay for the Azure Container Instances or Azure Kubernetes Service resources you are using, the container registry that tracks them, any load balancers they require, and storage for those containers.
This proposition can get fairly expensive fairly quickly, so you should plan very carefully for your needs.
First, Azure Container Instances (ACI) are going to be cheaper than Azure Kubernetes Service (AKS) in general because ACIs are intended to be more geared towards developing and testing while AKS clusters are built for production-level scalability. However, I found ACIs to be outside of my price range as a hobbyist machine learning practitioner.
Where possible, you should prefer batch endpoints instead of real-time endpoints since the compute costs are far lower. However, this is not an option for applications that require real-time predictions or classification.
Secondly, I recommend you remove any endpoints you are not regularly using as the existence of endpoints from the designer may be the cause of a persistent load balancer cost I incurred in some of my experiment workspaces.
Finally, if costs are critical and you have an existing production web application, you could look into using ONNX to export your trained models out of Azure Machine Learning Studio and import them to another framework. For example, you could take the exported ONNX model and use ML.NET to integrate it into an ASP .NET application as a new REST endpoint.
Please let me know if this topic is of interest and I can investigate it in future articles, but it seems plausible based on what I know of Azure Machine Learning Studio and ML.NET in general.
Conclusion
Azure Machine Learning is a broad topic that encompasses model training, evaluation, and versioning, dataset management, and model deployment. There are also a large number of ways you can interact with Azure Machine Learning from Automated ML to Notebooks to the Designer to the Azure ML Python SDK.
Because of this complexity, it can be easy to get lost in the pricing so I encourage you to calculate your costs up front with the pricing calculator and rely on Azure Cost Management, Budgets, and Alerts to show you how your actual costs are stacking up against your estimates.
Azure Machine Learning has changed significantly over its lifetime and I am confident it will continue to change.
The exact nature of your costs will depend on how large your models are, how long it takes to train them, the size of your datasets and the resulting models, and the ways in which you deploy your models.
Stay tuned for more advice on different areas of Azure AI and Machine Learning, and please feel free to share your own tips for managing your AI / ML costs on Azure in the comments!
This post is part of Azure Spring Clean 2023


