
Computer Vision in C# using Azure Cognitive Services
Intelligent analysis of images using pre-trained image models
Computer Vision is part of Microsoft Azure’s Cognitive Services suite of artificial intelligence capabilities. With computer vision you can take advantage of pre-trained computer vision models to analyze your own images and get a wealth of information about them.
In this article we’ll cover how to get started with Azure Cognitive Services computer vision using C# and the Azure SDK.
What can Computer Vision do?
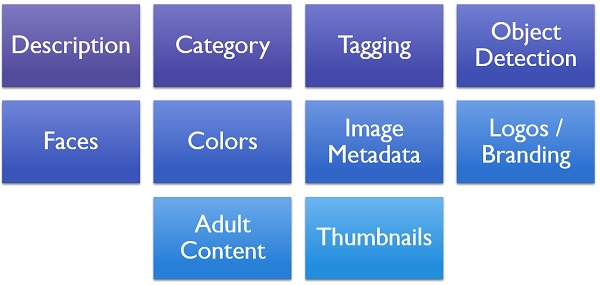
Computer vision gives us APIs to determine the following pieces of information from an image:
- An overall description of what’s in the image
- What category or categories the image falls under
- Tags of entities that are present in the image
- Object detection for specific entities (including a bounding box)
- Faces that are present in the image
- Information about colors present in the image
- Information about the image’s metadata
- Any known logos or brands that might be present
- Whether or not the image contains adult content
- Thumbnail generation
A key thing about this is that you don’t need to be a data scientist to take advantage of these capabilities. Microsoft provides the pre-trained models and gives you access through the cognitive services vision API.
Like the rest of Azure Cognitive Services, computer vision is priced at a consumption-based plan where you pay fractions of cents per API call. This lets hobbyists and large organizations alike benefit from these APIs.
Billing Note: a free plan exists for those who need fewer than 5,000 transactions per month at the time of this writing.
So, computer vision is powerful, flexible, and helps us build awesome apps. Let’s see how to use it.
Setup
In order to get the most out of this article you should:
- Have an Azure account with a configured Azure Cognitive Services resource
- Understand the basics of Azure Cognitive Services
- Know the basics of C# programming
Note: you can either use a cognitive services resource or a computer vision resource for these tasks. Both will have the same information available on their Keys and Endpoints blade. See my article on cognitive services for more information on when to use a computer vision resource instead of a cognitive services resource
Before you can reference these APIs in C# code, you’ll need to add a reference to Microsoft.Azure.CognitiveServices.Vision.ComputerVision using NuGet package manager or via the .NET CLI via the following command:
dotnet add package Microsoft.Azure.CognitiveServices.Vision.ComputerVision
See Microsoft’s documentation on NuGet package manager for additional instructions on adding a package reference.
Connecting a ComputerVisionClient to Azure Cognitive Services
In order to work with the vision APIs in C# code, we need a ComputerVisionClient instance that knows how to authenticate and gain access to our cognitive services or computer vision resource on Azure.
To be able to declare any of these classes you’ll need the following using statements:
using Microsoft.Azure.CognitiveServices.Vision.ComputerVision;
using Microsoft.Azure.CognitiveServices.Vision.ComputerVision.Models;
Next, you’ll need to provide authentication details and create your ComputerVisionClient:
// These values should come from a config file and should NOT be checked into source control
string subscriptionKey = "YourKeyGoesHere";
string endpoint = "YourEndPointGoesHere";

// Create a computer vision client
ApiKeyServiceClientCredentials visionCredentials = new(subscriptionKey);
ComputerVisionClient vision = new ComputerVisionClient(visionCredentials);

// Tell the computer vision client what endpoint to talk to
vision.Endpoint = endpoint;
With that configured, we’re now ready to analyze a picture. For lack of a better picture, our analysis in this article will be of this image of of me at a large party:

Matt resting from socializing at a party and thinking about conversational AI systems.
Configuring Features of Interest
Unlike some other APIs, Azure’s computer vision API gives us a single method of interest and expects us to tell it what types of feature analysis we want it to do.
For example, if you wanted to analyze every available type of feature, you could write the following code:
// We need to tell it what types of results we care about
List<VisualFeatureTypes?> features = new()
{
    VisualFeatureTypes.Categories,
    VisualFeatureTypes.Description,
    VisualFeatureTypes.ImageType,
    VisualFeatureTypes.Tags,
    VisualFeatureTypes.Objects,
    VisualFeatureTypes.Adult,
    VisualFeatureTypes.Color,
    VisualFeatureTypes.Faces,
    VisualFeatureTypes.Brands,
    VisualFeatureTypes.ImageType
};
This will perform all of these different types of analysis on the image in question and include their results in the response.
So why wouldn’t you want to get all information every time?
First of all, some of these types of analysis can be computationally expensive. For example, object detection with bounding boxes will be noticeably slower for images with many different faces or other objects of interest inside of them.
Secondly, not all of these things bill at the same price and every analysis task you do has a billing cost associated with it. If your application doesn’t need tags in order to function, you shouldn’t request them with every request.
Billing Tip: Identify the types of information that are the most helpful during development and then request only those types to minimize the cost of calling the vision API.
Analyzing Images by URL
Okay, so let’s get started analyzing images. We’ll start with a simple case of analyzing an image via a publicly accessible URL:
// Call out to Computer Vision to get the results
ImageAnalysis analysis = await vision.AnalyzeImageAsync("https://singularitysally.blob.core.windows.net/images/MattAtAParty.jpg", features);
Note: if you don’t want to work with async / await patterns, you can drop the
awaitkeyword and add a.Resultto the end. Asynchronous code is usually a good move for production applications users interact with, however.
Calling AnalyzeImageAsync with those feature types sends a POST request to https://YourEndpointHere.cognitiveservices.azure.com/vision/v3.2/analyze?visualFeatures=Categories%2CDescription%2CImageType%2CTags%2CObjects%2CAdult%2CColor%2CFaces%2CBrands%2CImageType&model-version=latest with the following body:
{
  "url": "https://singularitysally.blob.core.windows.net/images/MattAtAParty.jpg"
}
We’ll talk more about the response from that shortly, but let’s talk about analyzing images from streams first.
Analyzing Images from Disk or Streams
The SDK also gives us an AnalyzeImageInStreamAsync method that works with Streams. This is useful if you wanted to load an image from your hard drive or a webcam.
The code for this is slightly more complex, but similar to the URL-based code:
string filePath = "someFileIncludingPath.png";
ImageAnalysis analysis;
using (Stream imageStream = File.OpenRead(filePath))
{
    analysis = await computerVision.AnalyzeImageInStreamAsync(imageStream, features);
}
However, the response will be identical to that of the URL-based method.
Image Results
The JSON response we get back from the API for the image of the author at a party is fairly bulky, but we did ask for all these details:
{
    "categories":[
        {
            "name":"outdoor_",
            "score":0.01953125,
            "detail":{"landmarks":[]}
        },
        {
            "name":"people_show",
            "score":0.33984375
        }
    ],
    "adult":{
        "isAdultContent":false,
        "isRacyContent":false,
        "isGoryContent":false,
        "adultScore":0.00669089425355196,
        "racyScore":0.008866488933563232,
        "goreScore":0.0005286912200972438
    },
    "color":{
        "dominantColorForeground":"Brown",
        "dominantColorBackground":"Black",
        "dominantColors":["Brown","Black"],
        "accentColor":"AA6321",
        "isBwImg":false,
        "isBWImg":false
    },
    "imageType":{
        "clipArtType":0,
        "lineDrawingType":0
    },
    "tags":[
        {"name":"clothing","confidence":0.9977331161499023},
        {"name":"sky","confidence":0.9966630935668945},
        {"name":"person","confidence":0.9912672638893127},
        {"name":"man","confidence":0.9857988357543945},
        {"name":"outdoor","confidence":0.9817671775817871},
        {"name":"water","confidence":0.9165242314338684},
        {"name":"boat","confidence":0.858830451965332},
        {"name":"night","confidence":0.7245724201202393},
        {"name":"standing","confidence":0.6460371017456055},
        {"name":"people","confidence":0.6369600296020508},
        {"name":"light","confidence":0.6141021847724915},
        {"name":"bridge","confidence":0.5820050239562988}
    ],
    "description":{
        "tags":["sky","person","outdoor","man"],
        "captions":[{"text":"a man standing on a boat","confidence":0.43777960538864136}]
    },
    "faces":[],
    "objects":[
        {
            "rectangle":{"x":233,"y":837,"w":138,"h":340},
            "object":"person",
            "confidence":0.668
        },
        {
            "rectangle":{"x":14,"y":772,"w":239,"h":717},
            "object":"person",
            "confidence":0.859
        },
        {
            "rectangle":{"x":222,"y":657,"w":542,"h":872},
            "object":"person",
            "confidence":0.914
        }
    ],
    "brands":[],
    "requestId":"9f1faf10-37b7-40b0-b118-cfd886c047d9",
    "metadata":{"height":1549,"width":1032,"format":"Jpeg"},
    "modelVersion":"2021-05-01"
}
So, that’s a lot of content there. Much of it is intuitive, but we’ll discuss it section by section as we go along and highlight how to work with this response from the .NET API.
Captions
Captions are arguably the most useful aspect of the result as they let us quickly describe an image in a single sentence.
We can loop over the captions present in the Description.Captions property of the ImageAnalysis and display information on them as follows:
Console.WriteLine("Captions: ");
foreach (ImageCaption caption in analysis.Description.Captions)
{
    Console.WriteLine($"\t{caption.Text} (Confidence: {caption.Confidence:p})");
}
This will display something along the lines of the following:
Captions:
    a man standing on a boat (Confidence: 43.78%)
I’m not sure why Description.Captions can hold multiple values. During testing and experimentation I’ve never seen multiple values come back. My guess is that this object might be shared with another method for bulk-analyzing images.
Also, for the record, the picture was taken on a pier, not a boat, but Azure did express a lower confidence in that prediction.
Categories
Categories define broad groups of images and can be helpful if you are trying to sort many images into related piles of images based on their categories.
Working with categories is actually simpler than working with captions:
Console.WriteLine("Categories: ");
foreach (Category category in analysis.Categories)
{
    Console.WriteLine($"\t{category.Name} (Confidence: {category.Score:p})");
}
This would display something like the following:
Categories:
    outdoor_ (Confidence: 1.95%)
    people_show (Confidence: 33.98%)
I’ve observed that every category I’ve seen has had an underscore (_) in its name. I suspect that what we see here is a parentCategory_subCategory type of arrangement. For example, show would be a subcategory of people.
In general, categories haven’t been incredibly useful to me, but I could see them being very useful when trying to organize many different pictures into related groups.
Tagging
Tagging is amazing. Tagging is maybe my favorite feature of the vision API, though object detection and captions offer stiff competition.
Tagging indicates whether a specific type of thing was present in the image. Images tend to have many different tags associated with them and this can be very helpful if you’re searching images for one that contains a specific thing, such as a sunset or a squirrel.
Looping over tags is simple:
Console.WriteLine("Tags:");
foreach (ImageTag tag in analysis.Tags)
{
    Console.WriteLine($"\t{tag.Name} (Confidence: {tag.Confidence:p})");
}
This displays the following tags for our image:
Tags:
    clothing (Confidence: 99.77%)
    sky (Confidence: 99.67%)
    person (Confidence: 99.13%)
    man (Confidence: 98.58%)
    outdoor (Confidence: 98.18%)
    water (Confidence: 91.65%)
    boat (Confidence: 85.88%)
    night (Confidence: 72.46%)
    standing (Confidence: 64.60%)
    people (Confidence: 63.70%)
    light (Confidence: 61.41%)
    bridge (Confidence: 58.20%)
I find these results very helpful for understanding an image and generally accurate.
Object Detection
Object detection is like tagging, but for specific entities within an image.
With object detection results, we get a bounding box for the object detected. This contains the X and Y coordinates within the image along with a width and height.
For reference, here is a bounding box of the objects detected in the image we sent over earlier:
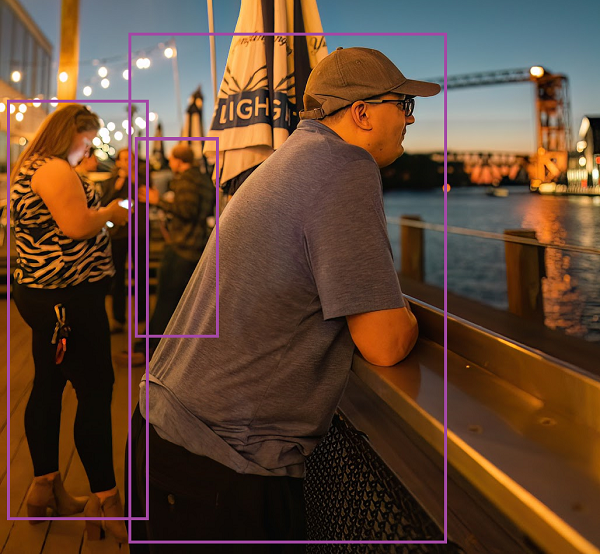
Note that these 3 objects detected in the image are all categorized as people and their bounding boxes partially overlap.
The code to loop over objects and bounding boxes follows:
Console.WriteLine("Objects:");

// Loop over all detected objects
foreach (DetectedObject obj in analysis.Objects)
{
    // Calculate a good string to represent the bounding box
    BoundingRect rect = obj.Rectangle;
    string bounding = $"({rect.X},{rect.Y}):({rect.X + rect.W},{rect.Y + rect.H})";

    // Log the object
    Console.WriteLine($"\t{obj.ObjectProperty} (Confidence: {obj.Confidence:p}) at {bounding}");
}
Adult Content Detection
Detecting adult content is fairly straightforward in that the API gives us back an Adult object containing boolean and score values for adult (explicit), racy, and gory images. Scores range from 0 to 1 with 1 being very likely to contain that topic.
The code for accessing and displaying these values is as follows:
Console.WriteLine($"Adult? {analysis.Adult.IsAdultContent} (Score {analysis.Adult.AdultScore:F2})");
Console.WriteLine($"Racy? {analysis.Adult.IsRacyContent} (Score {analysis.Adult.RacyScore:F2})");
Console.WriteLine($"Gore? {analysis.Adult.IsGoryContent} (Score {analysis.Adult.GoreScore:F2})");
For our very mild image the results are not shocking:
Adult? False (Score 0.01)
Racy? False (Score 0.01)
Gore? False (Score 0.00)
I could see this service as being incredibly useful for a Software-as-a-Service (SaaS) product. For such a team, you could run user-uploaded images through this API and if cognitive services flagged the images as adult or gory, you might want to hold them for review or simply reject them.
Color
Detecting color in images is less likely to be universally helpful, but in certain applications it could be helpful for automatically styling the user interface.
We can work with the Color property to get access to the foreground and background colors, the accent color, and whether or not the image is black and white:
Console.WriteLine($"Foreground: {analysis.Color.DominantColorForeground}");
Console.WriteLine($"Background: {analysis.Color.DominantColorBackground}");
Console.WriteLine($"Accent: {analysis.Color.AccentColor}");
Console.WriteLine($"Black / White? {analysis.Color.IsBWImg}");
Our image generates the following values:
Foreground: Brown
Background: Black
Accent: AA6321
Black / White? False
Image Type
The vision API also gives us information about whether or not an image is clip art or a line drawing as well as general information about the image’s dimensions.
Console.WriteLine($"Clip Art Type: {analysis.ImageType.ClipArtType}");
Console.WriteLine($"Line Drawing Type: {analysis.ImageType.LineDrawingType}");
Console.WriteLine($"Image Format: {analysis.Metadata.Format}");
Console.WriteLine($"Image Size: {analysis.Metadata.Width} x {analysis.Metadata.Height}");
This generates the following:
Clip Art Type: 0
Line Drawing Type: 0
Image Format: Jpeg
Image Size: 1032 x 1549
That’s one of the most boring aspects of the vision API, but it’s there if you need it.
Faces
For these next two capabilities, let’s use a different image that contains both a face and some brands:

Matt taking a selfie holding a Microsoft store bag
The "faces" portion of our JSON for this image looks as follows:
"faces": [
    {
        "age":38,
        "gender":"Male",
        "faceRectangle":{"left":77,"top":92,"width":132,"height":132}
    }
]
Here computer vision has flagged all faces in the image, given me a bounding box around it, just like I had for object detection, and gone ahead and told me its estimated age and gender for the face.
Note: for reference, I’m older than Azure’s prediction, so thank you cognitive services!
We can display this with the following code that is similar to the object detection code from earlier:
foreach (FaceDescription face in analysis.Faces)
{
    FaceRectangle rect = face.FaceRectangle;
    string boundingBox = $"({rect.Left},{rect.Top}):({rect.Width},{rect.Height})";

    Console.WriteLine($"{face.Gender} face detected aged {face.Age} at {boundingBox}");
}
In our case this displays the following:
Male face detected aged 38 at (77,92):(132,132)
Brands
In the prior picture I posed while wearing a T-Shirt from a local tech conference and holding a Microsoft bag.
The "brands" portion of the JSON registered the following data:
"brands": [
    {
        "name":"Microsoft",
        "confidence":0.872,
        "rectangle":{"x":390,"y":121,"w":145,"h":160}
    }
]
Note that the conference’s logo for this year was not well-known globally as a brand and as such was not recognized, but the results did include Microsoft’s logo.
I can loop through those results as follows:
foreach (DetectedBrand brand in analysis.Brands)
{
    BoundingRect rect = brand.Rectangle;
    string boundingBox = $"({rect.X},{rect.Y}):({rect.W},{rect.H})";

    Console.WriteLine($"{brand.Name} detected at {boundingBox} with {brand.Confidence:P} confidence");
}
Again, this is very similar code to working with objects and their bounding boxes.
The results for this image are:
Microsoft detected at (390,121):(145,160) with 87.20% confidence
This capability is helpful if you wanted to blur out or remove brands in images, or if you wanted to analyze the advertising prevalence of brands that appear in photos.
Thumbnail Generation
It is possible to use the ComputerVisionClient to resize and crop images down to thumbnails of a desired size. This works either by providing desired dimensions and then either an image stream or a URL for a source image.
Unfortunately, the code for this gets too complex to handle in an already long article and deserves to be the topic of its own article.
However, if you are curious, take a look at the GenerateThumbnailWithHttpMessagesAsync and GenerateThumbnailInStreamWithHttpMessagesAsync methods, but be prepared to work with Streams.
Conclusion
Azure Cognitive Services' computer vision offering gives us an incredibly powerful method for analyzing images and determining a wealth of information about these images. While services like caption generation, tagging, and object detection seem incredibly valuable to many audiences, there are also other parts of that offering that are equally valuable to those in need of their services.
Ultimately, computer vision gives us a pre-trained and relatively simple way of deriving intelligent insights from images at an affordable and flexible pricing model.