How to get started with Azure Cognitive Services
Create and configure your first Azure Cognitive Services instance
Azure Cognitive Services are a collection of related machine learning services that make it easy to build smart, engaging applications using artificial intelligence as a service.
In this article, we will explore how to get started with Azure Cognitive Services by creating and configuring your first Azure Cognitive Services instance.
This article assumes that you have an Azure account already. If you don’t have one, you may want to create a free Azure account before continuing on.
What are Azure Cognitive Services?
Using Azure Cognitive Services you can easily add vision, language, speech, and even decision-making capabilities to an application.
Your application can call out to the Azure Cognitive Services API using REST or a the Azure Cognitive Services SDK and get back useful information about images, speech, text, and more.
Azure Cognitive Services uses an artificial intelligence as a service approach where you pay for the volume of API calls you make, meaning that the cost of this service scales perfectly to make it affordable to hobbyists and large enterprises alike.
The high-level flow for getting started with Azure Cognitive Services is as follows:
- Create an Cognitive Services resource in Azure
- Get the API endpoint and access key from the Keys and Endpoints blade in Azure
- Use the REST API or the Azure Cognitive Services SDK to make calls to Azure Cognitive Services from your app
- Use the results of the API calls to deliver value to your users
While I have a full article about what you can do in Azure Cognitive Services, let’s take a quick high-level look into what we can do in Azure Cognitive Services:
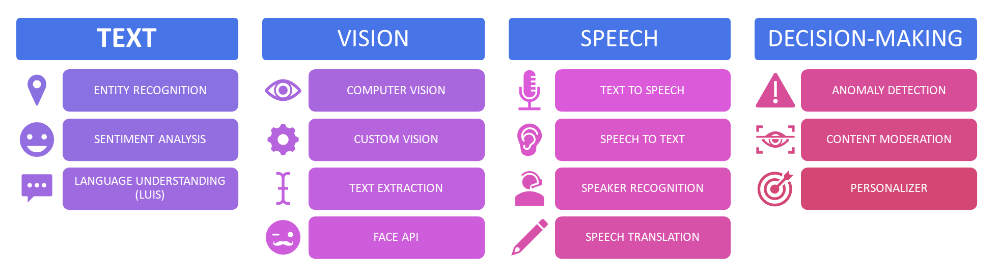
Vision
- Computer Vision lets you use pre-trained vision models to describe images, detect objects (and their bounding boxes), and more.
- Custom Vision allows you to train a vision model using your own images and then use that model to recognize those objects in future images.
- Face API allow you to do a variety of operations with faces in images including verifying identity, comparing similarity between faces, detecting emotion, and more.
- Form Recognizer lets you read data from common forms such as identification documents and receipts or generate your own custom recognizer model.
Language
- Key Phrase Extraction identifies key phrases of interest in passages of text.
- Entity Recognition involves analyzing text and detecting people, places, and other entities contained in that text.
- Sentiment Analysis involves determining if some piece of text is generally positive, negative, or somewhere in between.
- Question Answering lets you take an existing knowledge base and quickly turn it into a searchable repository of information.
- Conversational Language Understanding is the backbone of chatbot applications, like those built in Microsoft Bot Framework, and lets you map user sentences to supported commands.
- Translator lets you translate and transliterate between a growing number of supported languages (including Klingon).
- Language Recognition automatically detects the dominant language of a string
Speech
- Speech to Text allows a computer to listen to audio input (including from the microphone) and generate text from the words it heard.
- Text to Speech lets you take a string and translate it to spoken audio in one of any number of voices of various genders and cultures, including neural voices designed to sound more human-like.
- Speech Translation lets you translate speech live from one language to others.
- Speaker Recognition allows you to identify or verify the identity of the speaker against pre-trained audio profiles.
Decision
- Anomaly Detector detects unusual activity in live datasets.
- Content Moderator allows you to identify adult or racy content users might generate.
- Personalizer lets you build a recommender system that personalizes the experience of each user.
OpenAI and Search
Azure OpenAI is a service currently in preview that allows you to customize and deploy open AI models to meet your needs in a secure and responsible manner. You must apply to use this service and be approved.
Microsoft also offers Azure Cognitive Search, Bing Search, and Bing Custom Search to add search capabilities to applications.
When to Create a Cognitive Services Instance
You can think of Azure Cognitive Services as a single entity way of managing an endpoint and keys for your cognitive services needs. Instead of using a cognitive services instance, you could instead create separate resources for computer vision, speech to text, language, etc.
Having a single cognitive services resource lets you make calls to that same resource to get speech, language, vision, and other predictions using the same endpoint and same key. This is easier to manage in Azure and easier for developers as they have fewer configuration variables to deal with.
However, there are a few reasons you may wish to not use a cognitive services resource and instead create separate services. First of all, if someone has a cognitive services endpoint, they may take advantage of any part of cognitive services. For organizations that wish to restrict developers to only specific aspects of cognitive services, this leaves open the possibility that developers may use those other APIs.
Secondly, separating out your services into separate services makes it slightly easier to determine the exact costs you’re paying for at a per-service level. For example, vision and speech costs would normally be lumped together into the cognitive services resource, but if you separate these out into separate services it will be more clear as to how much you’re paying for speech vs how much you’re paying for vision.
Still, it’s usually simpler, easier, and better to work with a single cognitive services instance, but each organization has different needs.
Creating an Azure Cognitive Services Instance
Okay, enough preamble. Let’s actually create an Azure Cognitive Services instance.
Finding Azure Cognitive Services in the Azure Marketplace
First, go to the Azure Portal and click Create a resource.
Next, type Cognitive Services in the search bar in the marketplace, then select the service when it appears.
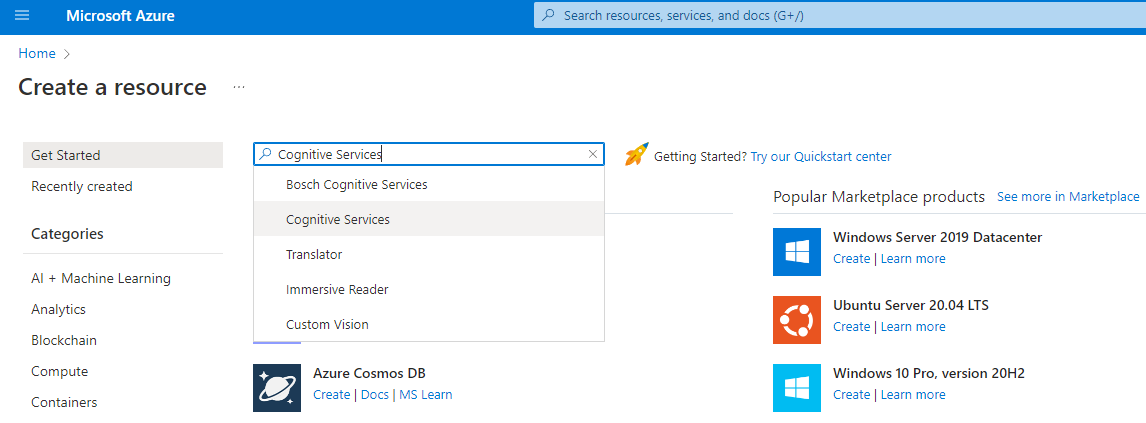
Keep the defaults and then click Create to begin configuring the new service.
Configuring the Azure Cognitive Service Instance
In the starting Basics tab, you’ll need to set values for each of the fields as shown below:

Here are a few notes on some of the fields:
- Resource group can be a new or old group, but I typically create one resource group per application or experiment. This makes it easy to measure the cost of that project and delete all the resources associated with it later.
- Region can be any Azure region listed, but it’s good to keep the Azure region close to the location the applications interacting with it will be deployed. If you can, try to use the same region for your cognitive services instance and the application, if you host the app on Azure as well.
- Pricing tier may vary over time and by region so always make sure to view the latest pricing details.
- Responsible AI Notice Microsoft is leading the way in its Responsible AI initiatives, and these initiatives are beginning to be more tightly integrated into Azure’s offerings. You should read over the Responsible AI Notice and linked documents.
- Face Notice Microsoft does not license its facial APIs to any police department in the United States.
Once you are satisfied with your settings, click Review and Create to skip to the last tab, then click Create.
After a moment, your new resource will be created and you can click Go to resource to navigate to its page.
Touring your Cognitive Services Instance
While we’re in Azure portal, let’s take a look at some key portions of your cognitive services instance.
Once you navigate into your cognitive services instance you should see the main overview “blade” as pictured below.
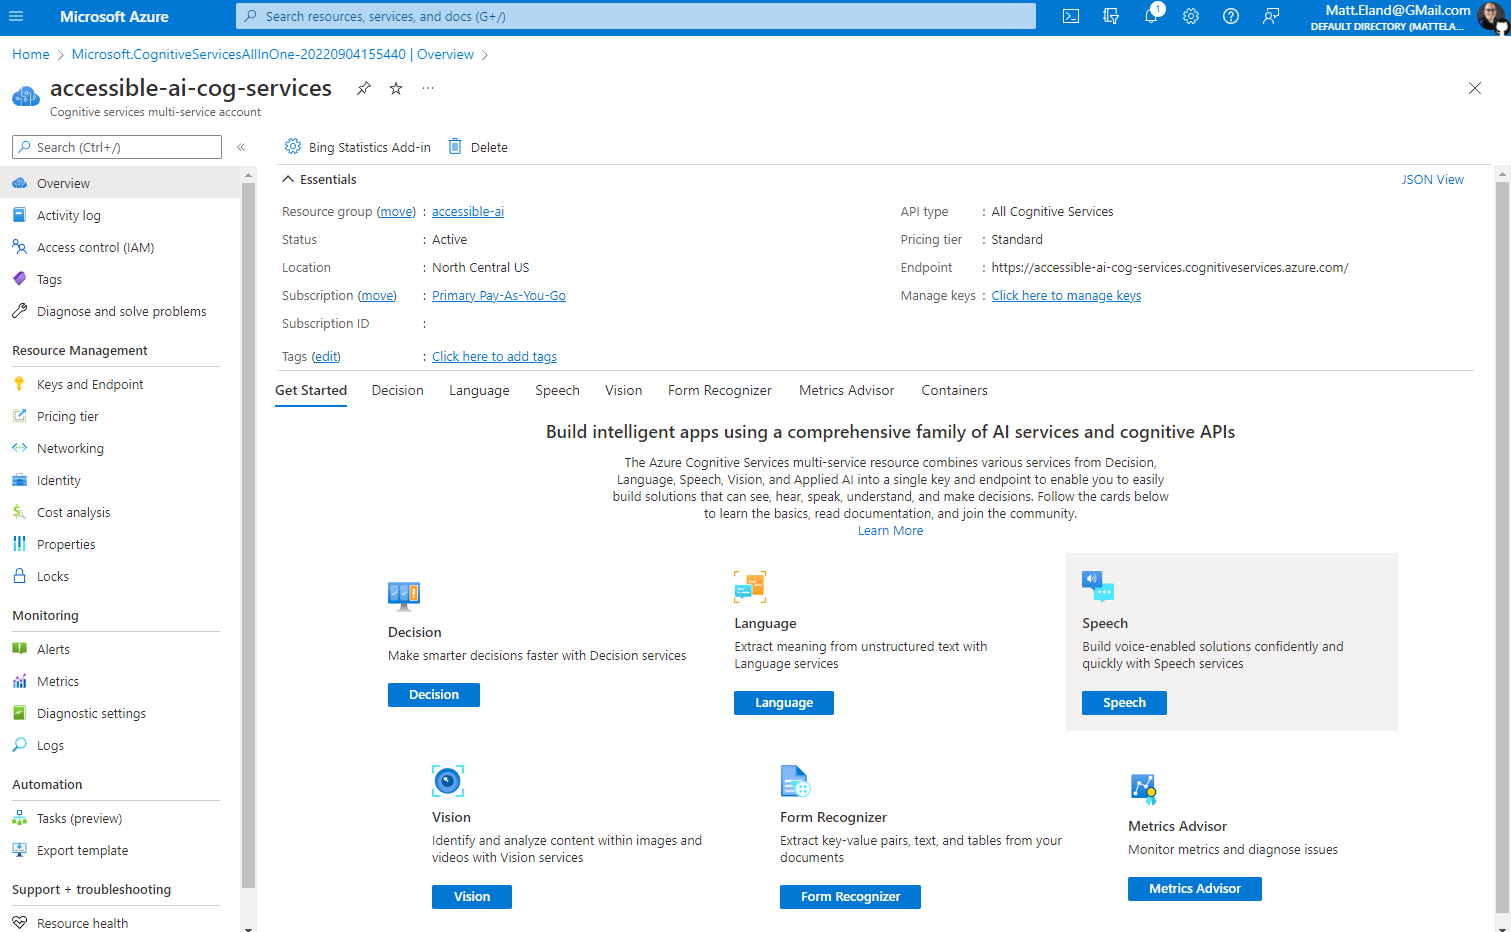
The top half of the overview blade features information on the location and resource group of your services, but it also includes information on the REST endpoint that your intelligent applications will need to call out to as well as a link to manage API keys.
The bottom portion of the overview blade contains many helpful learning resources on discovering how to get started with the various parts of Azure Cognitive Services.
Click the Click here to manage keys link in the overview or the Keys and Endpoints link on the sidebar to move to the Keys and Endpoints “blade”.
Cognitive Services Keys and Endpoints Blade
The Keys and Endpoint blade allows you to see your location and region as well as the REST endpoint that your applications will need to call to work with Azure Cognitive Services.
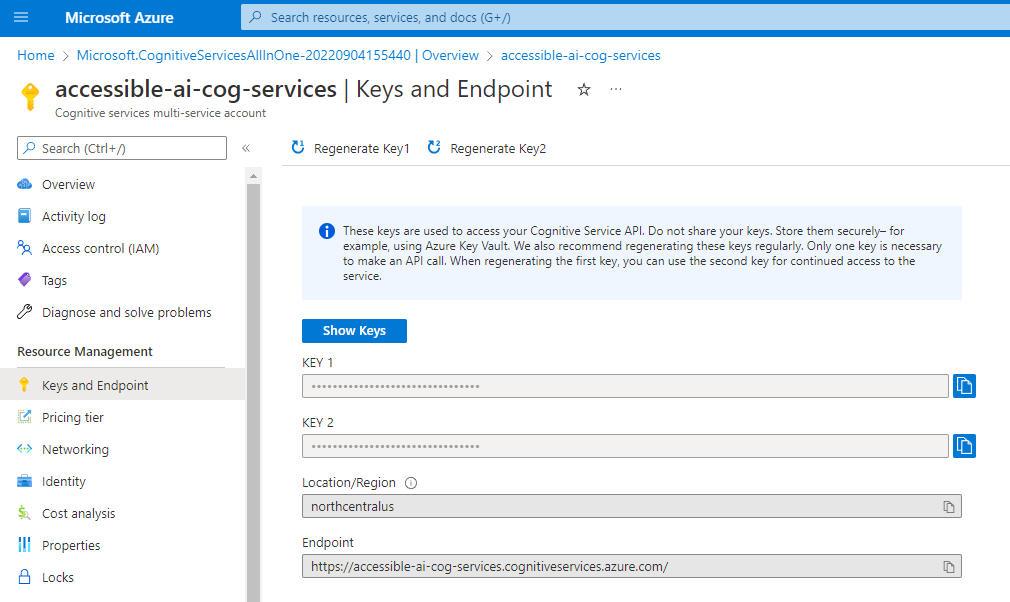
There’s also a pair of keys here that can be used to grant access to your Azure Cognitive Services endpoint.
These keys are sensitive information and should not be shared or checked into source control. Both keys have the same effect and Azure gives us two of them so we can periodically move applications off of one key and onto the other, then replace the old key with a new one to help keep our keys secure.
All of the information on this screen is something you will need when modifying your applications to talk to your cognitive services instance, however that’s all you’ll need to authenticate to your cognitive services instance.
Getting Started with Azure Cognitive Services
Now that you have an Azure Cognitive Services instance and know where to find its keys and endpoint, you can begin to focus on taking advantage of it in your applications.
The exact steps you’ll take to call the Azure Cognitive Services API will be different based on what programming languages and platforms you are working with and which aspects of Azure Cognitive Services you want to use, but stay tuned for dedicated articles on each one of these services in the near future.