Speech to Text with Azure Cognitive Services in C#
Easy & affordable speech recognition on demand
Speech to text (also called speech recognition) extracts plain text strings from audio files or microphones. Azure’s speech to text offering is part of Azure Cognitive Services and lets developers convert audio to strings at an affordable pay-per-use pricing model.
This allows developers to build intelligent apps that users can interact with using their voices. It’s easy to see how this technology could be used to create a voice-powered chatbot or a transcription app.
In this article we’ll look at how you can use the Azure Cognitive Services SDK to interact with the speech API and easily recognize text from audio using C#.
Setup
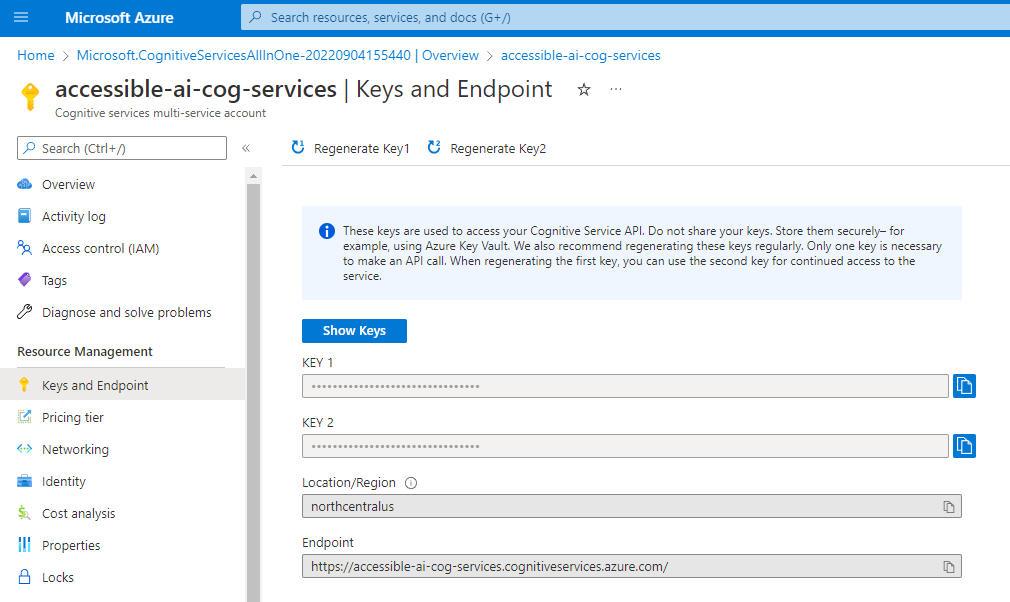
In order to work with speech to text, you must have first created either an Azure Cognitive Services resource or a Speech resource on Azure and have access to one of its keys and the name of the region that resource was deployed to:
Note: you can either use a cognitive services resource or a speech resource for these tasks. Both will have the same information available on their Keys and Endpoints blade. See my article on cognitive services for more information on when to use a computer vision resource instead of a cognitive services resource
Keys can be found on the keys and endpoints blade of your resource in the Azure portal:
Before you can reference these APIs in C# code, you’ll need to add a reference to Microsoft.CognitiveServices.Speech using NuGet package manager or via the .NET CLI via the following command:
dotnet add package Microsoft.CognitiveServices.Speech
See Microsoft’s documentation on NuGet package manager for additional instructions on adding a package reference.
Creating a SpeechConfig
In your C# file you’ll need to add the following using statement to get access to speech classes in the SDK:
using Microsoft.CognitiveServices.Speech;
Once you have that, you can create a SpeechConfig instance. This object is the main object that communicates with Azure and allows us to recognize and synthesize speech.
In order to work with the SpeechConfig we’ll need the key to our cognitive services or speech resource as well as the region it was deployed to.
// These values should come from a config file
string subscriptionKey = "YourSubscriptionKey";
string region = "northcentralus"; // use your region instead

SpeechConfig speechConfig = SpeechConfig.FromSubscription(subscriptionKey, region);
Security Note: your subscription key is a sensitive piece of information because anyone can use that key to make requests to Azure at a pay-per-use cost model and you get the bill for their requests if you’re not careful. Because of this, do not check your key into source control, but rather store it in a configuration file that can be securely stored.
If you don’t know your Azure region or prefer to provide the endpoint instead, there’s also SpeechConfig.FromEndpoint which allows you to provide an endpoint and a key. This approach is more consistent with many of the other cognitive services APIs.
Once you have a SpeechConfig, you can listen to audio from the system mic via the RecognizeOnceAsync method as follows:
// Connect to the speech recognizer and get the result
SpeechRecognitionResult result;
using (SpeechRecognizer recognizer = new(speechConfig))
{
    // Actively listen to the system microphone and wait for speaking to stop
    result = await recognizer.RecognizeOnceAsync();
}
Note: if you do not need asynchronous code and do not want the
awaitkeyword propagating throughout your code, you can remove theawaitkeyword and add a.Resultto the end of the line and it will treat it as a synchronous call instead.
This stores the result of the speech recognition request in our SpeechRecognitionResult instance. We’ll look at that object in the next section.
Interpreting Results
The SpeechRecognitionResult contains a few pieces of information including the Text and a Reason property which is essentially the status of the speech recognition requests.
We can switch on this reason to look at common statuses coming back from Azure and handle them appropriately:
switch (result.Reason)
{
    case ResultReason.RecognizedSpeech:
        // We were able to understand the user
        Console.WriteLine($"Recognized '{result.Text}'");
        break;

    case ResultReason.NoMatch:
        // We couldn't recognize audio from the stream. There may not have been words or the mic may have malfunctioned
        Console.WriteLine("Speech Recognition could not understand audio. Your mic may not be working.");
        break;

    case ResultReason.Canceled:
        // The operation was cancelled before it could complete
        Console.WriteLine("Speech Recognition canceled.");
        break;
}
That’s all we have to do to get audio from the mic into a dotnet string!
Other Workflows
Of course, there’s more we can do with speech to text.
Microsoft also gives us the StartContinuousRecognitionAsync and StartKeywordRecognitionAsync along with their associated Stop variants.
These two methods allow us to transcribe a stream of audio with no definitive end (for continuous recognition) and listen for a pre-trained “wake word” similar to how most voice activated smartphone assistants work.
These topics are more advanced than this article allows, but if you need longer-running live audio transcription or need to make a “hands-free” voice triggered system, Azure cognitive services' speech API has you covered.
Next Steps
I’d encourage you to try speech recognition out on your own in your own apps. In my own experimentation I’ve found it to be remarkably effective at transcribing my words, guessing when I am complete, and handling background noise.
As we close out this article, I’ll take the opportunity to nudge you to investigate the Language Understanding (LUIS) offering in Azure that uses artificial intelligence and natural language processing to map text from users to known intents apps are able to respond to.
Paired together with speech to text, LUIS helps your program not only understand your words but also make a guess as to what those words actually mean, which can bring about some truly impressive results.