Text to Speech with Azure Cognitive Services in C#
Give voice to your applications with a few lines of C# code
Text to speech, or speech synthesis, lets a computer “speak” to the user using its speakers. Specifically, text to speech takes a string of text and converts it to an audio waveform that can then be played or saved to disk for later playback. In this article we’ll see how text to speech is easy and affordable in Azure Cognitive Services with only a few lines of C# code.
Setup
In order to work with text to speech, you must have first created either an Azure Cognitive Services resource or a Speech resource on Azure and have access to one of its keys and the name of the region that resource was deployed to.
Note: you can either use a cognitive services resource or a speech resource for these tasks. Both will have the same information available on their Keys and Endpoints blade. See my article on cognitive services for more information on when to use a computer vision resource instead of a cognitive services resource
Keys can be found on the keys and endpoints blade of your resource in the Azure portal:
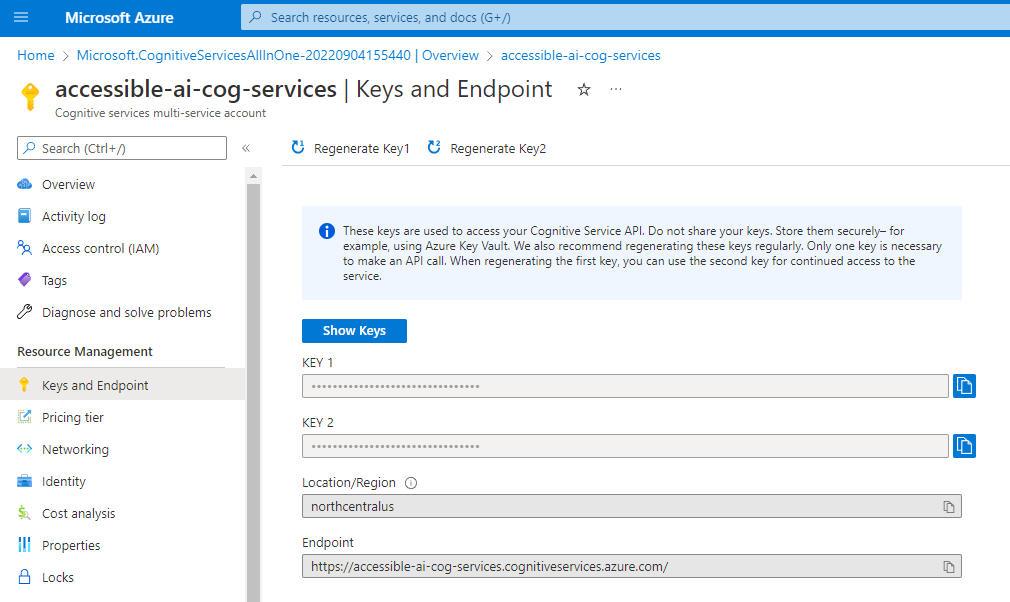
It does not matter which of the two keys you use. Microsoft gives us two keys so you can swap an application between keys and then regenerate the old key to keep these credentials more secure over time.
Before you can reference these APIs in C# code, you’ll need to add a reference to Microsoft.CognitiveServices.Speech using NuGet package manager or via the .NET CLI via the following command:
dotnet add package Microsoft.CognitiveServices.Speech
See Microsoft’s documentation on NuGet package manager for additional instructions on adding a package reference.
Creating a SpeechConfig
In your C# file you’ll need to add the following using statement to get access to speech classes in the SDK:
using Microsoft.CognitiveServices.Speech;
Once you have that, you can create a SpeechConfig instance. This object is the main object that communicates with Azure and allows us to recognize and synthesize speech.
In order to work with the SpeechConfig we’ll need the key to our cognitive services or speech resource as well as the region it was deployed to:
// These values should come from a config file
string subscriptionKey = "YourSubscriptionKey";
string region = "northcentralus"; // use your region instead

SpeechConfig speechConfig = SpeechConfig.FromSubscription(subscriptionKey, region);
Security Note: your subscription key is a sensitive piece of information because anyone can use that key to make requests to Azure at a pay-per-use cost model and you get the bill for their requests if you’re not careful. Because of this, do not check your key into source control, but rather store it in a configuration file that can be securely stored.
Choosing a Voice
Azure Cognitive Services offers a wide variety of voices to use in speech. These voices represent different genders, languages, and regions throughout the world and can give your applications a surprisingly human touch.
Now that we have the SpeechConfig instance, we need to tell it which of these voices it should use for our application.
Since I’m located in the United States and speak English, I go to Microsoft’s speech service language support page and look at the en-US voices.
There are a wide variety of voices, but the voices ending with Neural use neural networks to make the generated speech sound more natural and human-like.
It’s normal to try several different voices and phrases for each voice until you find one you like for your application. In our sample here, I’ll go with en-US-GuyNeural simply because I used it recently on another projects.
Once we have our voice picked, you can set it into the SpeechConfig’s SpeechSynthesisVoiceName property as follows:
speechConfig.SpeechSynthesisVoiceName = "en-US-GuyNeural";
Now your speech config is ready to start talking.
Speech Synthesis with Azure Cognitive Services
In order to make noise, we’re going to need a SpeechSynthesizer. This is a memory-intensive class that implements IDisposable so we’ll need to wrap it in a using statement for responsible handling of system resources.
Next, we’ll call the SpeakTextAsync method on our SpeechSynthesizer. This will call out to the Cognitive Services APIs on Azure, get back the audio data and store it in a SpeechSynthesisResult instance. This also has the side effect of actually speaking the voice aloud using your system speakers.
Sample code for this is as follows:
string message = "Hello there!";

using (SpeechSynthesizer synthesizer = new SpeechSynthesizer(speechConfig))
{
    using (SpeechSynthesisResult result = await synthesizer.SpeakTextAsync(message))
    {
        Console.WriteLine($"Speech resulted in status: {result.Reason}");
    }
}
Note here that we have one using statement nested inside of the other one. This is important because the SpeechSynthesisResult instance has the full audio data associated with it, which could have a very large memory footprint for long audio samples, so it’s important to dispose this result once it is no longer needed.
The code above prints out the Reason or status of the result, which displays the following:
Speech resulted in status: SynthesizingAudioCompleted
For very simple usages of SpeakTextAsync, this is all you need as simply calling the method will result in audio reaching the speakers.
Saving Audio to Disk
If your application frequently needs to generate speech from the same strings every time, it’s likely more cost effective to use Azure Cognitive Services once to generate an audio file and then save that audio file into a .wav file on disk. This .wav file could then be played any number of times in the future without needing to regenerate it from the cognitive services speech API.
We can write out the audio file to disk in a number of different ways, but perhaps none more simple than a File.WriteAllBytes call as listed below:
using (SpeechSynthesizer synthesizer = new(speechConfig))
{
    using (SpeechSynthesisResult result = await synthesizer.SpeakTextAsync(message))
    {
        File.WriteAllBytes("output.wav", result.AudioData);
    }
}
This will write the audio data to a file named output.wav in the application’s runtime directory, creating that file if it needs to. This file can then be used anywhere a normal wav file could.
Pricing and Next Steps
As with other things in Azure Cognitive Services, text to speech is available at a flexible pay-per-use model. At the time of this writing, speech synthesis was $1 per audio hour in the United States. Additionally, a free plan for low utilization scenarios was also available. However, you should always check the latest pricing information for your Azure region before building an application using a pay-per-use API like Azure Cognitive Services.
Ultimately, text to speech is a very affordable and appealing feature to add to your applications whether you generate the audio every time you need it or if you use the API to generate and save files for later use.
Finally, I should point out that text to speech supports both plain text strings and speech synthesis markup language (SSML). SSML is helpful for more advanced speech scenarios where you want nuanced control over the emotion and pronunciation of the computer voice, but it is definitely more involved than simply passing a string to the API.
I encourage you to try adding text to speech to your latest app and see where you can take it. For added benefit you can also investigate speech to text along with text to speech to create a conversational and engaging application experience.