Sentiment Analysis with Azure Cognitive Services in C#
Measuring user sentiment in text using the Azure Cognitive Services SDK
Sentiment analysis gives us valuable insight into user attitude behind text. We can use sentiment analysis to determine if reviews, tweets, or messages are generally positive, negative, neutral, or mixed. Azure Cognitive Services gives us an easy way of measuring user sentiment in text using the Cognitive Services SDK.
In this article we’ll explore using C# and the Azure SDK or REST requests to determine the sentiment of user text. We’ll then look at how you can take those results and display a result to a user.
In order to get the most out of this article you should:
- Have an Azure Cognitive Services instance created in Azure
- Understand the basics of C# programming
Adding a Reference to the Azure Cognitive Services Language SDK
Before we can work with Azure Cognitive Services, we need to install the latest version of the Azure.AI.TextAnalytics package in Visual Studio using NuGet package manager.
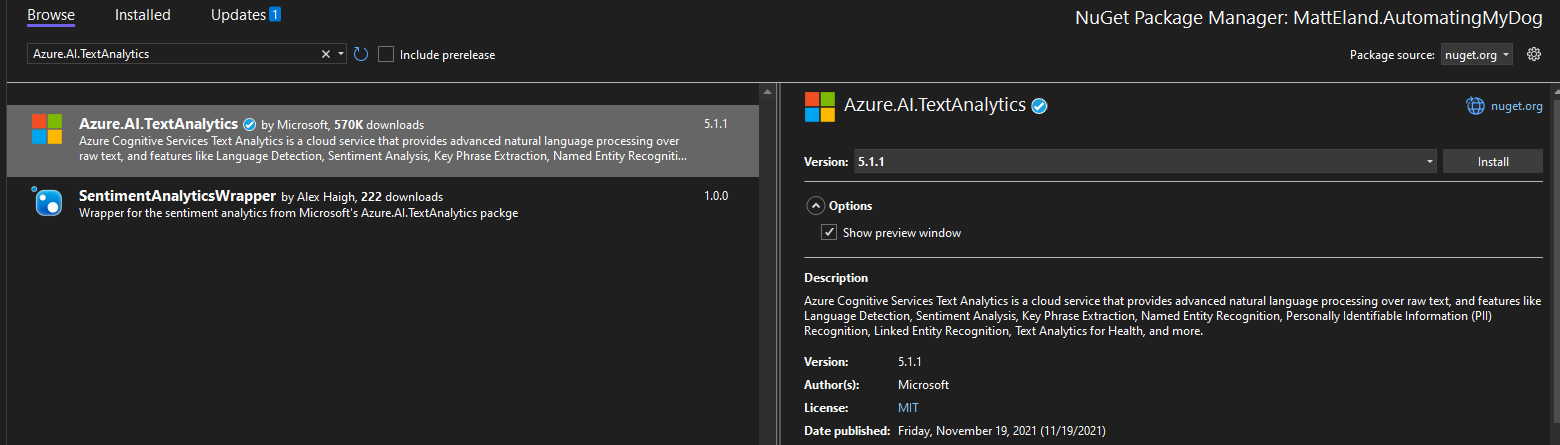
Caution: do not use
Microsoft.Azure.CognitiveServices.Language.TextAnalytics. This is the old version of this library and it has some known bugs.
See Microsoft’s documentation on NuGet package manager for additional instructions on adding a package reference.
Note: Adding the package can also be done in the .NET CLI with
dotnet add package Azure.AI.TextAnalytics.
Creating a TextAnalyticsClient Instance
Next, we’ll add some using statements to the top of our C# file:
using Azure;
using Azure.AI.TextAnalytics;
These allow us to use classes in the TextAnalytics namespace.
Next, we’ll need a reference to our key and endpoint. These can be found on the Keys and Endpoints blade of your cognitive services instance in the Azure portal.
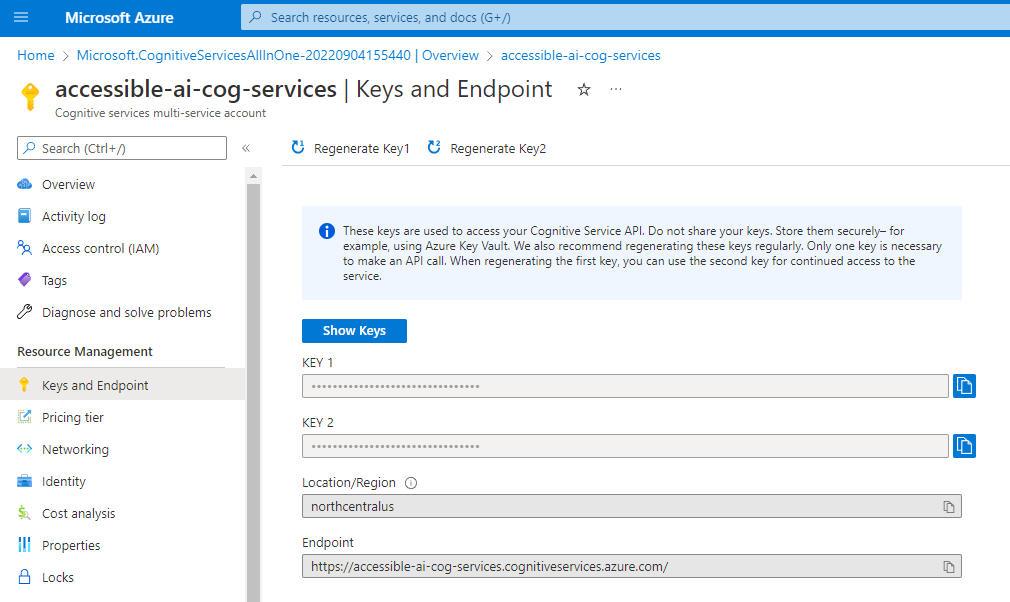
If you are using a single Azure Cognitive Services instance, you should use one of that service’s keys and its endpoint. If you wanted an isolated service and created a stand-alone Language Service, you would use that service’s key and endpoint instead.
// These values should come from a config file and should NOT be stored in source control
string key = "YourKeyGoesHere";
Uri endpoint = new Uri("https://YourCogServicesUrl.cognitiveservices.azure.com/");
Important Security Note: In a real application you should not hard-code your cognitive services key in your source code or check it into source control. Instead, you should get this key from a non-versioned configuration file via
IConfigurationor similar mechanisms. Checking in keys can lead to people discovering sensitive credentials via your current source or your source control history and potentially using them to perform their own analysis at your expense.
Next, we’ll need to authenticate with a TextAnalyticsClient. This object will handle all communications with Azure Cognitive Services later on.
// Create the TextAnalyticsClient and set its endpoint
AzureKeyCredential credentials = new AzureKeyCredential(key);
TextAnalyticsClient textClient = new TextAnalyticsClient(endpoint, credentials);
With the textClient created and configured, we’re ready to start detecting sentiment from sentences.
Analyzing Sentiment
Okay, next let’s grab some text from the user. For us this will be as simple as reading it from Console.ReadLine:
Console.WriteLine("What text would you like to analyze?");
string text = Console.ReadLine();
Now it’s time to actually send our text to Azure to analyze.
We do this with the following C# code:
// Detect Sentiment
Response<DocumentSentiment> sentimentResponse = textClient.AnalyzeSentiment(text);
DocumentSentiment sentiment = sentimentResponse.Value;
This will send a REST POST request to https://YourCogServicesUrl.cognitiveservices.azure.com/text/analytics/v3.1/sentiment?showStats=false&stringIndexType=Utf16CodeUnit. Note that some of the query string parameters here represent optional parameters to the AnalyzeSentiment method.
If you’re curious, the body of that REST request looks like the following:
{
    "documents":[
        {
            "id":"0",
            "text":"At first I thought I adored the little eatery. However, when my meal came out it was cold, disgusting, and contained a dead fly!",
            "language":"en"
        }
    ]
}
Note that the language defaulted to “en” for English. If you wanted to, you could have specified a different language code as a parameter to AnalyzeSentiment. Of course, you could also use the language detection features of cognitive services to provide this based on a prior call to the cognitive services API.
Microsoft also gives us an AnalyzeSentimentBatch method that allows you to specify multiple strings instead of one string. Additionally, there are Async versions of both AnalyzeSentiment and AnalyzeSentimentBatch.
Another important note is that this REST request includes an Ocp-Apim-Subscription-Key header containing your cognitive services key. This is how Microsoft knows that you’re allowed to make the request to that cognitive services endpoint. If you fail to include this header or use the wrong key, your call will not succeed.
Understanding Sentiment Results
Now that we’ve seen how to make a request and what that REST request looks like, let’s take a look at the JSON response to that request:
{
    "documents":[
        {
            "id":"0",
            "sentiment":"mixed",
            "confidenceScores":{
                "positive":0.49,
                "neutral":0.0,
                "negative":0.5
            },
            "sentences":[
                {
                    "sentiment":"positive",
                    "confidenceScores":{
                        "positive":0.98,
                        "neutral":0.0,
                        "negative":0.01
                    },
                    "offset":0,
                    "length":47,
                    "text":"At first I thought I adored the little eatery. "
                },
                {
                    "sentiment":"negative",
                    "confidenceScores":{
                        "positive":0.0,
                        "neutral":0.0,
                        "negative":0.99
                    },
                    "offset":47,
                    "length":81,
                    "text":"However, when my meal came out it was cold, disgusting, and contained a dead fly!"
                }
            ],
            "warnings":[]
        }
    ],
    "errors":[],
    "modelVersion":"2022-06-01"
}
That’s a lot, but we see that the cognitive services API returned back an overall sentiment as well as sentiments for each sentence we gave it. Additionally, each sentence and the overall message has a confidenceScores object containing confidence values for positive, neutral, and negative sentiments. These confidence scores range from 0 to 1 with 1 meaning 100 % confidence.
Thankfully, if we’re using C# and the Azure SDK, we don’t need to worry about deserializing this JSON document because the following line does that for us:
DocumentSentiment overall = sentimentResponse.Value;
Now we can look at the overall sentiment and loop over each sentence’s sentiment as follows:
Console.WriteLine($"Overall Sentiment: {overall.Sentiment}");

// Log confidence scores for the overall sentiment
Console.WriteLine($"\tPositive: {overall.ConfidenceScores.Positive:P}");
Console.WriteLine($"\tNeutral: {overall.ConfidenceScores.Neutral:P}");
Console.WriteLine($"\tNegative: {overall.ConfidenceScores.Negative:P}");

Console.WriteLine();

// Log scores for each sentence
foreach (SentenceSentiment sentence in overall.Sentences)
{
    Console.WriteLine($"'{sentence.Text}' had a sentiment of {sentence.Sentiment}");

    // Log confidence scores for the sentence
    Console.WriteLine($"\tPositive: {sentence.ConfidenceScores.Positive:P}");
    Console.WriteLine($"\tNeutral: {sentence.ConfidenceScores.Neutral:P}");
    Console.WriteLine($"\tNegative: {sentence.ConfidenceScores.Negative:P}");
}
This would display the following text:
What text would you like to analyze?
At first I thought I adored the little eatery. However, when my meal came out it was cold, disgusting, and contained a dead fly!

Overall Sentiment: Mixed
        Positive: 49.00%
        Neutral: 0.00%
        Negative: 50.00%

'At first I thought I adored the little eatery. ' had a sentiment of Positive
        Positive: 98.00%
        Neutral: 0.00%
        Negative: 1.00%
'However, when my meal came out it was cold, disgusting, and contained a dead fly!' had a sentiment of Negative
        Positive: 0.00%
        Neutral: 0.00%
        Negative: 99.00%
Note here that the Sentiment properties are TextSentiment enums. TextSentiment has the values of Positive, Negative, Neutral, and Mixed. This is likely going to be the property you care the most about as you build intelligent apps.
For example, if you wanted to respond to reviews you could write code like the following:
switch (overall.Sentiment)
{
    case TextSentiment.Positive:
        Console.WriteLine("Good attitude! Thanks for the positive review!");
        break;
    case TextSentiment.Negative:
        Console.WriteLine("Hey, can we talk? Are you alright?");
        break;
    case TextSentiment.Neutral:
        Console.WriteLine("Thank you for submitting that!");
        break;
    case TextSentiment.Mixed:
        Console.WriteLine("Wow, it sounds like you had an experience! We'll look over your comments and get back to you.");
        break;
}
And that’s it! Sentiment analysis is easy with Azure Cognitive Services and C#.
It’s not too hard to see how this simple technology could be used to analyze product reviews, social media feeds, or even articles, books, or speech transcripts. You could also use this technology to build a chatbot that can guess at the user’s emotional state based on their words.
I hope you have fun adding little bits of awareness to your applications using Azure Cognitive Services and sentiment analysis.