Creating and deploying a Microsoft Bot Framework Bot with the SDK
Using the Bot Framework v4 SDK, C#, and Azure to Build Chatbots
Creating and deploying a bot using Microsoft Azure and the Bot Framework SDK has a few unusual gotchas. In this article I’ll walk through the basics of creating and deploying a starter bot. We’ll walk through creating and configuring the Azure resources, creating the project in Visual Studio using Bot Framework SDK templates, testing the bot locally, deploying it to Azure, and then hosting the bot on a web page.
This article can be used as a step-by-step tutorial or a troubleshooting reference.
If you’d like to follow along you’ll need:
- An Azure account
- Visual Studio 2022 or later with .NET 6
- Bot Framework v4 SDK Templates
- Bot Framework Emulator
Creating a Bot with the Bot Framework SDK
Let’s start by creating our bot and testing it out locally.
Create the Project
If you haven’t already, make sure you’ve installed both Visual Studio 2022 or later along with the Bot Framework v4 SDK Templates.
Next, open up Visual Studio and create a new project.
When prompted to select a template, find the Echo Bot (Bot Framework v4 - .NET Core 3.1) C# template under the AI Bots category as shown below:
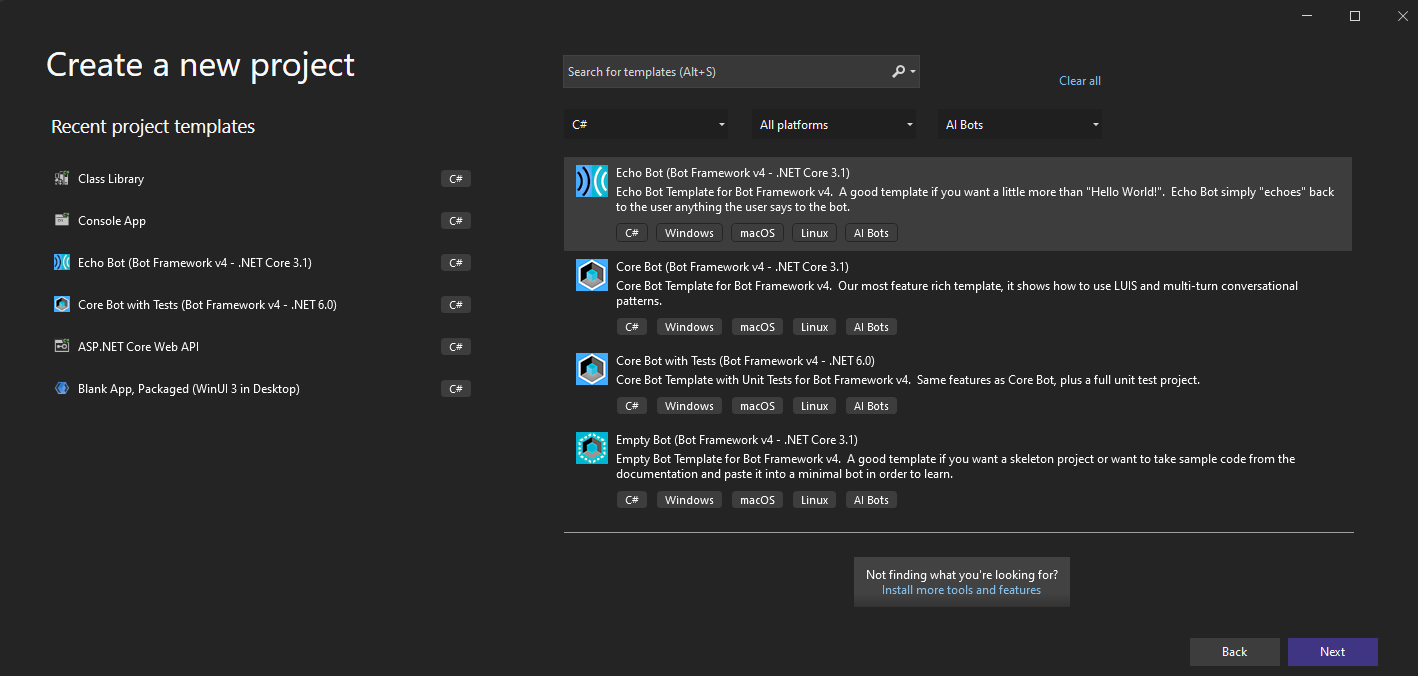
Note: Even though the Echo Bot template says .NET Core 3.1, I’ve observed that the Bot Framework v4 SDK projects do not currently build under 2019 or earlier due to .NET 6 dependencies, so you will need to be on Visual Studio 2022 or later.
Click next, then name your project and select its directory before clicking create.
The created application should now be open in Visual Studio.
An important note for those of you familiar with ASP.NET development: bot projects are built on top of ASP.NET Web APIs so you should be very familiar with things like Startup.cs, appsettings.json, and the Controllers folder.
This particular template is very simple and will just reply to the user with the text they just typed. However, this level of complexity is fine for an exploration of deploying and configuring bots.
Running your Bot Locally
Now that we’ve created our simple application, run the bot project by hitting F5 in Visual Studio or clicking the green triangle in the toolbar to run IIS Express.
Your browser should open and you should see something like the following:
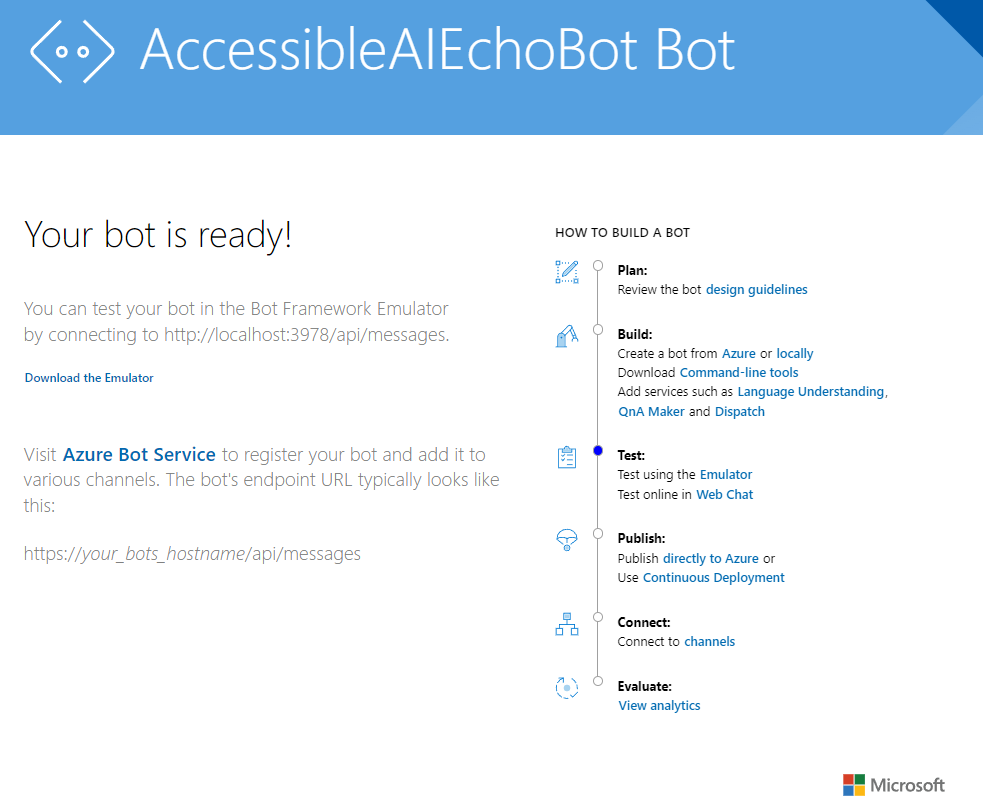
Take note of the URL note on connecting to http://localhost:3978/api/messages. We’ll use that URL next.
Testing the Bot with the Bot Framework Emulator
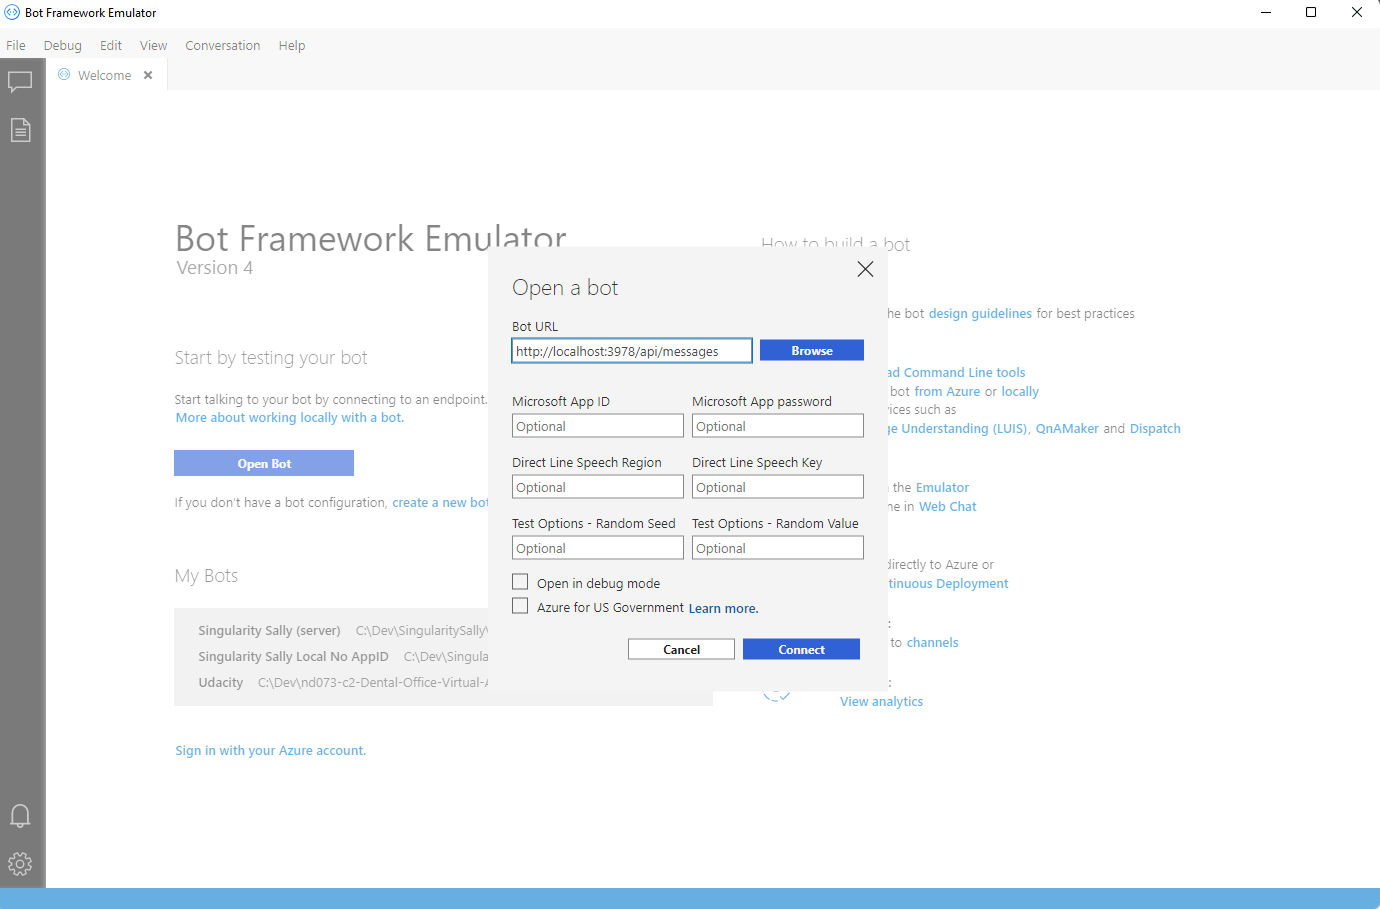
Now that your bot is running on your machine, open up Bot Framework Emulator (V4) and click Open Bot.
Next, set your Bot URL to http://localhost:3978/api/messages, leave the other fields blank, and click connect.
The left pane should now say "Hello and welcome!". This is the starter greeting text from your bot.
Type something into the message bar in the bottom and hit enter or click the send button.
The bot should reply with "Echo: " and then whatever you said.
If you click on the message from the bot, you’ll see additional details about the message in the pane to the right.
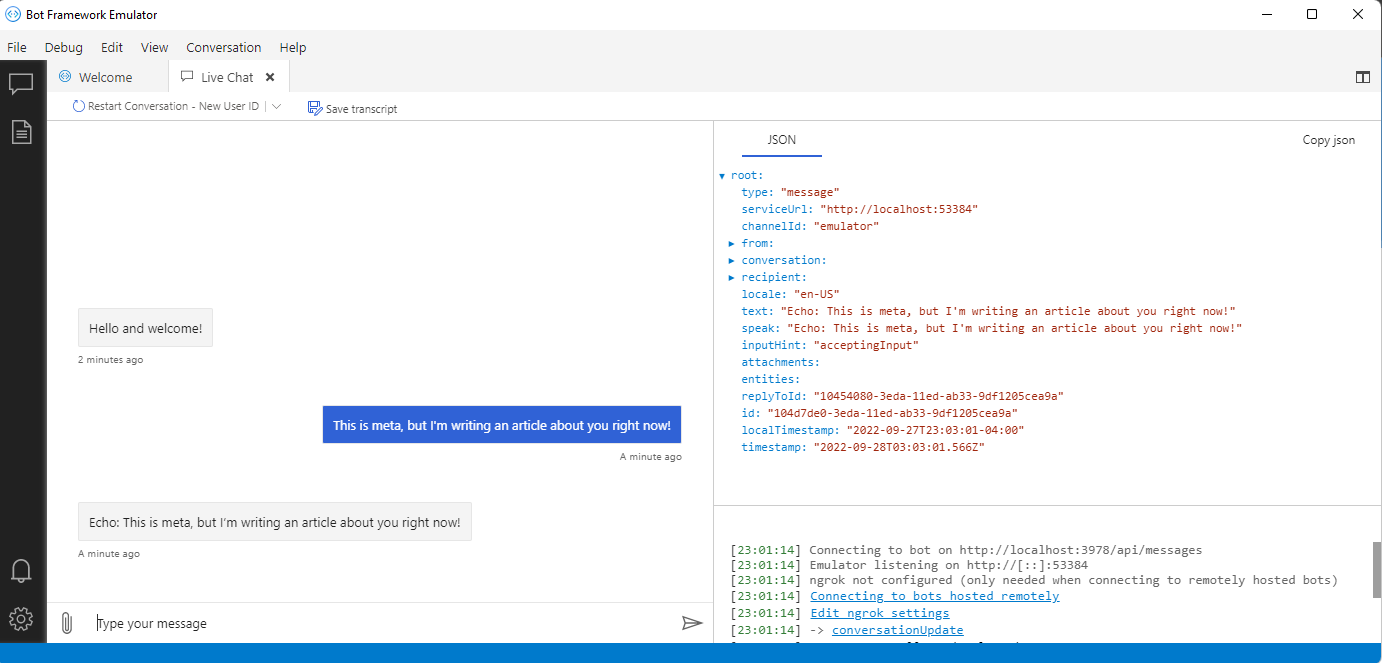
While there’s a lot more we can do with Bot Framework Emulator, this is good enough for our purposes to make sure the bot is healthy and responsive.
Next we’ll look at deploying our simple bot to Azure.
Creating Resources in Azure
Bot Framework bots are actually two separate resources: an App Service to host the bot’s code and an Azure Bot to act as a management point for integrating the bot into various channels such as web chat, Slack, and Teams.
Creating the Azure Bot
First we’ll create an Azure Bot resource.
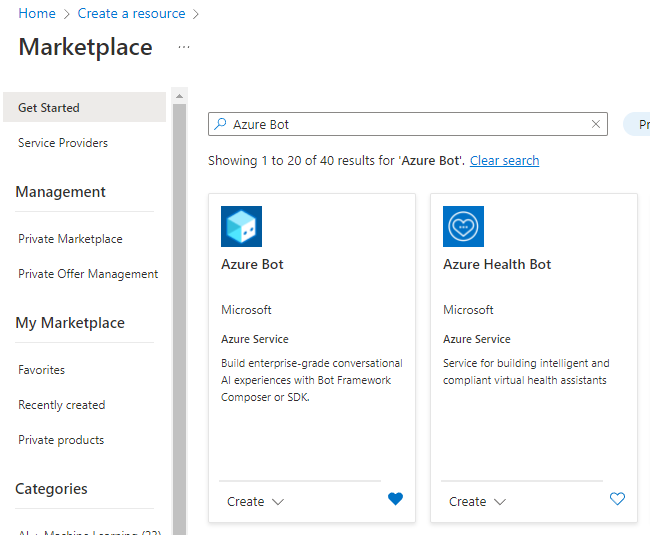
Log in to the Azure portal and click Create a Resource.
Next, search for Azure Bot and click Create.
You’ll need to give your bot a unique handle that’s appropriate for what you’re trying to do. I’m going to call mine AccessibleAIEchoBot, but you may want to include your name in yours for uniqueness.
Next, specify the resource group for your bot. I strongly recommend creating a new resource group for each bot that you build as it makes it easier to manage resources related to that bot.
For Pricing, I recommend changing your Pricing tier from Standard to Free during development of any bot for cost savings.
Important: when prompted for your Microsoft App ID, make sure you leave User-Assigned Managed Identity as the selected option for Type of App as this will govern how your app service needs to authenticate against the bot.
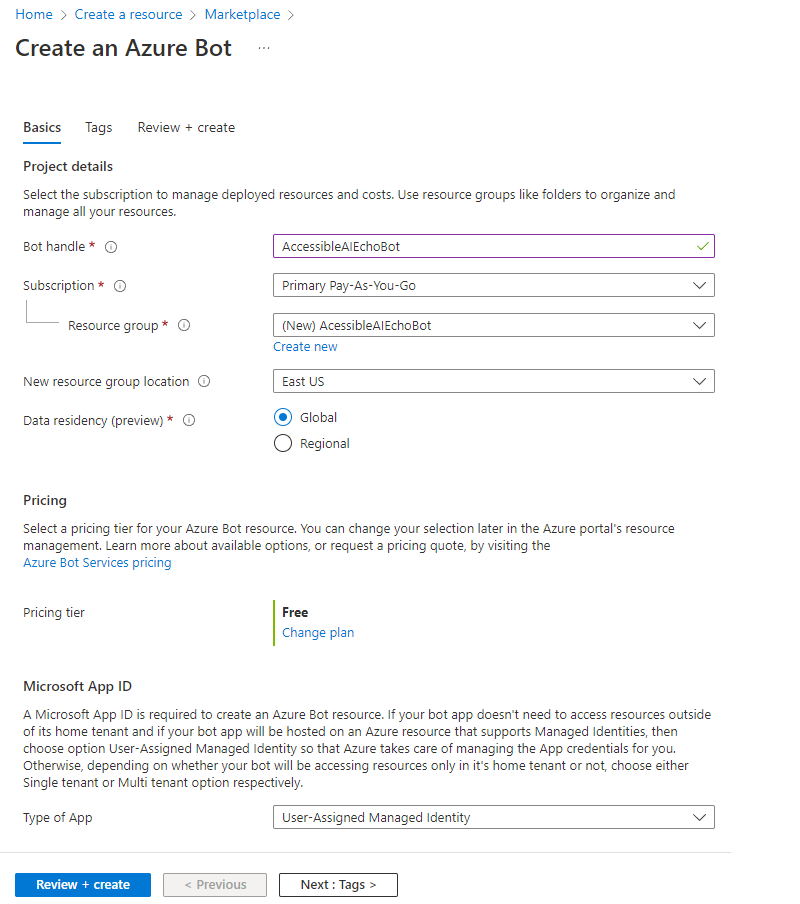
Finally, leave Create new Microsoft App ID selected and click Review + Create and finally click Create to create your Azure Bot resource.
Next, let’s create the App Service.
Deploying our Bot to a new App Service
Now that we’ve created the Azure Bot, let’s go back to Visual Studio and publish our bot as a new app service.
Stop the service if it is currently running, then right click on the project in Solution Explorer and click Publish…
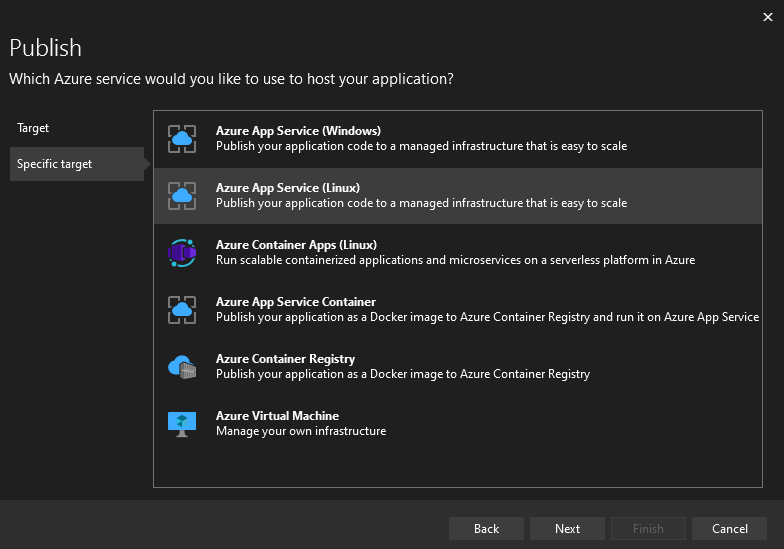
Select Azure as the target and then click Next.
Next, select the operating system you want to use. While Microsoft recommends Windows, the Linux plans tend to be cheaper so I tend to pick them when working on new development work
At this point you may need to log in to your Azure account if you haven’t before.
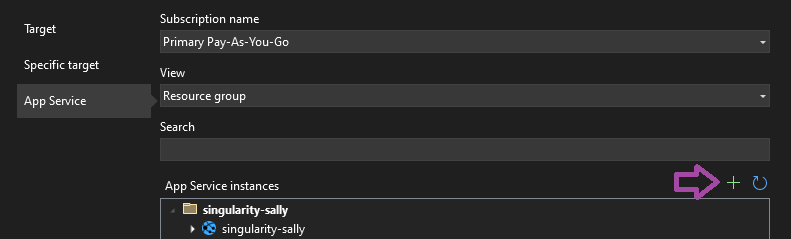
Once you’re logged in, select App Service and then click the green plus icon to create a new App Service.
Next, select your resource group you created earlier.
I also recommend customizing the name of your App Service here.
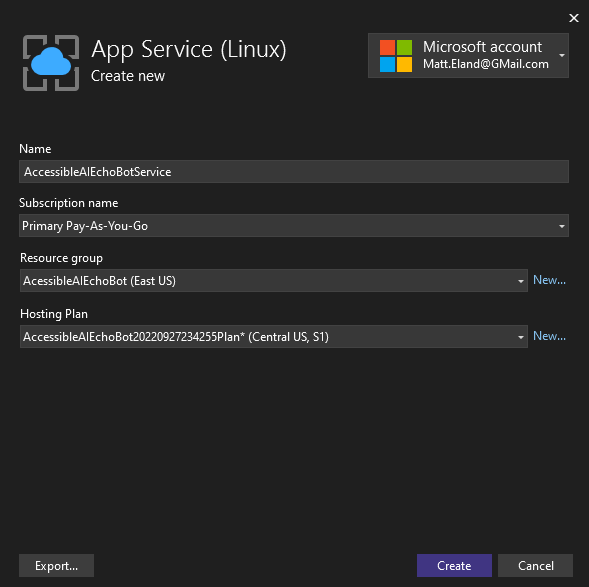
Finally, click Create and the new App Service resource will be created for you on Azure.
Once that completes you’ll see a final display of your app service with your app service selected. Click Finish to finalize the deployment profile.
Important Note: Your app is not yet deployed. This just created a deployment profile and an empty app service to deploy it into.
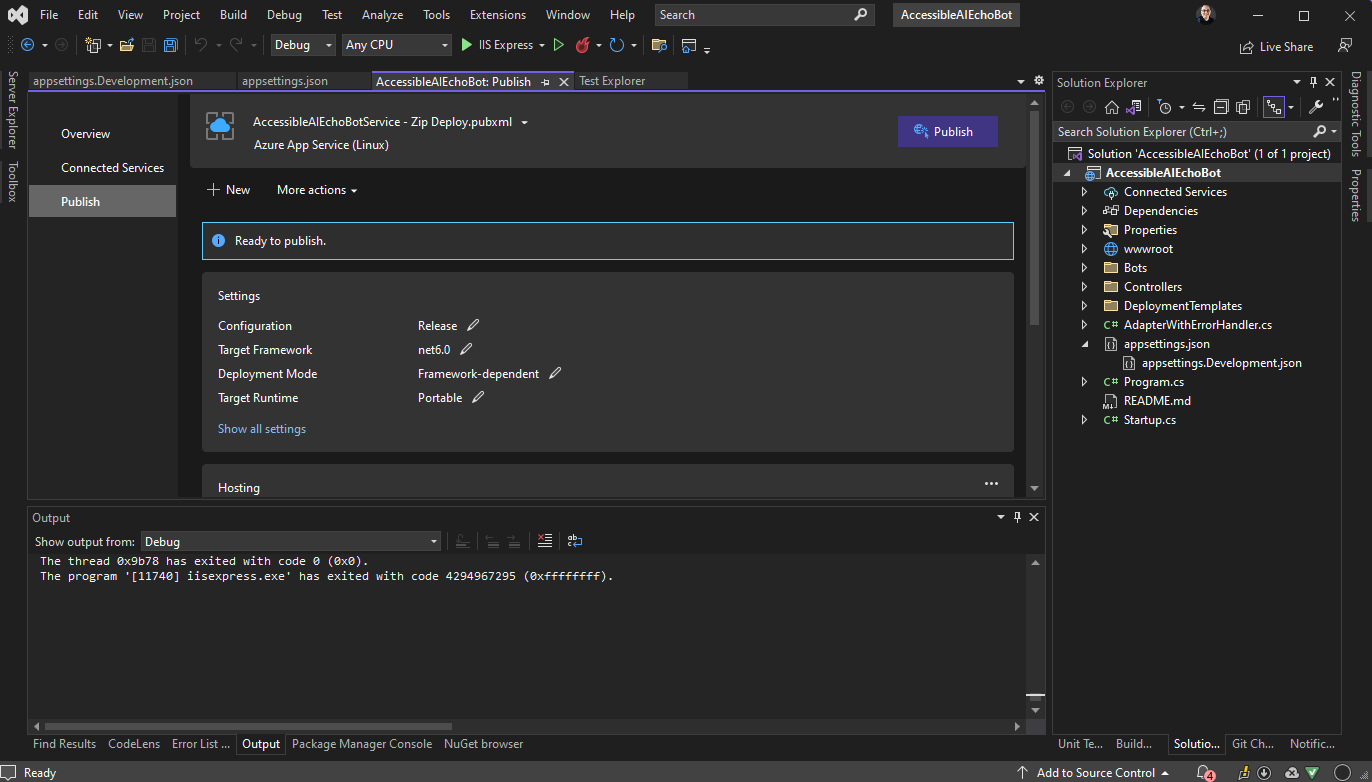
Finally, click Publish in the header. This step will build your application, zip up the deployment artifacts, and then upload them to Azure into your app service.
Once it completes, your browser should open a window with the same bot running window you saw before.
Billing Note: your new app service was likely created under a production service tier which has a production-level monthly cost. You probably don’t want this while developing a bot, so make sure to change it later.
Connecting the Azure Bot and App Service
In order for our App Service and Azure Bot to communicate, we’ll need to make a few configuration changes.
Customizing the App Service Plan
In order to make sure you aren’t billed at a production level for your resource, go into the Azure portal and find your resource group, then locate the App Service Plan inside of it.

Click into that App Service Plan and then click on the Scale Up (App Service plan) blade on the side.
Review your options for various servers and pick one that meets your development needs.
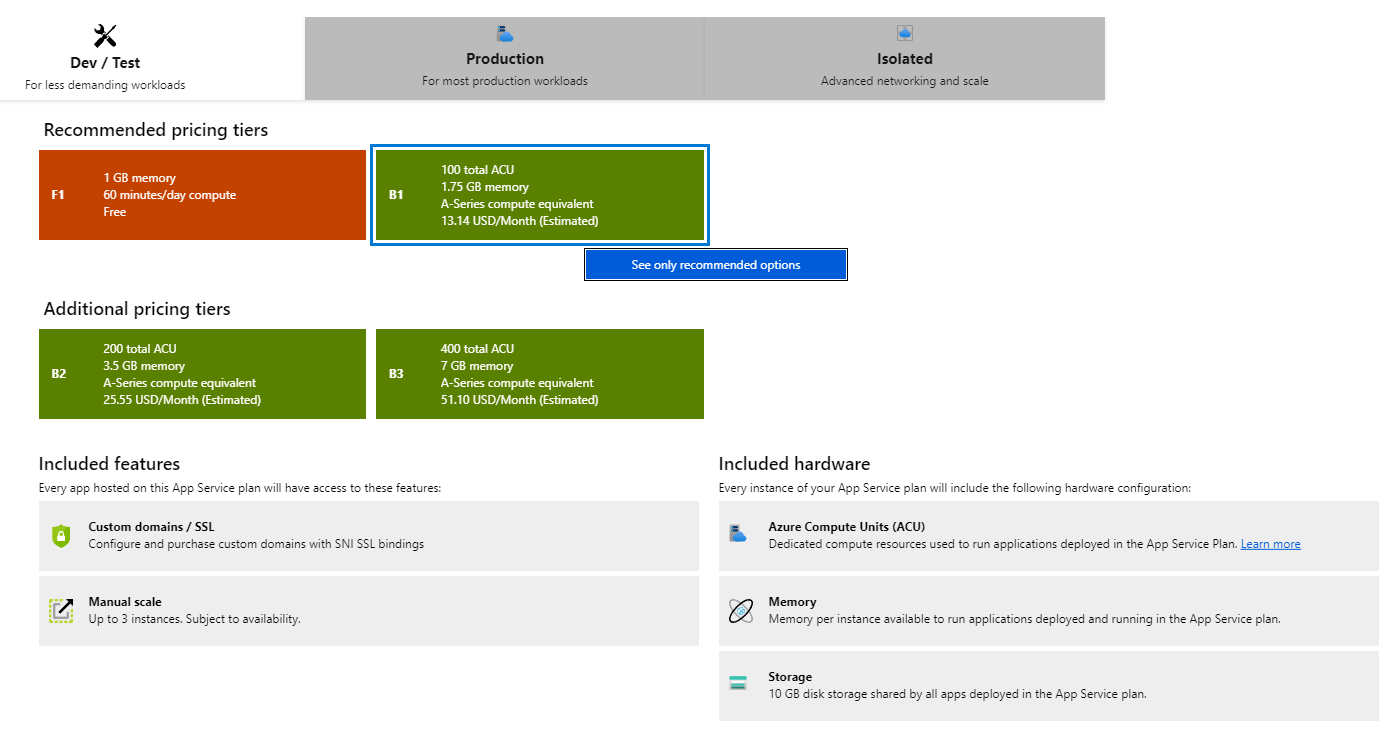
I tend to pick Dev / Test B1 plans on Linux App Service plans when doing application development.
Once you’ve selected a tier you’re happy with, click Apply.
Granting Azure Bot Permissions to the App Service
In order to avoid authentication errors later on, we’ll need to add the App Service to the managed identity that was created for the Azure Bot.
If you are still inside of your app service plan, click on the Apps blade on the sidebar and then on the name of your app service. If you are elsewhere, you can use the search bar to find your app service by its name or resource group.
Next, click on the Identity blade and then click on the User assigned tab at the top.
You should see an empty list of identities here.
Click Add user assigned managed identity to bring up the sidebar, then click on your bot’s managed identity to select it. Finally, click Add to add it to the list of managed identities our App Service has.
This should prevent a number of authorization issues later on.
Pointing the Bot to the App Service
Next, let’s tell our bot where it can find the app service it is associated with.
Click on the Overview blade of the App Service and copy the URL to the clipboard. For me this was https://accessibleaiechobotservice.azurewebsites.net but it will be different for different bot names.
Once you have this URL copied, find your Azure Bot in Azure using the search bar.
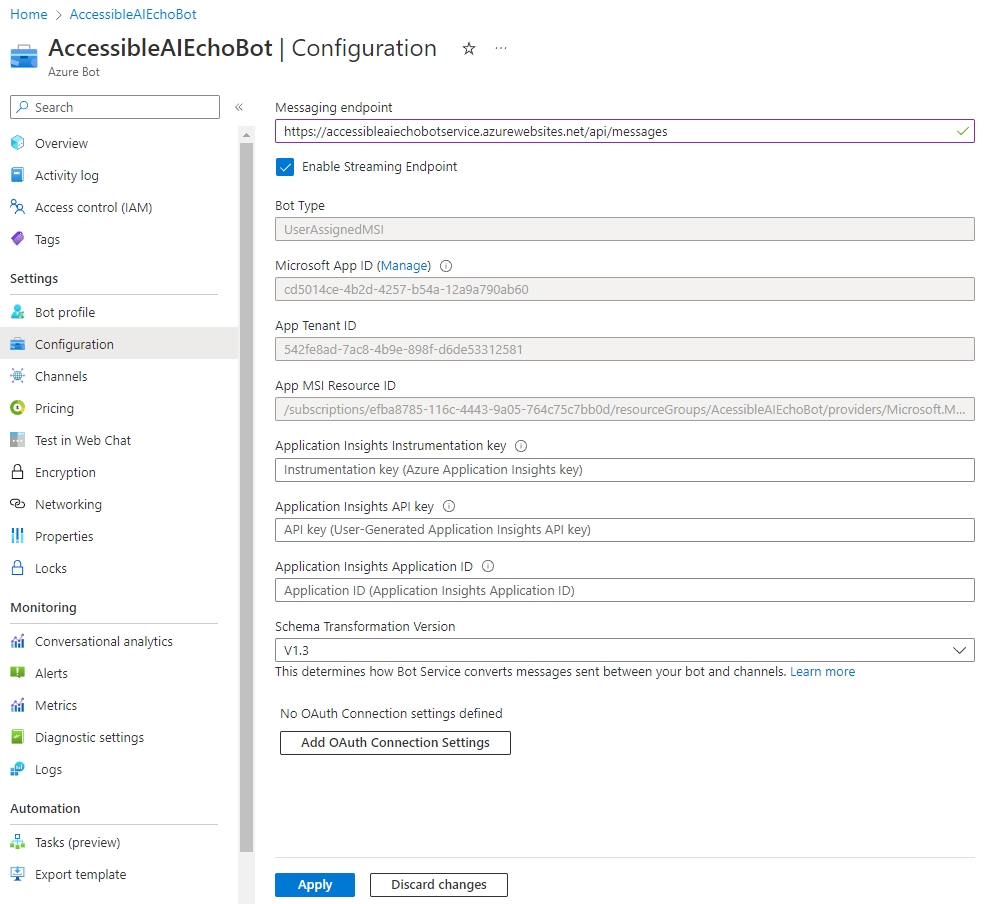
Once in your Azure Bot, click on the Configuration blade.
In the Messaging endpoint, paste your URL there and add /api/messages to the end of it.
For example, my URL from earlier becomes https://accessibleaiechobotservice.azurewebsites.net/api/messages.
Check the “Enable Streaming Endpoint” checkbox as well and then click Apply.
Finding your App ID and Tenant ID
We’re nearly there, but not quite there yet.
The last step for us is to set some configuration settings for the bot into the App Service as setting.
Before we go back to the App Service, click on the Configuration blade of the Azure Bot and then click Manage next to the Microsoft App ID.
This will take you to the Azure Bot’s managed identity. This is the same managed identity we shared with the App Service earlier.
While some of the values we’ll need are on the overview blade, all of the values we’re looking for can be found on the Properties blade, so let’s go there instead.
Here, take note of the Tenant id and Client id.
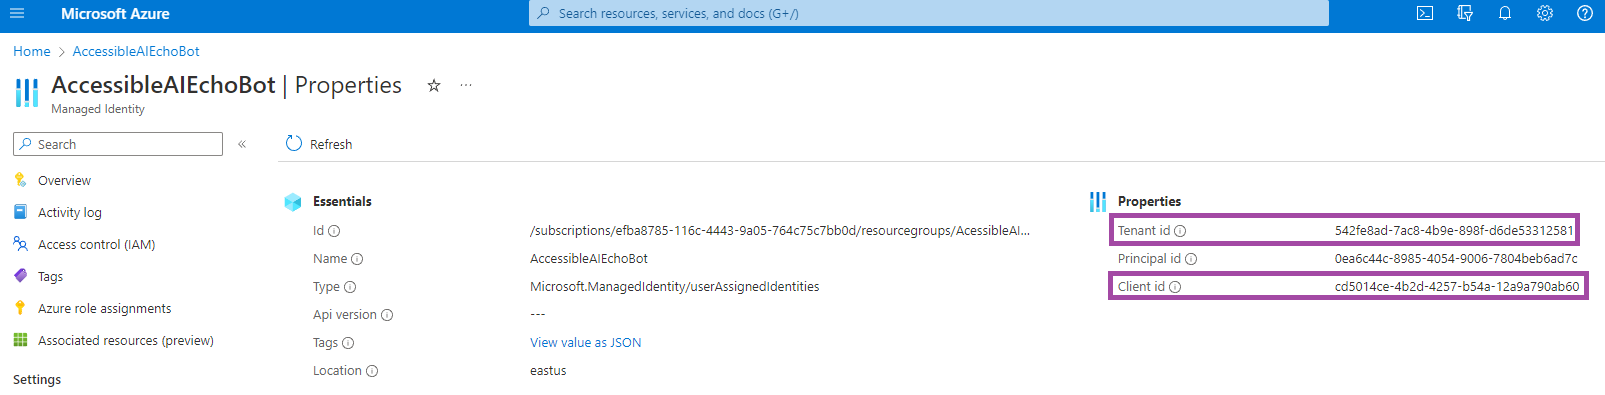
The Client id is what we’ll need later on for our MicrosoftAppId.
The Tenant id will be used wherever we need MicrosoftAppTenantId.
Copy these two values and paste them somewhere where you can remember which one was the client Id and which one was the tenant id.
Configuring App ID and Tenant
Next, return to your App Service in the Azure Portal and click on its Configuration blade.
Here we’re going to add 3 different application settings by clicking New application setting.
The first setting will have a name of MicrosoftAppType and a value of UserAssignedMSI.
Your next setting will have a name of MicrosoftAppId and use the value you copied down from your client id earlier.
Your final setting should have the name of MicrosoftAppTenantId and the tenant id’s value.
None of these should be deployment slot settings.
Review these values and then click Save.
Once you confirm, your App Service will restart.
Testing in the Azure Bot
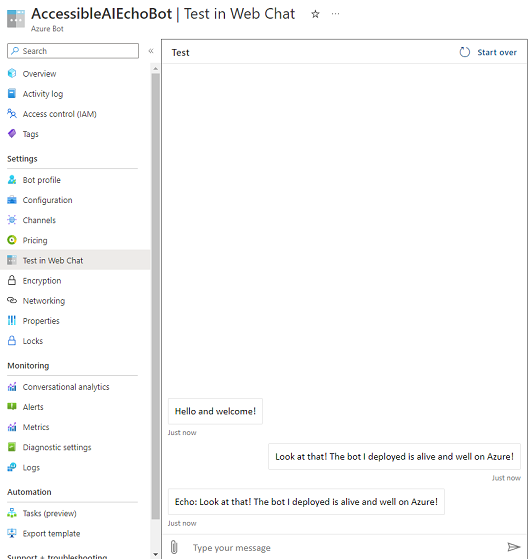
Next, go back into your Azure Bot and click on the Test in Web Chat blade.
If all is well, this should populate with your bot, ready to interact with you.
Of course, there’s a lot of steps in this guide and a lot of things that could go wrong. This article is the result of many hours of debugging these issues.
If you do have issues with your bot, you can always click on the Channels blade in the Azure Bot and then look at the issues next to the Web Chat channel.
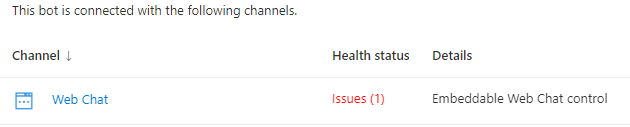
Clicking the word Issues will bring up more details on what went wrong.
Most commonly I forget to add in the app settings into the App Service or I forget to grant the App Service the same managed identity that is used by the Azure Bot.
Deploying Web Chat to your site
So, our bot is up and running, but that’s not terribly helpful for people without access to the Azure Portal.
To help alleviate that, let’s look at how you can quickly add a web chat control to any web page.
Navigate into your Azure Bot in the Azure Portal and then click into its Channels blade.
Next, click Web Chat to bring up details for the web embed control.
Click on Default site to open up a sidebar that contains both an HTML snippet and a pair of secret keys for your bot.
Your embedded code should look something like this:
<iframe src='https://webchat.botframework.com/embed/AccessibleAIEchoBot?s=YOUR_SECRET_HERE'
        style='min-width: 400px; width: 100%; min-height: 500px;'>
</iframe>
Note that your URL will be different than mine, but this control is an iframe that delivers Microsoft’s control to whatever web page you’re developing.
Note also the ?s=YOUR_SECRET_HERE portion of the snippet. You’ll need to reveal one of the two secret keys and use that key’s value in place of YOUR_SECRET_HERE when adding this snippet to your site.
With this basic snippet, you can quickly get a working web embed control into a new or existing web page without much work.
Next Steps
This tutorial covered the basics of configuring an Azure Bot and an App Service along with its App Service Plan.
We also explored local development of a bot using the Bot Framework v4 SDK and Bot Framework Emulator (V4) and Visual Studio to deploy your bot to the app service.
From here, you can make modifications to your bots code as needed and redeploy it to the same app service without having to make further configuration changes.
Important Note: If you followed along with this tutorial, make sure you delete all the resources we created as part of this tutorial to avoid recurring billing charges. This is particularly important for the app service plan.
Stay tuned for more content on how to work with Microsoft Bot Framework and the Bot Framework v4 SDK to deliver conversational AI solutions.