Automating my Dog with Azure Cognitive Services
Building intelligent apps in C# with Azure's AI as a Service offering
I should start this article with a disclaimer: I have not turned my dog into a cyborg, nor do I have any plans to do so.
Instead, this article is the written form of a conference and user group talk I came up with awhile back while thinking “What is the most absurd way I could teach people how to add AI capabilities to existing applications?”..
In this article we’re going to explore how easy it is to add AI vision, speech, and text analysis capabilities to a new or existing application by exploring snippets of a C# app I made to simulate things my dog commonly does.
This content is also available in video form on YouTube
Introducing Jester, the Cairn Terrier
I’d like to briefly introduce you to my dog, Jester. Jester is a Cairn Terrier and is a very intelligent and sweet dog with a severe barking problem.
Jester’s job, as he sees it, is to watch out the window for any activity by local woodland creatures and bark at it incessantly should it arise. He also listens intently to our commands (aside from “stop barking”) and knows a wide variety of words and phrases.
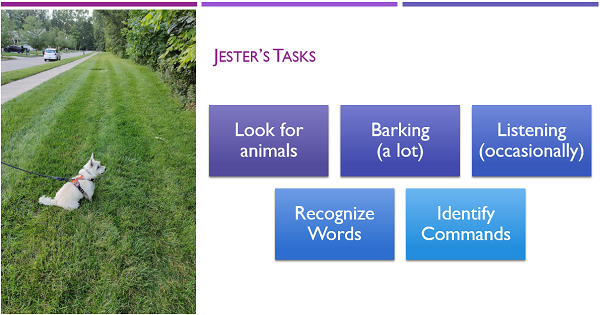
We can summarize Jester’s core responsibilities as the following tasks:
- Look for animals
- Bark when animals are spotted
- Listen to speech
- Recognize known commands in our words
- Respond to Commands (aside from “stop barking”)
It occurred me that a lot of Jester’s tasks can be supported fairly easily with Azure Cognitive Services. To explore this, I built a small app to show how these core features can be provided through simple C# code.
Introducing Azure Cognitive Services
Azure Cognitive Services are a set of related APIs for speech, vision, language, and decision-making that are billed at a per-usage model with very affordable rates.
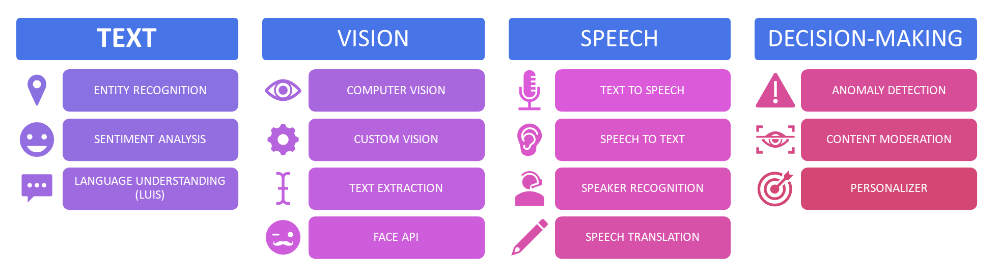
These APIs, and the optional SDKs Microsoft provides to interact with them, allow you to easily interact with pre-trained machine learning models and get their benefits without having to develop, train, test, and deploy your own models. This lets you quickly augment applications with AI capabilities.
The billing is rather reasonable at rates below a penny per API call. That being said, you should always check the pricing page for your region and services of interest before starting a project. For reference, I worked on this project and its demo code for a week or so in August and my overall bill for Azure Cognitive Services that month was only 17 cents.
Note: this article skims the surface on the full capabilities of Azure Cognitive Services as a practical example. See my dedicated article for details on what’s possible with Azure Cognitive Services
Setting up for Cognitive Services
Before we dive into the code, let’s talk about a few things you’re going to need to have in place to work with Cognitive Services.
Create an Azure Cognitive Services Instance
First, you’re going to need an Azure account and will need to create an instance of Azure Cognitive Services.
Note: If you don’t have an Azure account, Microsoft offers free accounts that give many free services for a year and a credit for the first month.
Alternatively, you could create separate resources for computer vision, speech, and language. However, it’s far easier to manage a single cognitive services resource, so this article will assume you’re running under that model.
Getting your Cognitive Services Key
To use the cognitive services APIs you typically need at least a key and an endpoint. Both of these pieces of information can be found in the Keys and Endpoint Blade in the Azure portal inside your cognitive services resource as show below:
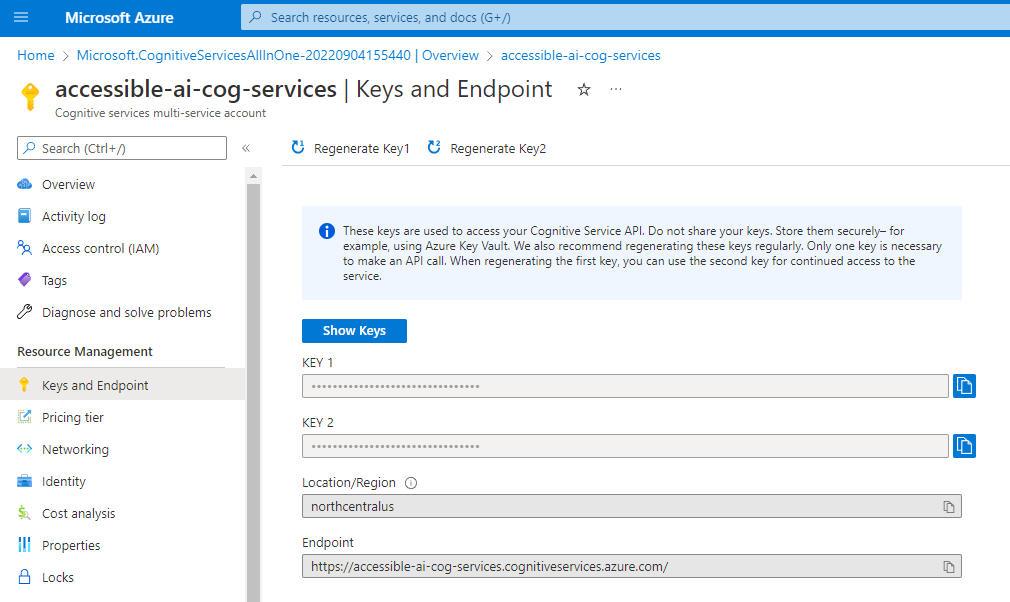
Key 1 and 2 are identical in their functionality, but Microsoft gives you two so you can rotate users to using the other key, then regenerate keys that are not in use. This helps you migrate to new keys over time without disrupting service.
Jumping into Code
For the rest of this article we’ll focus on the C# code needed to interact with Azure Cognitive Services. Before we do that, I want to stress that C# is only one of the languages that you can use to work with Azure Cognitive Services.
Microsoft offers SDKs for .NET, Go, Java, JavaScript, Python, and R. Even if your language is not listed here, all of these features work through a REST API so if you can generate a proper REST request and interpret the result, you can use Cognitive Services even if Microsoft doesn’t officially support your language of choice.
Add Cognitive Services to a .NET Project
Microsoft knows that not everyone will use every aspect of Cognitive Services so they break up their SDK into different packages for different tasks. This way if you’re only working with speech APIs you don’t need to have dependencies on code for vision or text APIs.
For this project, I used the text, speech, computer vision, and language understanding SDKs.
These packages can be installed via NuGet package manager in Visual Studio or by running the following .NET CLI commands:
dotnet add package Azure.AI.TextAnalytics
dotnet add package Microsoft.CognitiveServices.Speech
dotnet add package Microsoft.Azure.CognitiveServices.Vision.ComputerVision
dotnet add package Microsoft.Azure.CognitiveServices.Language.LUIS.Runtime
Using Statements
Once you have dependencies installed, you’ll need to add using statements to your code so Visual Studio can understand what code lives in what namespace.
I wound up using the following using statements, though not every one of these appeared in every source file:
using Azure;
using Azure.AI.TextAnalytics;
using Microsoft.Azure.CognitiveServices.Vision.ComputerVision;
using Microsoft.Azure.CognitiveServices.Vision.ComputerVision.Models;
using Microsoft.Azure.CognitiveServices.Language.LUIS.Runtime;
using Microsoft.Azure.CognitiveServices.Language.LUIS.Runtime.Models;
using Microsoft.CognitiveServices.Speech;
With these setup tasks out of the way, let’s jump into the code for different tasks to start automating Jester.
Image Analysis
The first major task to tackle is Jester’s ability to look out the window and identify squirrels and rabbits that might enter the yard.
We’ll simulate that by making a call out to Azure’s Computer Vision API. Computer vision is a pre-trained deep learning model that can recognize common objects in images and describe the contents of those images.
Since rabbits and squirrels are common objects, the computer vision API works perfectly for my needs.
To start, we need to create a ComputerVisionClient and pass it our cognitive services key and endpoint.
ApiKeyServiceClientCredentials visionCredentials = new("YOUR_COG_SERVICES_KEY");
ComputerVisionClient computerVision = new(visionCredentials);
computerVision.Endpoint = "https://YOUR_URL_HERE.cognitiveservices.azure.com/";
Important Note: The cognitive services key is a piece of sensitive information that should not be checked into source control. If you did, people could use this key to make calls against a cognitive services API and you would get the bill for their usage!
Instead, retrieve your cognitive services key from a configuration file or app setting that is not checked into source control.
With our newly created cognitive services key, we can tell computer vision to analyze an image for us by specifying the image (either in raw data or via a URL) and the types of features to analyze.
After that, we make a call to AnalyzeImageAsync to retrieve an ImageAnalysis result containing the information we requested.
Here’s the code for that process:
// We need to tell it what types of results we care about
List<VisualFeatureTypes?> features = new()
{
    VisualFeatureTypes.Categories,
    VisualFeatureTypes.Description,
    VisualFeatureTypes.ImageType,
    VisualFeatureTypes.Tags,
    VisualFeatureTypes.Objects,
    VisualFeatureTypes.Adult,
    VisualFeatureTypes.Color,
    VisualFeatureTypes.Faces,
    VisualFeatureTypes.Brands,
    VisualFeatureTypes.ImageType
};

// Call out to Computer Vision to get the results
string imageUrl = "https://accessibleai.dev/img/CogServices/Squirrel.png";
ImageAnalysis analysis = await computerVision.AnalyzeImageAsync(imageUrl, features);
If you’re curious, the image that we sent to Azure looks like this:

Once we have the ImageAnalysis result, we can loop over a number of collections inside of it to detail the information returned. Here’s some sample code that displays captions and tags in the image above:
foreach (ImageCaption caption in analysis.Description.Captions)
{
    Console.WriteLine($"{caption.Text} (Confidence: {caption.Confidence:p})");
}

Console.WriteLine("\r\nTags:");
foreach (ImageTag tag in analysis.Tags)
{
    Console.WriteLine($"{tag.Name} (Confidence: {tag.Confidence:p})");
}
The output of this is as follows:
a squirrel standing on its hind legs (Confidence: 54.36%)

Tags:
squirrel (Confidence: 99.97%)
animal (Confidence: 99.96%)
mammal (Confidence: 99.96%)
outdoor (Confidence: 99.43%)
rodent (Confidence: 98.97%)
ground (Confidence: 96.37%)
ground squirrels (Confidence: 95.49%)
grey squirrel (Confidence: 94.58%)
douglas' squirrel (Confidence: 92.84%)
grass (Confidence: 92.12%)
plant (Confidence: 85.96%)
tail (Confidence: 85.41%)
This gave us a remarkable idea of what is in the image as well as confidence with different predictions it made.
In an image, we can also detect individual objects with a bounding box within the image. This can help applications locate and count multiple occurrences of things they’re interested in.
The code is similar to the tagging code above, but because we now have bounding boxes it does get a little more involved:
Console.WriteLine("\r\nObjects:");
foreach (DetectedObject obj in imageAnalysis.Objects)
{
    items.Add(obj.ObjectProperty);

    BoundingRect rect = obj.Rectangle;
    string bounding = $"({rect.X},{rect.Y}):({rect.X + rect.W},{rect.Y + rect.H})";
    Console.WriteLine($"{obj.ObjectProperty} (Confidence: {obj.Confidence:p}) at {bounding}");
}
This tells us exactly where in the image our squirrel is:
Objects:
eastern fox squirrel (Confidence: 56.30%) at (21,31):(250,354)
So here we were able to quickly analyze an image, generate a very accurate caption, tag entities inside of the image, and even get bounding boxes for some of those things.
In the case of our terrier-replacement app, the code to detect if a squirrel, rabbit, or chipmunk is present is fairly simple:
bool shouldBark = analysis.Tags.Select(thing => thing.Name.ToLowerInvariant())
                                .Any(n => n.Contains("Squirrel") ||
                                          n.Contains("rabbit") ||
                                          n.Contains("rodent") ||
                                          n.Contains("dog"));
Of course, the vision API can do other things including:
- Face detection
- Brand detection
- Landmark detection
- Categories
- Adult / Gore / Racy image detection
- Color analysis
- Thumbnail generation
If you’re curious about the full extent of what you can do with image analysis, check out my article on computer vision.
For now, let’s move on to text.
Text Analysis
In order for our simulated dog to be able to make sense of the things we say to him later on, it’s going to need some ability to analyze text.
Cognitive Service’s language APIs work in a similar way to the vision APIs where we must create a client and provide endpoint and authentication information:
Uri endpoint = new("https://YOUR_URL_HERE.cognitiveservices.azure.com/");
AzureKeyCredential credential = new("YOUR_COG_SERVICES_KEY");
TextAnalyticsClient textClient = new(endpoint, credential);
Just like before, it’s important to keep the cognitive services key secure and out of source control.
There’s a lot of things you can do with the text APIs, but you’ll make separate calls for each once.
Here we analyze some text to see what entities we can detect in it:
string text = "Does Jester want to go on a walk in the park?";
Response<CategorizedEntityCollection> recognizeResponse = textClient.RecognizeEntities(text);

Console.WriteLine("Entities:");
CategorizedEntityCollection entities = recognizeResponse.Value;
foreach (CategorizedEntity entity in entities)
{
    Console.WriteLine($"\t{entity.Text} (Category: {entity.Category}) with {entity.ConfidenceScore:P} confidence");
}
That produces the following text:
Entities:
        Jester (Category: Person) with 100.00% confidence
        park (Category: Location) with 98.00% confidence
We can also identify key phrases present in that same text with some very similar C# code:
Response<KeyPhraseCollection> keyPhrasesResponse = textClient.ExtractKeyPhrases(text);
KeyPhraseCollection keyPhrases = keyPhrasesResponse.Value;

Console.WriteLine("Key Phrases:");
foreach (string phrase in keyPhrases)
{
    Console.WriteLine($"\t{phrase}");
}
This gives us more key phrases, but less context on what each one of these things is:
Key Phrases:
        Jester
        walk
        park
Using just these two APIs we could now start to look at entities and key phrases in sentences and scan for recognized commands, but there’s a better way to handle commands through Language Understanding (LUIS) as we’ll see later.
If we wanted to know if the words we were receiving were generally positive, negative, or neutral, we can use the sentiment analysis API for that:
Response<DocumentSentiment> sentimentResponse = textClient.AnalyzeSentiment(text);
DocumentSentiment sentiment = sentimentResponse.Value;

Console.WriteLine($"Overall Sentiment: {sentiment.Sentiment}");
Console.WriteLine($"\tPositive: {sentiment.ConfidenceScores.Positive:P}");
Console.WriteLine($"\tNeutral: {sentiment.ConfidenceScores.Neutral:P}");
Console.WriteLine($"\tNegative: {sentiment.ConfidenceScores.Negative:P}");
To produce the following result:
Overall Sentiment: Neutral
        Positive: 20.00%
        Neutral: 76.00%
        Negative: 5.00%
This added context can be helpful to determine the tone of messages that are being received. After all, most dogs respond more to voice and body language than they do to the actual words someone says!
Text analysis can do a lot more and I’d encourage you to check out my other resources on analyzing text with Cognitive Services. For now, I’ll tease you by highlighting a few other key capabilities:
- Language detection
- Linked Entity Detection
- PII Detection
- Detailed per-sentence sentiment analysis
- Translation
Next, let’s take a look at how we can interpret phrases as commands and respond intelligently.
Language Understanding
Microsoft offers a set of language understanding APIs including the older Language Understanding (LUIS) API and the newer Conversational Language Understanding (CLU) APIs. The SDK for CLU appears to still be under development as it is significantly harder to work with than LUIS at the moment, so this article will feature code from LUIS, but expect future content on CLU once those APIs mature.
With either flavor of language understanding, you must set up a series of intents that represent discrete commands that your application can handle. For this simple application, all we support is Walk and Good Boy, but in a real application you would expect to have more.

Each intent is programmed with a series of utterances that map to that intent.
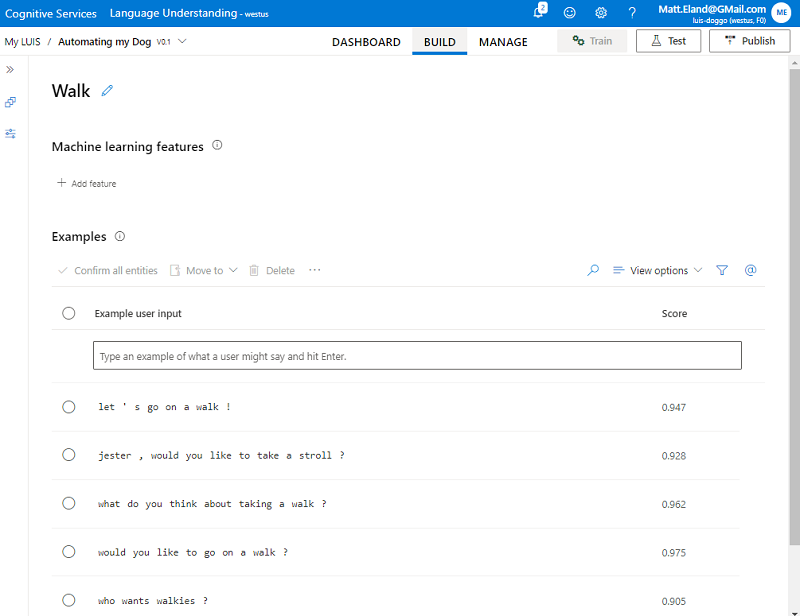
For example, given our Walk intent, the following phrases could all be relevant utterances for that intent:
- Let’s go on a walk!
- Jester, would you like to take a stroll?
- What do you think about taking a walk?
- Would you like to go on a walk?
- Who wants walkies?
Each one of these utterances would be entered into LUIS or CLU for that specific intent:
After that, you then click the train button to fit a machine learning classification model to this dataset. This trained model is then used to map future utterances to the most appropriate intent to support it, given your training intents. This way the model can make intelligent decisions about phrases its never encountered before.
When you think about it, this is actually very similar to how dogs understand humans. Like cognitive services, dogs do not have a deep understanding of language and its grammatical rules. Instead, dogs know a few key phrases mean things that they understand. When you say something new, if it’s close enough to something the dog already knows, the dog will interpret it that way, which gives the illusion of a deeper understanding of language than what is present.
Note: If you want to learn more about LUIS in the portal, check out my article on language understanding
Communicating with LUIS from C#
Let’s jump into the code and see how we can work with a pre-trained LUIS model from C#.
We’ll start in much of the same way by providing our cognitive services key and an endpoint:
ApiKeyServiceClientCredentials credentials = new("YOUR_COG_SERVICES_KEY");
LUISRuntimeClient luisClient = new();
luisClient.Endpoint = "https://YOUR_URL_HERE.cognitiveservices.azure.com/";

// The App ID can be found the LUIS portal
Guid appId = new("129475ea-40aa-49d7-b7ce-c2fe5b3f4a85");
string slotId = "production"; // or "staging"
Note that we need to provide an app ID and a slot ID when working with LUIS. This is because you can have multiple trained LUIS models and each model can be deployed to a production or a staging environment, so Azure needs you to clarify which resources you’re trying to interact with.
Once we have a LUISRuntimeClient and the related configuration elements, we can create a new PredictionRequest and get a PredictionResponse from that:
string message = "Do you want to go on a walk?";

// Call out to LUIS
PredictionRequest request = new(message);
PredictionResponse predictResult = await luisClient.Prediction.GetSlotPredictionAsync(_appId, _slotId, request);

// Interpret the response to identify the matching intent
Prediction prediction = predictResult.Prediction;
string topIntent = prediction.TopIntent;
This will send information about the request to LUIS and get back a prediction response. This response contains information about many different candidate intents as well as the name of the top matching intent. Each intent will have a confidence score. This confidence score is a percent ranging from 0 to 1 with 1 being 100 % confidence.
The results of this call can be helpful for identifying weaknesses in your LUIS model as well as telling the user when the model is uncertain about what they said.
However, the most common thing to do is to look at the TopIntent property associated with the Prediction and respond to that based on the intent that was matched:
switch (topIntent)
{
    case "Good Boy":
        RespondWith("Jester is a good doggo!");
        break;

    case "Walk":
        RespondWith("Why yes, Jester DOES want to go on a walk!");
        break;

    case "None": // Didn't match a specific intent
    default:     // For intents not in code here, but exist in Azure
        RespondWith("I don't understand.");
        break;
}
Note that every LUIS model will have a "None" intent, which you should train with sentences unrelated to your app’s functions. These will be the things your app should express confusion to the user and suggest valid things the user could try.
It is also recommended to handle a default case where the intent was matched, but your code doesn’t have custom logic for it yet. This code may be triggered if someone adds a new intent and retrains the LUIS model but the application has not yet been updated to support this new intent.
LUIS and CLU are impressive technologies that can fuel conversational AI solutions.
Let’s wrap things up by introducing the cognitive services speech APIs.
Speech
Speech in Azure can be broken down into several main categories: speech to text, text to speech, and speech translation.
Our app will take advantage of speech to text to recognize input from the user and text to speech to allow our app to talk back to the user.
Speech Synthesis (Text to Speech)
Text to speech involves using Azure’s speech APIs to translate text into spoken words using a specified voice from Microsoft’s list of voices.
This list includes a variety of genders, regions, and ethnicities and is truly remarkable. The best voices are the ones ending in Neural as they use deep learning to smooth their output to be more human-like in pronunciation and cadence.
The code for authenticating and sending a message follows:
string region = "northcentralus"; // Wherever your Cog Services resource is on Azure

// Authenticate
SpeechConfig speechConfig = SpeechConfig.FromSubscription("YOUR_COG_SERVICES_KEY", region);
speechConfig.SpeechSynthesisVoiceName = "en-US-GuyNeural";

// Generate speech
string message = "I saw a squirrel! Bark bark bark!";
using (SpeechSynthesizer synthesizer = new(speechConfig))
{
    // This line will actually speak the results through your speakers
    using (SpeechSynthesisResult result = await synthesizer.SpeakTextAsync(message))
    {
        // We can save the file to disk for later if we want...
        File.WriteAllBytes("output.wav", result.AudioData);
    }
}
Here we create a SpeechSynthesizer using a SpeechConfig that includes the key, the region, and the name of the voice we want to use.
Next, we call SpeakTextAsync to actually send that voice output to the speakers so the user can hear it.
If we wanted to, we could also save the resulting audio data to a .wav file. This would allow us to generate and save common sound files in advance and not need to rely on Azure Cognitive Services APIs to generate the same audio over and over again. Of course, this doesn’t help if the words we’re saying changes every time or is otherwise unpredictable.
Speech Recognition (Speech to Text)
Speech recognition is actually simpler than speech synthesis. With speech to text we take a SpeechRecognizer and call its RecognizeOnceAsync to retrieve a SpeechRecognitionResult as follows:
// Listen to a speech stream and transcribe it to words
SpeechRecognitionResult result;
using (SpeechRecognizer recognizer = new(speechConfig))
{
    // This will listen via the microphone and wait until a pause occurs
    result = await recognizer.RecognizeOnceAsync();
}
This will wait for the user to say something and then stop talking before the request completes with a RecognizedSpeech result. If the user says nothing or their mic is malfunctioning, the call will wait a few seconds before completing with a NoMatch result.
Note: with speech to text you do not need to specify a
SpeechSynthesisVoiceNameas that only affects text to speech
We can switch on the result and get access to the user’s spoken text with just a few lines of code:
// Respond to what we just heard
switch (result.Reason)
{
    case ResultReason.RecognizedSpeech:
        Console.WriteLine($"You said: '{result.Text}'");
        break;

    case ResultReason.NoMatch:
        Console.WriteLine("I couldn't understand you. Your mic may not be working.");
        break;

    default:
        Console.WriteLine($"Other speech recognition result: {result.Reason}");
        break;
}
In my experience speech to text has worked exceptionally reliably, even with background noise. It should be said that I am an adult white male from the United States with a fairly neutral midwest accent. This is important because speech recognition must be tested against all types of accents before we can reliably call it effective. However, knowing Microsoft’s priorities with fighting bias in AI, I have confidence that a capable recognizer that can handle all ethnicities and accents is a high priority for Microsoft.
Putting it all Together
So, let’s review the code we’ve looked over and see how it all fits together.
We saw how computer vision can be used to analyze, describe, and tag images and how this could be used to detect specific animals such as squirrels, rabbits, and chipmunks.
We saw how text to speech could be used to take a string such as "I saw a squirrel. Bark bark bark!" and speak it out to the user.
We saw how speech to text could take a user’s words and generate a string from those words. This lets the user talk to our application without needing the keyboard.
We saw how text analysis can identify key phrases, entities, and the overall sentiment (among other things) in text communication. This lets the application make an informed analysis of the user’s words and their tone.
Finally, we saw how language understanding lets us match users words (called utterances) to commands the system supports (called intents).
When we put all of this together we get a system that can observe images (such as those from a web cam) and flag activity containing animal tags. This system can alert the user that something has been spotted using text to speech.
Speech to text lets the user speak to the system and text analysis and language understanding lets the system infer meaning, content, and tone from the user’s words and intelligently determine how the system should react.
Next Steps
While we didn’t quite turn Jester into a cyborg (thank goodness!), it’s clear how these APIs can add a lot of intelligence to your applications with only a little bit of custom code.
All of this is just skimming the surface in Azure. I encourage you to check out my full demo code and play around with it using your own keys and endpoints.
If you’re curious about what else you can do with Azure Cognitive Services, I have a wealth of articles on AccessibleAI.dev to look into under the Cognitive Services tag.
Finally, if you build something really awesome with cognitive services, I’d love to hear about it. Please let me know what you’re up to and how I can help.