Machine Learning in .NET with F# and ML.NET 2.0
Using F#, ML.NET, and Polyglot Notebooks to Train, Save, Load, and Evaluate Regression Models
Cover image created by Matt Eland using MidJourney
Machine learning is awesome, and ML.NET is a fantastic open-source library that lets us write dotnet code to perform machine learning tasks in our production applications. However, there aren’t as many articles walking you through how to do machine learning using either F# or Polyglot Notebooks, so this article aims to fix that.
In this article I’ll outline a simple pipeline that trains a regression machine learning model and saves it to a file for use later on. We’ll look at how to load the model using F# and use it to generate new predictions for new data points.
To round things out, I’ll be showing you how to do this all in a Polyglot Notebook, though you can skim over this aspect of the experiment as almost all of the code will work just fine in a normal .fs file outside of Polyglot Notebooks.
Note: This article was intended for the F# Advent 2022 series of articles for an audience familiar with F#. If you’re not familiar with F#, it’s a functional programming language that’s fully part of the dotnet family of languages. If you want some C# materials, see my other content on ML.NET for more content.
What are Polyglot Notebooks?
Polyglot Notebooks are the new name of Microsoft’s .NET Interactive Notebooks project. This project adds a new kernel to Jupyter Notebooks and allows you to write F#, C#, HTML, SQL, and other languages in an interactive data science notebook.
Setup: See my article on Installing Polyglot Notebooks for your first steps getting started with Polyglot Notebooks.
This allows you to write quick data science experiments without needing a full F# project. This also allows you to mix together F# code and Markdown code as well as see intermediate data values between cells.
The end result is a lightweight development experience that mixes rich markdown documentation, editable code, and inline results. This allows you to easily share small experiments with your team and allows for them to easily execute that code, make tweaks, and investigate the results on their own.
The rest of this article will focus on the ML.NET specific aspects of Machine Learning using F#. If you’re curious about Polyglot Notebooks in more depth, or want detailed instructions for installing it, check out my article and video on Polyglot Notebooks for C#.
What is ML.NET?
ML.NET allows you to train and use machine learning models on the dotnet platform. ML.NET is open-source and cross-platform. ML.NET is actively maintained and growing with the major ML.NET 2.0 release occurring just recently in late 2022. What’s more, ML.NET is heading in incredibly exciting directions with many deep learning features on its horizon.
While the majority of the data science community does currently use Python for machine learning tasks, ML.NET exists for two major purposes:
- First, some developers prefer to write F# or C# code to Python code, and ML.NET lets you train models in dotnet
- Secondly, ML.NET supports Open Neural Network eXchange (ONNX) which allows cross-platform and cross-language model sharing. This lets you train a model in Python and deploy it using dotnet (or vice versa)
Referencing ML.NET
Before we can do anything with ML.NET, we’ll need to add a reference to that package.
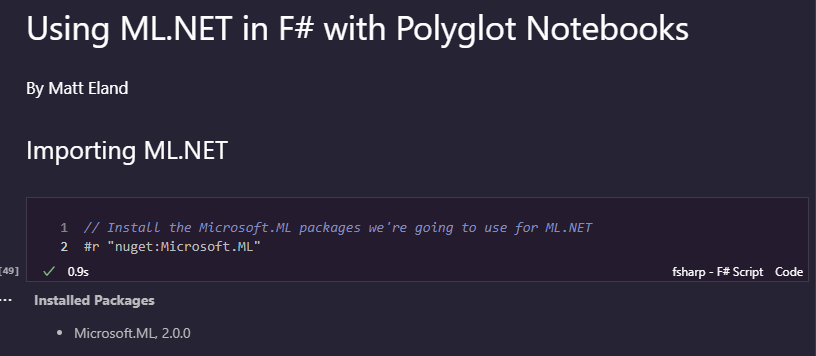
In Polyglot Notebooks you can do this with the following F# code cell:
// Install the Microsoft.ML packages we're going to use for ML.NET
#r "nuget:Microsoft.ML"
Once you run this, the Notebook will download the relevant package and let you know it installed Microsoft.ML and the relevant version number (2.0.0 at time of writing this article).
If you are working in Visual Studio, you can use NuGet Package Manager to add the reference manually by searching for “Microsoft.ML” and then installing that dependency.
You can also run the following command in the .NET CLI: dotnet add package Microsoft.ML
Working with F# Namespaces
Once you have ML.NET added to your project or notebook, add a notebook cell that uses the open keyword for a few namespaces:
open Microsoft.ML;
open Microsoft.ML.Data;
This allows us to use ML.NET types from F# in Polyglot Notebooks without needing to use fully-qualified names.
Note: This could also be part of another cell if you want it to be. I tend to have my NuGet statements in a cell of their own and my open statements in their own cells since I tend to rapidly iterate between different cells and the NuGet steps take longer than other steps.
Retrieving a Data Source
The exact experiment we’ll be doing in this project is to take historical weather data for London and use it to predict rainfall in the future. The exact data source comes from Kaggle.com and is available for download and inspection.
The dataset includes the following columns:
- date - recorded date of measurement - (int)
- cloud_cover - cloud cover measurement in oktas - (float)
- sunshine - sunshine measurement in hours (hrs) - (float)
- global_radiation - irradiance measurement in Watt per square meter (W/m2) - (float)
- max_temp - maximum temperature recorded in degrees Celsius (°C) - (float)
- mean_temp - mean temperature in degrees Celsius (°C) - (float)
- min_temp - minimum temperature recorded in degrees Celsius (°C) - (float)
- precipitation - precipitation measurement in millimeters (mm) - (float)
- pressure - pressure measurement in Pascals (Pa) - (float)
- snow_depth - snow depth measurement in centimeters (cm) - (float)
Dataset and column descriptions from Emmanuel F. Werr
The first step you need to do is download this London_Weather.csv file and place it inside the same directory as your Jupyter Notebook.
If you are using code outside of a Jupyter Notebook, make note of the location on disk you save the file and provide that to your F# code instead in future steps.
Representing Data in F# for ML.NET Input
In ML.NET we use a DataFrame object called an IDataView to store and manipulate data. This is similar to a Pandas DataFrame for those with a Python background.
One option for loading an IDataView involves declaring the type that each row will contain.
Here is an F# cell that defines a new WeatherInput record that can store the contents we care about for any given row.
type WeatherInput =
    {
        // Ignore date column
        [<LoadColumn(1)>]
        CloudCover: Single // in oktas
        [<LoadColumn(2)>]
        Sunshine: Single // in hours
        [<LoadColumn(3)>]
        GlobalRads: Single // Global radiation in Watt / square meter
        [<LoadColumn(4)>]
        MaxTemp: Single // Celsius
        [<LoadColumn(5)>]
        MeanTemp: Single // Celsius
        [<LoadColumn(6)>]
        MinTemp: Single // Celsius
        [<LoadColumn(7)>]
        Precipitation: Single // This is the precipitation in millimeters. This is what we want to predict
        [<LoadColumn(8)>]
        Pressure: Single // In Pascals
        // Ignore snow depth since that won't be known at time of prediction and is related to Precipitation
    }
This WeatherInput type will also be used later on for generating predictions from our trained model.
You likely noted the [<LoadColumn(1)>] syntax. This is a F# Attribute which tells ML.NET the zero-based index of the column in the data source the property should map to. This is maybe my least favorite part of ML.NET code, though ML.NET does offer some alternatives to infer column types if you prefer. However, I’m covering the basic ML.NET syntax in this article.
One particular thing to note is that these columns are all Single or Float32 values. ML.NET is very particular on the data types you give it and it doesn’t like double values in particular, so this data choice is deliberate to avoid errors later on in the process.
Finally, note that I did not choose to represent the Date or SnowDepth columns since the Date column was one that I didn’t want the model training process to be aware of. I chose to omit the depth of snow on that day because if I included that value, we’d need to provide it when generating rainfall predictions for the next day. Because we can’t know the snowfall accurately in advance and it is tightly correlated to precipitation, I felt it would be most useful for the model training and prediction process to not know about it.
Loading Data into an IDataView
Now that we have our data type declared, loading it into an IDataView can be done with a trivial amount of code:
// Create an ML Context. We'll use this for all ML operations
let context = MLContext();
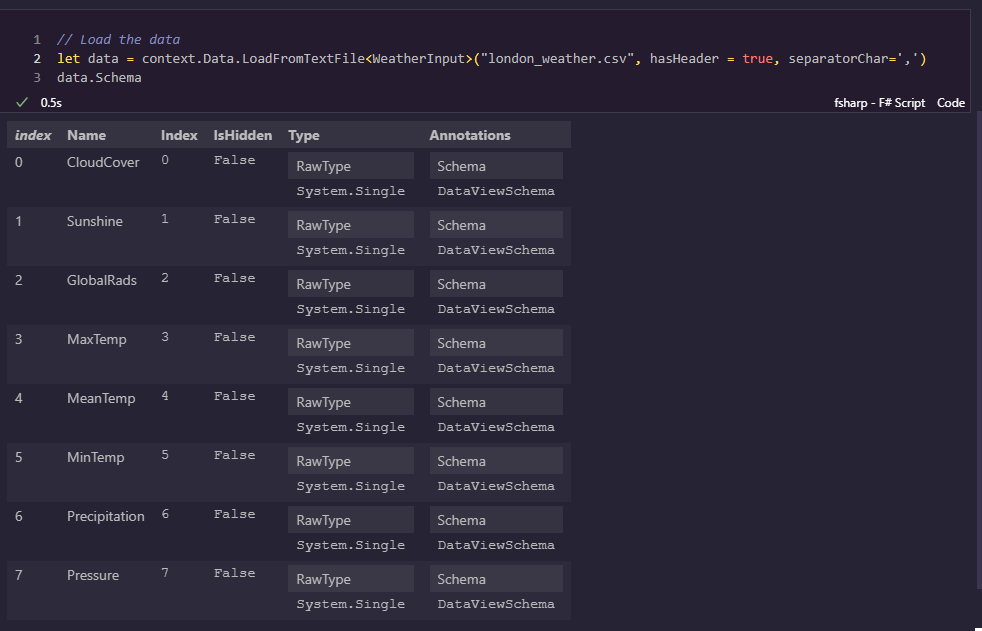
// Load the data
let data = context.Data.LoadFromTextFile<WeatherInput>("london_weather.csv", hasHeader = true, separatorChar=',')
data.Schema
The first thing we do is create a new MLContext instance. Almost everything in ML.NET flows through a MLContext instance, so we need one going forward.
Next we load the data from a file using this context instance. ML.NET lets us use hasHeader to indicate that the first row is just a header and should not be treated as data. We also must specify the comma delimiter via the separatorChar parameter in order to have rows loaded accurately.
Finally, the last line of code is just data.Schema which grabs the Schema property of the IDataView. We do this to visualize the loaded schema via Polyglot Notebooks. Polyglot Notebooks lets you specify values on the last line of any code cell and will automatically log out a display of that object below it as shown below:
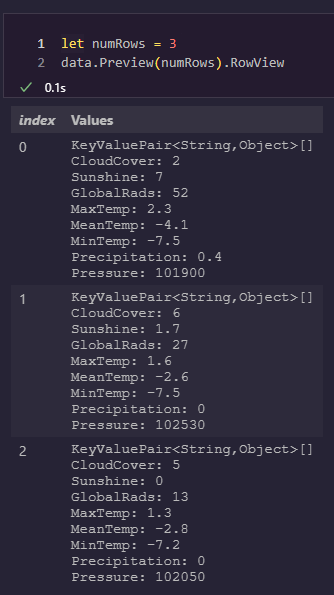
If you wanted to proof your loaded data to make sure it was properly loaded, you could take a look at the first 3 rows using the Preview function and the RowView property of that preview:
let numRows = 3
data.Preview(numRows).RowView
This tip will save you a lot of issues. During the writing of this article, for example, I encountered a few issues causing rows to be loaded with all 0’s for data and I hadn’t realized it because I didn’t preview my data.
Splitting the Data into a Train and Test Split
In Machine Learning it is customary to split your data into training and test splits in order to detect overfit models that have memorized the training data but don’t perform well against new data.
F# lets us split any IDataView into two parts using the TrainTestSplit method as shown in the code cell below:
// Split into train and test splits to detect overfitting
let split = context.Data.TrainTestSplit(data, testFraction = 0.2)

let testSet = split.TestSet   // 20 % of the data (0.2)
let trainSet = split.TrainSet // 80 % of the data (0.8)
If you wanted to use a different allocation of percentages with your train / test split, just tweak testFraction to be something else. However, values between 0.1 and 0.3 are recommended.
Note: You don’t have to split your data this way. You could also load two separate IDataView instances using LoadFromTextFile as shown above. Alternatively, you could give all of your training data to the model training step later on, but this is not recommended. The lack of a test dataset makes it harder to get accurate metrics of how your model performs against new data.
Training a Regression Model in F# using ML.NET
Now that you have your training and test data loaded, we’ll need to build out a featurization pipeline, select a model training algorithm, fit that algorithm to the training data, and evaluate its metrics.
Creating a Featurization Pipeline
The next part is maybe the most intimidating part of learning ML.NET: creating a processing pipeline.
This pipeline is a sequence of discrete steps that take in input data and form it in a standardized way that can be interpreted by a machine learning model training process.
In order to train a model effectively, we’ll need to do the following things:
- Ensure the value we’re trying to predict is in a column called “Label”
- Ensure the features that contribute to that prediction are aggregated into a column called “Features”
- Normalize values between different columns so they use a standard scale
- Cache data transformations for more accurate and performant model fitting
Note that the normalization step is particularly important when different columns have different scales so all have an equal chance at impacting the trained model. In our data set we have columns in degrees Celsius, Watts, Pascals, and even hours.
We can represent this processing pipeline in F# code with ML.NET with the following code:
let featureArray = [|"CloudCover";"Sunshine";"GlobalRads";"MaxTemp";"MeanTemp";"MinTemp";"Pressure"|]

let processPipeline = EstimatorChain()
                        .Append(context.Transforms.CopyColumns("Label", "Precipitation"))
                        .Append(context.Transforms.NormalizeMeanVariance("CloudCover", "CloudCover"))
                        .Append(context.Transforms.NormalizeMeanVariance("Sunshine", "Sunshine"))
                        .Append(context.Transforms.NormalizeMeanVariance("GlobalRads", "GlobalRads"))
                        .Append(context.Transforms.NormalizeMeanVariance("MaxTemp", "MaxTemp"))
                        .Append(context.Transforms.NormalizeMeanVariance("MeanTemp", "MeanTemp"))
                        .Append(context.Transforms.NormalizeMeanVariance("MinTemp", "MinTemp"))
                        .Append(context.Transforms.NormalizeMeanVariance("Pressure", "Pressure"))
                        .Append(context.Transforms.Concatenate("Features", featureArray))
                        .AppendCacheCheckpoint context
This is a lot, but most of these should be fairly straightforward given the explanations above.
First of all, everything starts with a new EstimatorChain.
Next, we rename the Precipitation property in WeatherInput to the Label column during the pipeline process.
After that we take the numeric columns and normalize their ranges according to their average (mean) and variance. We do not need to rename these columns so you see the same names listed twice.
After that, we merge all of our features together into the Features column which our estimator will use in the next step. Features refers to anything that contributes to the label being predicted, so you could look at the word “features” as “contributing factors” in machine learning.
Finally we have ML.NET cache these results so that these values are calculated before the training process occurs which improves the accuracy and performance of our training process.
Selecting a Model
Next we need to select a regression model training algorithm from the context.Regression.Trainers group.
The available options with the base ML.NET package are:
LbfgsPoissonRegressionOnlineGradientDescentSdca
Of these three, gradient descent is the easiest to explain, so I chose to start with OnlineGradientDescent.
The code for creating a new OnlineGradientDescent trainer and adding it to a new pipeline is as follows:
// Select the algorithm we want
let trainer = context.Regression.Trainers.OnlineGradientDescent(labelColumnName = "Label", featureColumnName = "Features")

// Generate a training pipeline based on the processing pipeline mixed with the trainer
let trainingPipeline = processPipeline.Append trainer
Here we specify the algorithm we want (OnlineGradientDescent) as well as the name of the columns in our processing pipeline that contain the label and features.
If we wanted to, we could also customize the various hyperparameters to the model, which include the following for OnlineGradientDescent:
- Learning Rate
- Whether learning rate decreases over time
- Loss Function
- l2 Regularization
- Number of Iterations
However, the focus of this article is to tour machine learning in ML.NET with F#, not to find the most optimal model to this sample problem.
Training the Model
Now that we have our data loaded and the model training pipeline ready to go, we can fit the training pipeline to the training dataset:
// Train the model
let model = trainingPipeline.Fit trainSet
This synchronously uses the training pipeline with the training dataset to find the optimal model using the algorithm we selected. For me this took 0.1 second on my primary development machine with this dataset. This is significantly less time than it takes to even check if NuGet Packages are installed. This highlights ML.NET’s performance, though admittedly on a small sample dataset.
Once the Fit process is complete, the resulting model is stored in model as an ITransformer.
We can use this trained model to generate new predictions, but before we do that, we should gather some metrics to determine how accurate the resulting model actually is.
Evaluating a Regression Model in F#
To determine how good (or how bad) a model is, we have it generate predictions for our test dataset by calling Transform on the model. This transforms multiple input rows to rows with predictions using that trained model.
Since we know from our dataset the actual precipitation that occurred on those days, we can use this to gauge the accuracy of those predictions via the Evaluate function.
This will give us a set of metrics that we can then evaluate using our data science knowledge to determine how good the resulting model is.
My F# code for this is as follows:
let testResults = model.Transform testSet

let testMetrics = context.Regression.Evaluate(testResults, "Label", "Score")

testMetrics
Since I’m ending a Polyglot Interactive notebook cell with a single variable, I can see the metrics inline in a table following the cell:
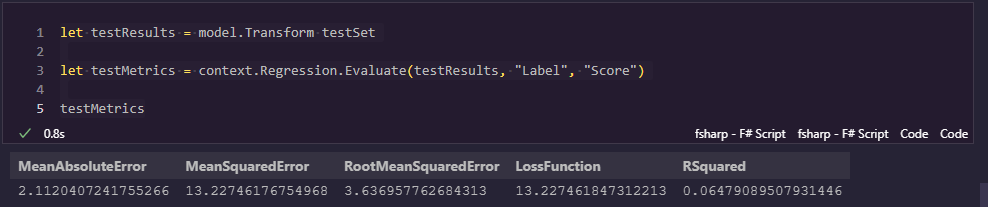
This lets us see the following standard regression metrics:
- Mean Absolute Error (MAE) - the average absolute distance the prediction was off from the source (error)
- Mean Squared Error (MSE) - the squared error. This is like MAE, but extreme values are amplified
- Root Mean Squared Error (RMSE) - the root MSE is similar to the MSE but its units are easier to work with
- R Squared - the coefficient of determination is a value indicating how useful this model is for predicting new values
Note: LossFunction here is a duplicate of MSE. I suspect LossFunction selects one primary metric to use since all 4 of these metrics are different loss functions
In these metrics you want your MAE, MSE, and RMSE to be as close to zero as possible (indicating no errors whatsoever) while you prefer your R Squared to be as close to 1 as possible.
These metrics aren’t quite terrible, but they’re not amazing either. To me, these metrics indicate an initial model to start with, but I’d want to investigate different hyperparameter settings for the model training process, different algorithms, and different processing steps in my pipeline. If I couldn’t get a model to perform suitably well, you might even need to investigate your data source and see if there are significant data quality issues or just not enough information for an accurate model.
Saving and Loading the Model
Once you have a model you are happy with, you should save that model to disk so you can load it and use it to generate predictions without needing to retrain it in the future.
ML.NET supports a number of different formats including zip files and ONNX files. To keep things simple, we’ll just save our model to a zip file:
context.Model.Save(model, data.Schema, "Model.zip")
This writes the model to a Model.zip file alongside our Polyglot Interactive notebook or in your program’s working directory if you’re not using a Notebook for this code.
Once you have a model you’d like to use later on, you can load it just as easily:
let loadedModel, loadedSchema = context.Model.Load "Model.zip"
Here we load both the model and a schema definition for that model together. Often you’ll find you don’t need the schema definition at all, but it’s part of the ML.NET API.
Generating Predictions using ML.NET and F#
Now that we have a trained model, we can use it to generate predictions for new data.
In order to do this, we first create a PredictionEngine and tell it what type of rows it can expect and what type of rows we want it to give us.
The input type is the WeatherInput type we defined earlier when loading data into an IDataView, but output type will be something new:
[<CLIMutable>]
type WeatherPrediction = {
    [<ColumnName("Score")>]
    Precipitation: Single
}
This represents a simple type that has a Precipitation property. We use the ColumnName attribute to map from F#’s default “Score” column to something more easily understandable.
Finally, we need to put CLIMutable on our output type in order for ML.NET to be able to mutate values after instance creation and to satisfy some compiler requirements. Realizing I needed the CLIMutable attribute to get the output type working properly was probably the hardest aspect of working with F# and ML.NET together, so hopefully my learning journey helps you on your own path.
Now that we have our WeatherPrediction reference type, we can use it to create a PredictionEngine with the following F# code:
let predictionEngine = context.Model.CreatePredictionEngine<WeatherInput, WeatherPrediction>(model)
Next, you can create a fake set of conditions and use them to get a prediction for that day based on the trained model:
let conditions: WeatherInput = {
    CloudCover = 4f;
    Sunshine=5.8f;
    GlobalRads=50f;
    MaxTemp=5.2f;
    MinTemp=1.6f;
    MeanTemp=3.7f;
    Pressure=101170f;
    Precipitation=0f; // Needed for the compiler, but its value is ignored
}

let prediction = predictionEngine.Predict(conditions)

prediction
This yields a WeatherPrediction object with the predicted precipitation for that given WeatherInput. Putting prediction as the last value in a cell causes Polyglot Notebooks to display it for our convenience as well:
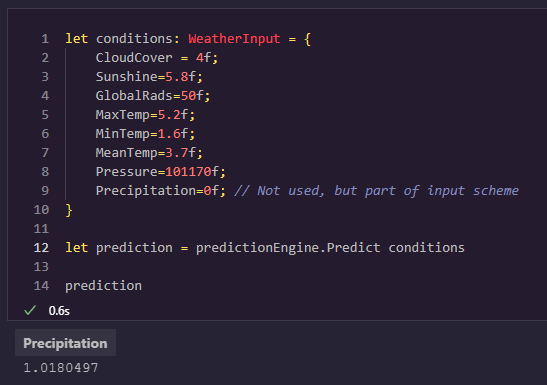
In other words, for our weather scenario our model predicts it’s going to rain 1.018 centimeters given the conditions and predictions we have for the other weather factors.
Closing Thoughts
We just walked through all the basic steps you’d need to perform a basic experiment in ML.NET 2.0 using F# and Polyglot Notebooks.
I found Polyglot Notebooks to be incredibly helpful when generating the code for this article.
This code is very similar to the C# code I’d write to accomplish the same tasks, so I think that if I did this task frequently in F# that I would likely start introducing more functions. I mention this primarily because it feels odd to write an F# article without using the |> operator outside of this sentence and without declaring any functions of my own.
However, F# did get us the ability to quickly declare types, ignore a lot of the verbosity in the generics syntax prevalent in ML.NET around prediction engines, and focus entirely on the task we wanted to accomplish.
With this final model that we have, we can save it to disk, load it upon application start up, and integrate it into any professional dotnet application in a repeatable and performant way.