Using AutoML, Python, and Azure to Classify Die Hard
Using Automated Machine Learning in Python to settle a classic question
Last year my wife and I were having an idle conversation and it turned to Die Hard. In our years of marriage, we’d not really discussed the movie before and so I asked her whether or not she thought it was a Christmas movie. As things often do with me, the discussion that followed spawned a machine learning project using Azure Machine Learning Studio and a series of content on the topic.
That video is embedded below for reference, and is still a good introductory resource for no-code automated machine learning on Azure:
Since releasing this project, I’ve become much more comfortable and confident with both machine learning in general and specifically machine learning on and around the Azure platform, including using the wonderful Azure ML Python SDK. I’ve gone on to complete a number of other data science projects, a machine learning nanodegree, earn the Azure Data Scientist certification, and ace several courses around data science for my master’s degree.
As we approach the one-year marker on my first forays into Azure machine learning, I thought I would revisit this experiment and use the Azure ML Python SDK to determine whether or not Die Hard should be considered a Christmas movie.
Experiment Design
At a high level, our experiment involves getting a bunch of data about movies that are either Christmas movies or non-Christmas movies, training a machine learning model to detect and internalize the factors that lead to movies being considered Christmas movies, validate that the model’s performance metrics appear adequate, and then use that trained machine learning model to see whether movies it’s never encountered before should be considered Christmas movies or non-Christmas movies.
Specifically, we’ll be intentionally excluding any knowledge of the movie Die Hard from this experiment until we have a trained machine learning model and then seeing whether or not that model thinks that Die Hard is a Christmas movie.
The Dataset
The full details and code of my data preparation steps are available for those curious, but essentially I did the following:
- Located a dataset of movies including basic details and keywords around those movies
- Locate 5 popular lists of Christmas movies
- Merge the two lists together where a movie is considered a Christmas movie if it appears on at least 2 of the 5 lists
- Remove extraneous columns and movies that were not released in theaters
- Remove Die Hard from the dataset (not doing this would bias the training one way or the other)
- Save the resulting dataset as the training dataset
This resulting training dataset can then be used to train a classification model using supervised learning.
AutoML in the Azure ML Python SDK
Let’s cover a few concepts before we dive into code.
AutoML, short for automated machine learning, is a way of running machine learning experiments using an automatically selected series of machine learning algorithms and hyperparameters. Essentially, we have the model training process evaluate different algorithms and settings for those algorithms to see what combination generates the best performing model according to the metric that is most important to us.
This is helpful to reduce the learning burden on new data scientists and also can help experienced data scientists who may not have considered particular algorithms.
The Azure ML Python SDK is a SDK that Microsoft offers Python developers for interacting with Azure machine learning resources. It can do almost everything (and perhaps even more) that you can do in Azure Machine Learning Studio, but is easy to share, reuse, repeat, and automate since it is in Python code.
More Details: See my article and video on Automated ML in the Azure ML Python SDK for more information on these concepts.
Get Started: See Microsoft’s installation instructions for details on installing the Azure ML Python SDK.
The Code
Okay, with all the concepts and overview out of the way, let’s walk through the experiment step by step. Along the way, I’ll link you to additional resources for understanding individual steps in more detail as the focus of this article is on the overall experiment.
The code we’ll be following is available in GitHub and we’ll be working out of the AutoML/experiment.ipynb Jupyter Notebook.
Loading Data
First, we load up the data into a Pandas DataFrame:
import pandas as pd

# Load the training data into a Pandas DataFrame
df = pd.read_csv('traintest.csv')
df.drop(columns='id', inplace=True) # Remove an extraneous column
This code loads the traintest.csv data file into a DataFrame that we can manipulate as needed. While the Azure ML Python SDK doesn’t quite support Pandas data frames, it’s fairly trivial to move back and forth between a Pandas DataFrame and an Azure DataSet as we’ll see later.
Connecting to Azure
Next, we need to get a reference to the workspace in our Azure Machine Learning instance. This object helps us manage all aspects of data science experiments on Azure and we’ll need it going forward.
from azureml.core import Workspace, Experiment, Dataset, Model

# Load the workspace information from config.json using the Azure ML SDK
ws = Workspace.from_config() # NOTE: This will error if you do not have a config.json present

# Get the storage account associated with this ML workspace
datastore = ws.get_default_datastore()
Important Note: The code above will error if you have not downloaded the
config.jsonfile from your Azure Machine Learning Studio resource. See my article on connecting to Azure Workspace for more details and steps on getting this file.
While we’re there, we get a reference to the default datastore associated with the workspace because that’s where our datasets will need to go and where our models will be stored.
Registering our Training Data
Before we can run our experiment, we need to upload our experiment’s training data onto the Azure platform. We already have our experiment data in a DataFrame named df and we have a reference to the default datastore in the datastore variable, so the code for this is fairly straightforward:
ds = Dataset.Tabular.register_pandas_dataframe(dataframe=df,
        name='ChristmasMovies',
        description='Movies broken down by Christmas movies and non-Christmas movies',
        target=datastore)
This takes our DataFrame, creates a new dataset for it in Azure, and gives us a reference to that new dataset in our ds variable. If the dataset existed already, this would have created a new version of that dataset so we could track multiple versions of that dataset over time.
More Details: See my article on Converting Pandas DataFrames to Azure Datasets for more information on converting back and forth between Pandas DataFrames and Azure Datasets.
Create or Retrieve a Compute Cluster
We’ll need to create or retrieve an existing compute resource in order to run our experiment, so let’s handle that next.
There are many different kinds of compute resources in Azure Machine Learning, but we’ll be using a compute cluster for this experiment because it scales up and down easily, doesn’t cost anything when 0 nodes are active, and it will meet our needs for this experiment.
The following code, adapted from a sample by Microsoft, retrieves a compute cluster by name or creates one if it doesn’t exist:
from azureml.core.compute import ComputeTarget, AmlCompute
from azureml.core.compute_target import ComputeTargetException

# Now let's make sure we have a compute resource
cluster_name = "Low-End-Compute-Cluster"
max_nodes = 4

# Fetch or create the compute resource
try:
    cpu_cluster = ComputeTarget(workspace=ws, name=cluster_name) # This will throw a ComputeTargetException if this doesn't exist
    print('Using existing compute: ' + cluster_name)
except ComputeTargetException:
    # Create the cluster
    print('Provisioning cluster...')
    compute_config = AmlCompute.provisioning_configuration(vm_size="Standard_D2DS_V4",
                                                           min_nodes=0,
                                                           max_nodes=max_nodes,
                                                           vm_priority='lowpriority')
    cpu_cluster = ComputeTarget.create(ws, cluster_name, compute_config)

# Ensure the cluster is ready to go
cpu_cluster.wait_for_completion(show_output=True)
Note here that I chose to provision this compute cluster as a lowpriority cluster, which significantly reduces your billing amount by using only spare compute resources Azure may or may not have available. If this doesn’t reliably work for you, you may need to use a dedicated VM priority instead.
Another critical note for billing here is that the min_nodes for a compute cluster should always be 0. This allows the compute cluster to “spin down” when not in use and prevents you for being billed for it during the time its not in use.
More Details: See my article on Managing Compute Resources from the Azure ML Python SDK for more information on provisioning compute clusters and my article on Azure Machine Learning Compute Resources for the different types of compute out there.
Creating the Experiment
Now we need to submit the experiment to Azure so Azure can run it on its compute resources.
The first step is to create the experiment as an empty bucket that will store trained models:
from azureml.core.experiment import Experiment

# Create a Machine Learning Experiment
experiment_name = 'DieHard-AutoML'

experiment=Experiment(ws, experiment_name)
Next, we create an AutoMLConfig instance that holds parameters for our machine learning experiment:
from azureml.train.automl import AutoMLConfig

# Set up the experiment
automl_config = AutoMLConfig(
    task='classification',                  # The machine learning task we're trying to accomplish
    primary_metric='AUC_weighted',          # How we judge one model as better than another. AUC tends to be fairly balanced
    training_data=ds,                       # Our dataset of movies
    enable_dnn=True,                        # Enable Deep Learning
    compute_target=cpu_cluster,             # The compute resource to use
    max_concurrent_iterations=max_nodes,    # Don't want more concurrent iterations than CPU nodes
    iteration_timeout_minutes=5,            # The maximum number of minutes per individual run
    label_column_name='Is Christmas Movie') # The value we want to predict for future values
Note that this step doesn’t run our experiment, it just creates a set of options that will allow Azure to run it in the next step.
Additional Details: For more details on these parameters and an example of an AutoML regression task, see my article on Auto ML with Python and the Azure ML Python SDK
Finally, we tell Azure to go ahead and run our experiment:
from azureml.widgets import RunDetails

# Submit the experiment
run = experiment.submit(automl_config)

# Wait for the experiment to complete
RunDetails(run).show()
run.wait_for_completion(show_output=False)
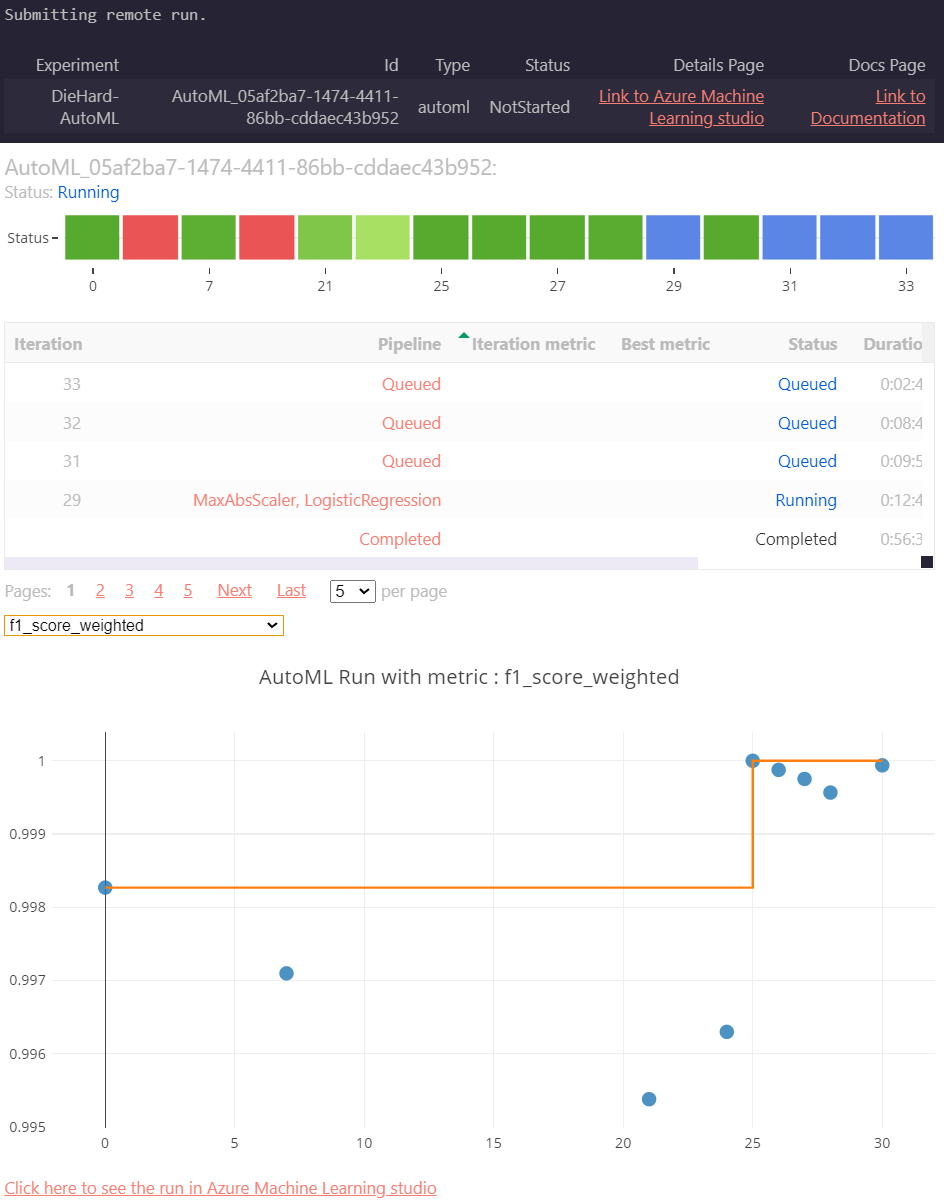
This step actually triggers the remote run and takes the longest.
Thankfully, Microsoft gave us a really nice RunDetails widget that lets us see the details of this run from a Jupyter notebook while the experiment is active:
The Model
Once the experiment completes, we can grab the details of the best performing experiment run and its associated model with the following Python code:
# Grab the resulting model and best run
best_auto_run, automl_model = run.get_output()

# Display details about the best run
RunDetails(best_auto_run).show()
This widget displays a wide range of charts and metrics for the best performing model.
There are a lot of metrics here, but the one that I usually find the most valuable to me in binary classification is the confusion matrix, which is shown below:
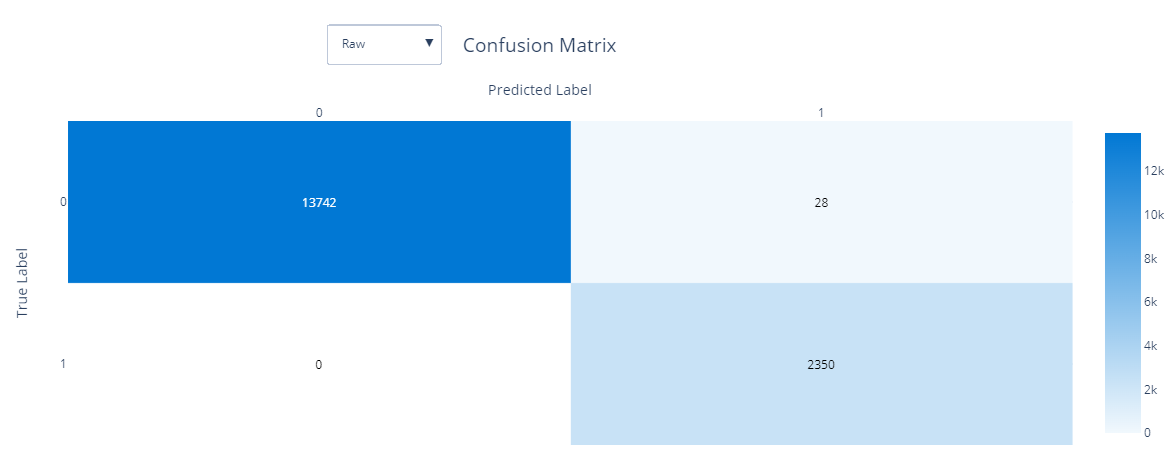
This shows a very good confusion matrix that has very infrequent problems with false positives less than 0.2 % of the time.
Additional Details: See my article on interpreting confusion matrixes for more details on confusion matrixes and classification metrics.
Save the Model
Now that we have our model, if we like it we can download it and work with it outside of Azure. We could also register it as a model in Azure that we could then refer to later or even deploy to a web service.
If we wanted to use the model outside of Azure (most models are SciKit-Learn models) we could download the model and all associated scripts and configuration with the following code:
# Save the best model locally
best_auto_run.download_files(output_directory='automl-output')
We can also register it in Azure for future experiments. This also allows us to deploy the model as an Azure Container Instance or to an Azure Kubernetes Service.
The registration code is fairly simple:
# Register the model in Azure
best_auto_run.register_model(model_name='ChristmasMovie-AutoML',
                                     model_path='outputs/model.pkl',
                                     description='Predict whether or not a movie is a Christmas movie')
Additional Details: If you’re curious about deploying to an Azure Container Instance, see my prior article on NHL Penalty Minute Prediction with AutoML and Python
Making predictions
A few steps ago, when we made our run.get_output() call, we got back an automl_model variable that actually gives us everything we need to make predictions.
All we need to do in order to predict new values is to load data into a Pandas DataFrame and send it to the predict method.
The data we load into the DataFrame should be nearly identical to the data we used for training in its structure, except it won’t have the column we’re trying to predictions.
For this experiment, the data we’re looking for is just basic information on the movie Die Hard and I have that provided in DieHard.csv which we can load as follows:
import pandas as pd

df_dieHard = pd.read_csv('DieHard.csv')
df_dieHard.drop(columns=['id', 'Is Christmas Movie'], inplace=True) # Drop columns we shouldn't have for prediction
Next, we run the following code to generate a prediction for the Is Christmas Movie column for the movie Die Hard:
# Make a prediction
prediction = automl_model.predict(df_dieHard)
print('Is Christmas Movie Prediction: ' + str(prediction[0]))
For me, this prints out the following text:

In other words: Yes, Virginia, Die Hard is still a Christmas movie.
Closing Thoughts
Admittedly, this is a decent amount of code for running an experiment, and it does take some time, but let’s take a look at what it gives us:
We now have a beginner-friendly, repeatable, documented mechanism for training and evaluating a machine learning model against the latest data that we can add to source control and repeat as needed.
In fact, this experiment doesn’t need to change very much at all if we’re using a different dataset or performing regression instead of classification.
If the complexity of this is a bit too much, there’s always the wonderful Azure Machine Learning Studio user interface that can help you through this task in a lot less complexity and code.
But if you’re comfortable with the code, this approach will help you solve many data science problems using Azure’s fantastic AutoML capabilities and cloud compute resources.
And, if you don’t agree with Azure on Die Hard, run your own experiment and share your results.