Text Classification in C# with ML.NET 2.0
Using NAS-BERT transformers to classify Text to Labels in C#
Cover image created by Matt Eland using MidJourney
Recently ML.NET 2.0 was released, giving us a bevy of new features for the open source machine learning library for dotnet applications.
The release improved ML.NET’s text processing capabilities and improved some aspects of the already fantastic automated machine learning capabilities it had. Moreover, the release seemed to reaffirm ML.NET’s determination to be relevant for advanced machine learning tasks, including deep learning and transformer-based architectures.
In this article we’ll explore ML.NET 2.0’s new text classification capabilities and see how you can use C# to analyze sentiment, match utterances to intents, or otherwise classify textual data without having to write a lot of custom code.
This content is also available in video form on YouTube
What is Text Classification?
Classification is a central task in machine learning applications. With classification, we train a model based on historical observations to predict a single categorical value.
For example, the following tasks are examples of classification tasks:
- Determining if a prospective student should be admitted to a college
- Predicting if someone would have lived or died on the Titanic based on their boarding pass information
- Determining if Die Hard is a Christmas movie
Text classification is classification applied primarily to textual inputs instead of numerical inputs.
However, with anything textual comes a lot of added complexity. You need to reduce individual words down to numeric tokens, typically introduce N-Grams and tri-grams, and other complex data science concepts. This can make it hard for the journeyman data scientist to get into text classification.
ML.NET changes that by giving us an easy way to train text classification models that lets us focus on the core task we’re trying to accomplish.
Additionally, ML.NET’s Text Classification library uses the NAS-BERT transformer to give your text classification a starting point to adapt from when learning your custom training data.
This means we can take full advantage of some advanced AI capabilities while staying in the same dotnet platform that powers our applications, and you don’t need to be a full data scientist to train and take advantage of powerful machine learning models.
Our Text Classification Task
Since this post exists to serve the larger community, I decided to take a poll on what I should write about.
Shockingly, 61% of all respondents indicated that they had strong leanings towards turtle-based content:

While this may indicate that my friends are secretly either wildlife creatures or members of the Foot Clan, I decided to run with it.
I made a follow-up post (which may be my most popular of the year, oddly enough), I gathered a bunch of random utterances from people of the internet. This list included such gems as:
- Turtles make good soup, but poor sandwiches
- Turtles look both ways before crossing the road
- It’s turtles all the way down (multiple instances)
- I like turtles (because of course)
- Never headbutt a turtle (there goes my weekend plans)
So, my friends are weird, but I was able to look over their sentences and come up with a few key themes:
- Things related to liking turtles
- Things related to eating turtles (those monsters!)
- Things related to taking care of turtles
- Things related to ninja turtles
- Everything else
I also realized that the volume of turtle-related sentences was low, so I took advantage of ChatGPT and asked it for a list of turtle-related facts.
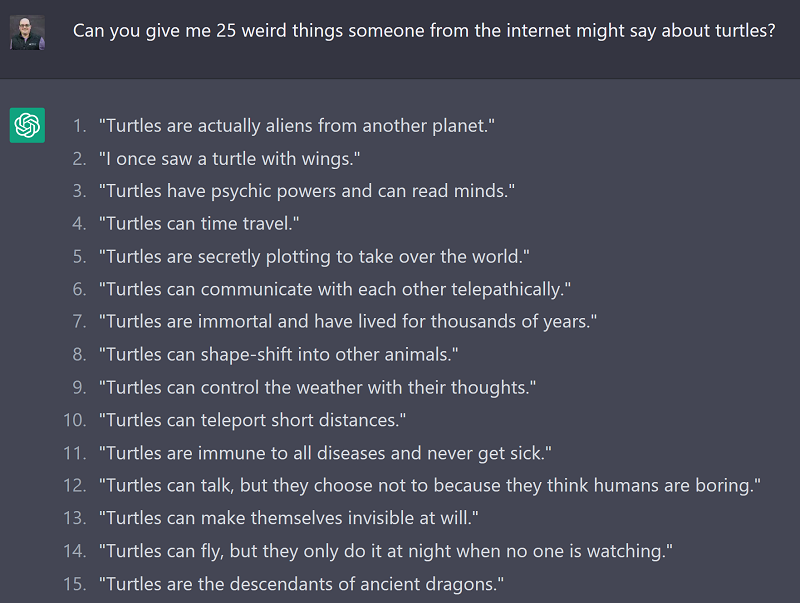
I took all of these things together and stored them in a tab-separated values (TSV) file which included the sentence someone said and a number indicating which of the 4 categories the sentence belonged to.
This gave me what I effectively considered a training dataset that I could use to train a model using text classification and ML.NET. From there, I could use that trained model to classify new sentences to see if it was closer to liking, eating, caring for turtles, ninja-related shenanigans, or something entirely different.
In case you’re wondering, I don’t see how classifying turtle text is a helpful capability to offer in an application. My friends are weird; we’re just rolling with it and we’ll use it to teach ML.NET Text Classification with C#.
Some more helpful uses of text classification might include:
- Sentiment analysis of text (positive / negative / neutral)
- Mapping utterances to intents for conversational AI solutions (chatbots)
Like I said, my friends are weird.
Classifying Text Using ML.NET and C#
With a training data set in hand and an objective in mind, let’s look over the code it takes to build a system that can:
- Load the data from a TSV file
- Train a text classification model
- Generate evaluation metrics for the trained model
- Build a prediction engine for classifying future values
- Generate predictions for individual user sentences
We’ll do all of this using the latest tooling (C# 11, .NET 7, and Visual Studio 2022 at the time of this writing).
The full source code from this article is available on GitHub.
Dependencies and Using Statements
First, we need to add a reference to the ML.NET libraries we’ll need.
This can be done either with NuGet Package Manager or package manager console, but either way we will need to include Microsoft.ML for the core ML.NET code, Microsoft.ML.TorchSharp to support text classification, and TorchSharp-cuda-windows or TorchSharp-cuda-linux for a device-specific implementation.
Note: The operating system specific implementations allow the code to take advantage of your device’s GPU to optimize the deep learning model training process.
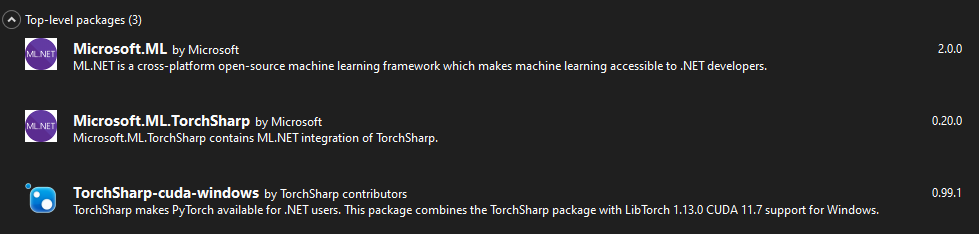
Because this install also includes the pre-trained NAS-BERT transformer, installation can take a significant amount of time. I believe I observed the install process taking between 5 - 20 minutes of time during my development of the code for this article.
One all three dependencies are installed, we’ll also need to add using statements (or global using statements) for the following namespaces:
using Microsoft.ML;
using Microsoft.ML.Data;
using Microsoft.ML.TorchSharp;
using Microsoft.ML.TorchSharp.NasBert;
With dependencies out of the way, we can start loading data and training our model.
Loading Data
The next part of this process is not new or specific to text classification in ML.NET, but rather common to almost all ML.NET development.
We’re going to need to create a MLContext to govern all machine learning tasks. We do so specifying a CPU fallback for machine learning on platforms that don’t have GPU support:
// Initialize MLContext
MLContext mlContext = new()
{
    GpuDeviceId = 0,
    FallbackToCpu = true
};
Next, we’ll need to load up the data into an IDataView by reading it from our TSV file, specifying tab-delimited files without a special first row:
// Load the data source
Console.WriteLine("Loading data...");
IDataView dataView = mlContext.Data.LoadFromTextFile<ModelInput>(
    "Turtles.tsv",
    separatorChar: '\t',
    hasHeader: false
);
IDataView is a structure similar to a DataFrame in Python or other data science libraries. It’s an efficient structure for storing and manipulating tabular data.
This IDataView is composed of rows of ModelInput instances. ModelInput is just a custom class that was defined with a sentence and label column:
public class ModelInput
{
    [LoadColumn(0)]
    [ColumnName(@"Sentence")]
    public string Sentence { get; set; }

    [LoadColumn(1)]
    [ColumnName(@"Label")]
    public float Label { get; set; }
}
Here the LoadColumn attributes tell ML.NET the order of the columns in our TSV file and ColumnName will be relevant in the model training step next section.
Here Sentence refers to the thing the user said while Label matches against a known supported intent, which I chose to represent in an enum:
public enum TurtleIntents
{
    EatTurtle = 0,
    LikeTurtle = 1,
    Unknown = 2,
    Ninjitsu = 3,
    TurtleCare = 4,
}
Note that Label is a float (or Single) and not the TurtleIntents Type. While the values will correspond to members of that enum, ML.NET is very specific about the types it supports and numerical values need to be floats (Singles) or you will get an error at runtime.
Model Training
Now that we have our data loaded, we can begin training our model.
Since we know we’ll want to get accurate metrics from our trained model at classifying data it hasn’t seen before, we’ll need to split the data into two halves: one for training and one for validating the model’s accuracy. This process is fairly standard in machine learning and helps detect models that have overfit their training data and are not reliable for generating predictions for new values.
The code for this is simple:
// To evaluate the effectiveness of machine learning models we split them into a training set for fitting
// and a testing set to evaluate that trained model against unknown data
DataOperationsCatalog.TrainTestData dataSplit = mlContext.Data.TrainTestSplit(dataView, testFraction: 0.2);
IDataView trainData = dataSplit.TrainSet;
IDataView testData = dataSplit.TestSet;
Here the above code takes 80% of the data and sticks it into the trainData IDataView while the remaining 20% goes into testData.
Next, we create a pipeline of repeatable machine learning training steps in a specific sequence:
// Create a pipeline for training the model
var pipeline = mlContext.Transforms.Conversion.MapValueToKey(
                            outputColumnName: "Label",
                            inputColumnName: "Label")
                        .Append(mlContext.MulticlassClassification.Trainers.TextClassification(
                            labelColumnName: "Label",
                            sentence1ColumnName: "Sentence",
                            architecture: BertArchitecture.Roberta))
                        .Append(mlContext.Transforms.Conversion.MapKeyToValue(
                            outputColumnName: "PredictedLabel",
                            inputColumnName: "PredictedLabel"));
Here our pipeline is composed of two MapValueToKey steps that transform the data into the expected shapes for training and prediction. However, the real magic occurs within the TextClassification step.
The TextClassification step will adjust a NAS-BERT transformer to match the patterns detected in the training data. It does so looking at the Sentence in our ModelInput class to determine the input and the Label to determine which TurtleIntents that sentence represents.
A key point here is that we didn’t need to do a lot of complex tokenization, N-Gram, or Tri-gram generation with our C# code. Instead, we rely on the TextClassification step and it takes care of that for us.
We can train a model using this pipeline using the following C# code:
// Train the model using the pipeline
Console.WriteLine("Training model...");
ITransformer model = pipeline.Fit(trainData);
This will spend time training the model synchronously and produce a single ITransformer instance.
This ITransformer model can then be used to generate predictions (as we’ll see later) or saved to disk to load later on. See my article on ML.NET AutoML classification for an example of saving and loading an ITransformer.
Evaluating Model Performance
Once you have a fitted model in an ITransformer, you can use your testing data to generate performance metrics from that model:
// Evaluate the model's performance against the TEST data set
Console.WriteLine("Evaluating model performance...");

// We need to apply the same transformations to our test set so it can be evaluated via the resulting model
IDataView transformedTest = model.Transform(testData);
MulticlassClassificationMetrics metrics = mlContext.MulticlassClassification.Evaluate(transformedTest);
Here we got multi-class classification metrics because there are more than two different classes a sentence could be in:
- Liking turtles
- Eating turtles
- Ninja turtles
- Turtle care
- Unknown
If there were only two different classes, we’d use BinaryClassification instead of MulticlassClassification.
The resulting metrics, stored in metrics can give us some basic statistics as well as the ability to render a confusion matrix.
// Display Metrics
Console.WriteLine($"Macro Accuracy: {metrics.MacroAccuracy}");
Console.WriteLine($"Micro Accuracy: {metrics.MicroAccuracy}");
Console.WriteLine($"Log Loss: {metrics.LogLoss}");
Console.WriteLine();

// List different intents with their class number
Console.WriteLine("Classes:");
foreach (TurtleIntents value in Enum.GetValues<TurtleIntents>())
{
    Console.WriteLine($"{((int)value)}: {value}");
}

// Generate the table for diagnostics
Console.WriteLine(metrics.ConfusionMatrix.GetFormattedConfusionTable());
The code above renders a confusion matrix breaking down the actual class of an utterance vs the class our model predicts:
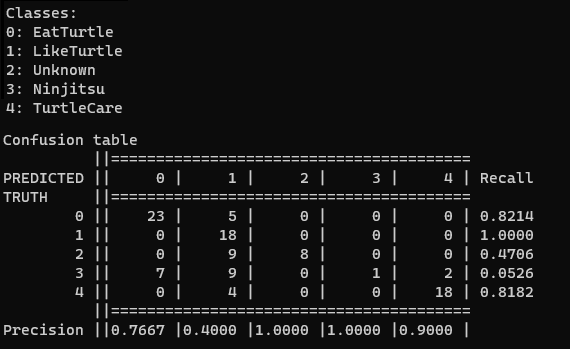
Here this gives us a tabular view of how our model is making predictions and see the types of mistakes it tends to make.
In the screenshot above, for example, the model is very good at recognizing statements about liking turtles (class 1), but tends to mistake statements about ninja turtles (class 3) as statements about liking turtles or eating turtles.
Confusion matrixes are complex and confusing initially (pun intended) with many metrics associated with them, so check out my article on confusion matrixes for more hints on how to read this chart.
Generating Predictions
If we like our model, we can create a PredictionEngine to generate predictions on new data:
// Generate a prediction engine
Console.WriteLine("Creating prediction engine...");
PredictionEngine<ModelInput, ModelOutput> engine =
    mlContext.Model.CreatePredictionEngine<ModelInput, ModelOutput>(model);

Console.WriteLine("Ready to generate predictions.");
Note: in a typical ML.NET deployment you will train your model, then save it. Future code will load up your model from disk and use it to create a
PredictionEnginewithout spending the time to retrain the model.
In order to do this, we have to define our ModelOutput class to store the resulting values:
public class ModelOutput
{
    [ColumnName(@"Sentence")]
    public string Sentence { get; set; }

    [ColumnName(@"Label")]
    public uint Label { get; set; }

    [ColumnName(@"PredictedLabel")]
    public float PredictedLabel { get; set; }

    [ColumnName(@"Score")]
    public float[] Score { get; set; }
}
Here this output looks like our input class, but also contains the label we predicted and an array of scores that include likelihood scores for each possible class.
While this does produce an array of scores, these scores don’t seem to be strictly between 0 and 1 and do not seem to fully represent a confidence score in any one category. Instead, the score is just be the relative strength of any given class compared to each other class.
With this prediction engine, we can now give it any string we want and it will give us a classification of that string into one of our TurtleIntents enum members:
// Generate a series of predictions based on user input
string input;
do
{
    Console.WriteLine();
    Console.WriteLine("What do you want to say about turtles? (Type Q to Quit)");
    input = Console.ReadLine()!;

    // Get a prediction
    ModelInput sampleData = new(input);
    ModelOutput result = engine.Predict(sampleData);

    // Print classification
    float maxScore = result.Score[(uint)result.PredictedLabel];
    Console.WriteLine($"Matched intent {(TurtleIntents)result.PredictedLabel} with score of {maxScore:f2}");
    Console.WriteLine();
}
while (!string.IsNullOrWhiteSpace(input) && input.ToLowerInvariant() != "q");
This code will then classify each new text input that users might type in using the pre-trained model.
It does this by instantiating a new ModelInput instance, then passing that in to the PredictionEngine as an argument to the Predict method. This results in a ModelOutput that contains the Score and PredictedLabel from the prediction.
Here’s what the model thought of a few sample test quotes:
- Turtles wear their houses as coats all year round
->Unknown - Teenage turtles will beat you up
->Ninjitsu - I like turtles
->LikeTurtle
Again, not a particularly useful sample app, but it seems to be working as far as the limited training data I gave it allowed it to.
Closing Thoughts on Text Classification
If you’ve done much with ML.NET before, you’ll notice that almost everything in this tutorial is standard ML.NET code. In fact, the only thing that was specific to TextClassification was the actual TextClassification pipeline step.
This is minimal by design and designed to fit into the standard ML.NET architecture. And yet, by adding a single line of code, we got to take advantage of a pre-trained NAS-BERT transformer and adapt it to our needs with our data.
I personally find text classification in ML.NET to be an extremely attractive scenario for chatbot development. In conversational AI solutions you need to be able to match a user’s statement or utterance to one of many known intents by following the training process outlined in this article.
Ordinarily you could use something like Language Understanding (LUIS) or Conversational Language Understanding (CLU) on Azure using Azure Cognitive Services, but that may not be feasible for all teams. I personally am finding myself hesitant to write unit tests around my chatbots if I know that running those tests will make calls out to a metered service such as Azure Cognitive Service’s CLU service, even if the pricing is extremely affordable.
By being able to train my own text classifier using C# and ML.NET, I have more control over my costs, the training process, and even the deployment process since I no longer need even an internet connection to generate classifications.
If you are interested in other text-based scenarios, I strongly recommend you check out the ML.NET 2.0 release notes and see the Sentence Similarity API and tokenizer features, which give you additional control over your application’s text classification efforts.
I’m always interested in ML.NET topics so if there’s ever anything you’re curious about, just give me a comment here and I’ll get back to you with an answer or add it to my queue of topics.
This post is part of C# Advent 2022. Check out the C# Advent site for a full list of other posts on relevant C# topics.